

Western Digital My Cloud Tutorial
![]()
Learning Center
Looking for more data about WD products? You've come to the right identify.
Please select your product family:
My Cloud Resources:
My Cloud Mirror Resources:
My Cloud DL2100 Resources:
My Cloud DL4100 Resources:
My Cloud EX2 Resource:
My Deject EX2 Ultra Resources:
My Cloud EX4 Resource:
My Cloud EX2100 Resources:
My Cloud EX4100 Resources:
My Deject PR2100 Resources:
My Cloud PR4100 Resources:
My Passport Wireless Resources:
My Passport Wireless Pro Resource:
My Cloud Home Resources:
My Cloud Home Duo Resource:
My Passport Wireless SSD Resources:
Mutual Questions:
-
How to setup your My Cloud via computer
- Power upwards the My Cloud device
- Connect the My Cloud device to a router
- Go to world wide web.mycloud.com/setup
- Click "Get Started"
- Enter the info you lot would like to use for the MyCloud.com account
- First name
- Last name
- The user name y'all would like to utilise on the device
- The email address you lot would like to use with the MyCloud
- Confirm the email address
- Check your email for the confirmation electronic mail
- Create a MyCloud.com account password
- Sign into the MyCloud.com account to access files from MyCloud.com
-
How to setup your My Cloud via computer (Advanced)
- Power up the My Deject device
- Connect your My Deject device to your router
- Access the My Cloud device spider web Dashboard. To open up your My Cloud web Dashboard:
- Windows: open a web browser and type in //devicename (or device IP address) to the web address bar
- Mac OSX: open a spider web browser and blazon in //devicename.local (or device IP accost) to the web accost bar
- Check the 'EULA'
- Click "Get Started"
- Enter the info you would like to apply for your MyCloud.com account
- Beginning proper name
- Last name
- The user name you would similar to use on your device
- The email address you would similar to use with your MyCloud.com account
- Confirm the email address
- Check your email for your confirmation e-mail
- Create your MyCloud.com account countersign
- Clicking done will connect you to your My Cloud device via MyCloud.com web access
-
How To Upgrade To My Cloud OS 3
From the My Cloud mobile application
- Launch your My Deject Mobile application
- Follow on-screen instructions
From your computer
- Admission the My Cloud Dashboard. To open up your My Cloud Dashboard:
- Windows: Open a web browser and type in //devicename (or device IP accost) to the web address bar
- Mac OSX: Open a spider web browser and type in //devicename.local (or device IP address) to the spider web address bar
- Click on the settings option on the pinnacle carte du jour
- Select the firmware tab
- Select the 'check for update button'
From the My Cloud desktop application
- Launch your My Deject desktop application
- Follow on-screen instructions
-
How to upload files to your My Cloud
One time yous've physically continued your My Cloud device, use the following steps to access the Public folder.
To upload a file:
Windows viii/8.i/10:
- On the Start page, blazon Estimator
- Click Reckoner.
- In the left pane, click Network.
- Double-click the My Cloud device and locate the device's Public folder
- Double-click the Public folder. You can at present drag and drop files into (and from) the Public binder using Windows Explorer
Windows seven
- Click the Windows icon and click Network, or Start > Computer > Network
- Double-click the My Cloud device and locate the device'southward Public folder
- Double-click the Public folder. Y'all can now drag and drop files into (and from) the Public folder using Windows Explorer
Mac Bone 10
- In a Finder window, Click the My Cloud device nether the shared items in the side bar.
- If presented with an authorization page, enter your Username and Password or select Invitee and click Connect to display the Public share.
- Double-click the Public folder. Y'all tin can at present drag and drop files into (and from) the Public folder using Finder.
-
How To Admission & Share Your Files From Mycloud.com
To access files from any uniform web browser:
- Go to www.mycloud.com
- Log in with a MyCloud.com account credentials
To share files from whatever compatible web browser:
- Right click the item y'all would like to share and select the 'Share' selection
- Select 'Ship a link' if y'all would like to create and share an email with a link that tin be forwarded and shared
- Select 'Send a private link' if you would like to create and share an email that requires a MyCloud.com account. This provides more control over access to the files
- You lot can also select to allow the user to edit the file or not
To manage and access shared files:
- Click on 'Shared'
- To see files that others have shared with y'all, Select Shared with me
- To see files you have shared with other people, select Shared with others
- Access to files shared can exist revoked here
-
How To Access & Share Files From The My Deject Mobile Apps
The My Cloud mobile application is available for both iOS and Android.
- Download the My Cloud mobile awarding from your smart devices app shop
- If this is the first time installing or using the application, you volition need to log into your MyCloud.com business relationship
- A list of devices available to add to your My Cloud app will exist displayed. Tap on the device yous'd similar to add and press 'OK'
- If you would like to automatically fill-in the photos and videos you lot capture with your smart phone or tablet, select the selection you lot would similar to employ for uploading files
- You volition be asked to select the location for your photos and videos to be uploaded
- The My Cloud app will brandish 'Shares' on the left side of the app. Navigate by tapping on files and folders to browse and access content
- Photos, Music and Video files can be filtered for easily finding those media types
- Tap on the media type on the bottom of the navigation window to switch between views
How to Share files from the My Cloud App
- Navigate to content that you lot would like to share
- Tap on the file three dots (found on the tiptop of the navigation window) to bring up the 'Options Card'
- Select the files you would similar to share
- Choose the 'Share' option on the 'Action Card'
- Share link – this option will generate an e-mail with a link that can be forwarded and shared by others
- Share privately – this choice requires the person receiving the file to create a MyCloud.com account
-
How To Add Family And Friends To A My Cloud
Family and friends tin get 'users' of a My Cloud. Each family unit member or friend will accept their own password protected 'Share' to store and access files.
To add family or friends and give them access to store and access files on a My Cloud:
From a Computer:
- Log into www.mycloud.com with a MyCloud.com account
- Click on the My Cloud device (located at the top left of the screen)
- Click on the 'gear icon' to bring upwardly the devices dialogue box
- Click on 'Manage users'
- Click 'Add user' and enter the following information for the person yous would like to grant access to the My Cloud
- Offset Proper name
- Last Proper name
- E-mail address
- Ostend electronic mail accost
- Device username
- Click done
- The new user volition receive an email with instructions on how to confirm their electronic mail address and a link to connect to MyCloud.com with admission
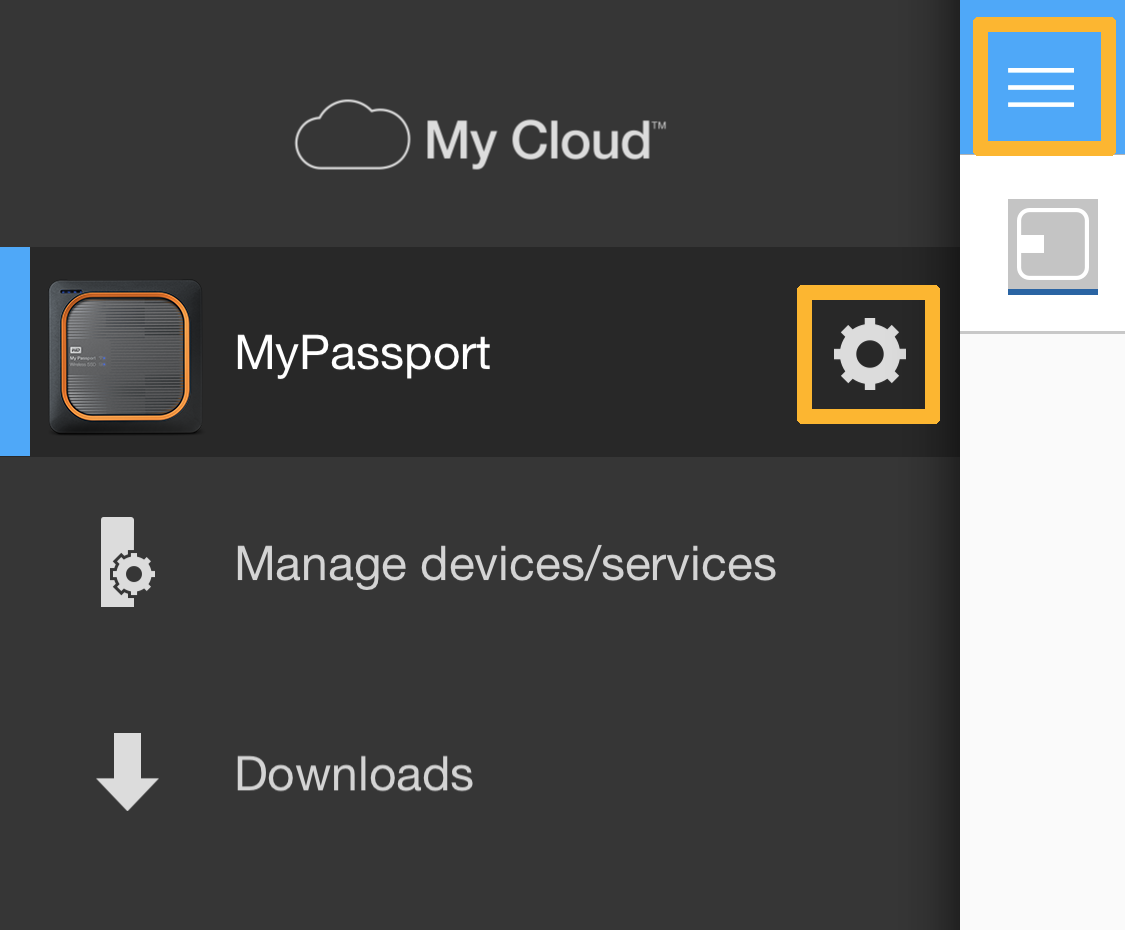
From the My Cloud mobile application:
- Launch the My Deject application
- Access the My Cloud app carte du jour by swiping right on the border of the screen
- For the device you would like to add a user to, tap on the 'gear' icon
- Tap on the Users option
- Tap on the Add user selection
- Enter the new users first name and email address
- That user volition receive an e-mail with instructions on how to create their account
-
How To Access The Web Dashboard
The My Cloud OSX web Dashboard is where administrators and users can make changes to the features and settings of the My Cloud device. The My Cloud Web Dashboard is also accessible from a spider web browser.
To open the My Cloud spider web Dashboard:
- Windows: open up a spider web browser and type in //devicename (or device IP address) to the web address bar
- Mac OSX: open a web browser and type in //devicename.local (or device IP address) to the web address bar
-
How To Backup A MAC Computer
My Cloud is compatible with Apple's Time Motorcar fill-in software.
To back up your Apple computer with My Cloud and Apple's Fourth dimension Machine:
- On your Apple figurer, click on the Apple logo on the menu bar to admission Organization Preferences
- From System Preferences, select and launch Fourth dimension Motorcar
- If a screen displays informing you that a storage location for Time Motorcar backups hasn't been selected, click Set Fourth dimension Machine
- Click Choose Backup Deejay, and select your WD My Cloud
- Click Use for Backup
- At the prompt, select Invitee, and so click Connect
- Click the Time Machine toggle switch to On
- Add a Time Machine dropdown icon to the bill of fare bar by selecting the Show Time Machine Status in the Menu Bar checkbox
-
How To Fill-in A Windows Estimator
Support all or selected file categories using WD SmartWare
To utilize WD SmartWare to dorsum up file categories - either all or just certain ones, do the post-obit:
Action 1: Download and install WD SmartWare
- Download the WD SmartWare software
- Run the .exe to start installation and follow the onscreen instructions
Action 2: Back up file categories with WD SmartWare
- Launch WD SmartWare by doing the post-obit:
- From the system tray, click the WD QuickView icon
- From the popup menu, select WD SmartWare
- On the Home screen, practise the post-obit depending on your setup:
- If you accept more than than i WD device connected to your network, select the one you want to use for backup
- If your computer has more 1 internal hard drive or drive partition, click the pointer beneath your computer icon and select the desired particular from the dropdown bill of fare
- Click the Backup tab
- Brand certain WD SmartWare is set to back up categories
Annotation: If set up to back up categories, "Set to Perform Category Backup" appears in the upper-left corner.
If the message "Prepare to perform file backup " appears, alter the fill-in manner past clicking Switch to Category Fill-in.
- Click Avant-garde View
- In the Detailed View section, do one of the post-obit:
- Select all file categories for fill-in
- Click side by side to specific categories to support only those categories
Annotation: A checkmark indicates a category selected for backup - Click Apply Changes
- Click Kickoff Backup
Common Questions:
-
How to add content to your drive from a calculator
From a Computer - Using a USB Cablevision
Copy files from your computer to your My Passport Wireless bulldoze using a USB cable.
This is the fastest style to get content onto your drive.- Connect your My Passport Wireless drive to your computer using a USB cablevision.
- Open Windows Explorer (PC) or the Finder (Mac).
- Access the drive:
- Windows PC: In the left pane of Windows Explorer, click the My Passport Wireless drive.
- Mac: In the left pane of the Finder, go to the Devices department and click the My Passport Wireless drive.
- Elevate files from your computer to the drive.
From a Computer - Using a Wireless Connection
Wirelessly copy files from your computer to your My Passport Wireless drive.- Get to your calculator's Wi-Fi settings and connect to the My Passport Wireless network. Default proper noun is MyPassport.
- Open up Windows Explorer (PC) or the Finder (Mac).
- Admission the drive:
- Windows PC: In the left pane of Windows Explorer, click Network and and then click MyPassport.
- Mac: In the left pane of the Finder, in the SHARED section, click MyPassport.
- Drag files from your computer to the drive.
-
How to add content to your drive from an iPhone or iPad
Upload photos and videos from your Camera Roll to your My Passport Wireless drive.
- Brand sure the WD My Deject app is installed on your iPhone or iPad.
- In the WD My Deject app, tap Public at the bottom of the left pane.
- In the top right corner of the Public pane, tap the three horizontal dots and so tap Add together Photo.
- Tap Photographic camera Roll.
- Select photos and tap the upload icon.
-
How to add content to your drive from an Android Smartphone or Tablet
Upload photos, videos, music, and files to your My Passport Wireless bulldoze.
- Make sure the WD My Cloud app is installed on your Android device.
- In the WD My Cloud app, tap the action icon (three vertical squares) in the top right corner, and then tap Upload.
- Tap a source (Gallery or Music).
- Select files and tap the upload icon.
-
How to add together content to your drive from an SD Bill of fare
From an SD Card – Using Your Reckoner
Import all or selected files on an SD carte to your drive.- Get to your computer's Wi-Fi settings and connect to the My Passport Wireless network. Default proper name is MyPassport.
- Open Windows Explorer (PC) or the Finder (Mac).
- Admission the drive:
- Windows PC: In the left pane of Windows Explorer, click Network so click MyPassport.
- Mac: In the left pane of the Finder, in the SHARED section, click MyPassport.
- Insert the SD card into your My Passport Wireless drive.
The SD menu contents will exist available in the SD share. - Drag files from the SD card to the My Passport Wireless bulldoze.
From an SD Card – Using the WD My Cloud Mobile App (iOS)
Import all files on an SD card to your drive using the WD My Cloud mobile app.- Make sure the WD My Deject app is installed on your mobile device.
- Insert the SD card into the My Passport Wireless bulldoze.
- On your mobile device, launch the WD My Cloud mobile app.
- Tap the menu icon in the top left corner.
- In the Already Added section, swipe MyPassport and tap the settings icon.
- Tap SD Card, and then tap Import.
From an SD Card – Using the WD My Cloud Mobile App (Android)
Import all files on an SD card to your drive using the WD My Deject mobile app.- Make certain the WD My Cloud app is installed on your mobile device.
- Insert the SD card into the My Passport Wireless drive.
- On your mobile device, launch the WD My Cloud mobile app.
- Tap the menu icon in the meridian left corner.
- In the Devices section, tap the settings icon.
- Tap SD Carte Import, so tap Import.
-
How to add content to your drive from a Wi-Fi Camera
Transfer photos from your Wi-Fi uniform camera to your My Passport Wireless drive.
- Make sure your computer is connected to the My Passport Wireless Wi-Fi network.
- Open a browser window and enter the URL to launch the My Passport Wireless dashboard:
- Windows: mypassport
- Mac: mypassport.local
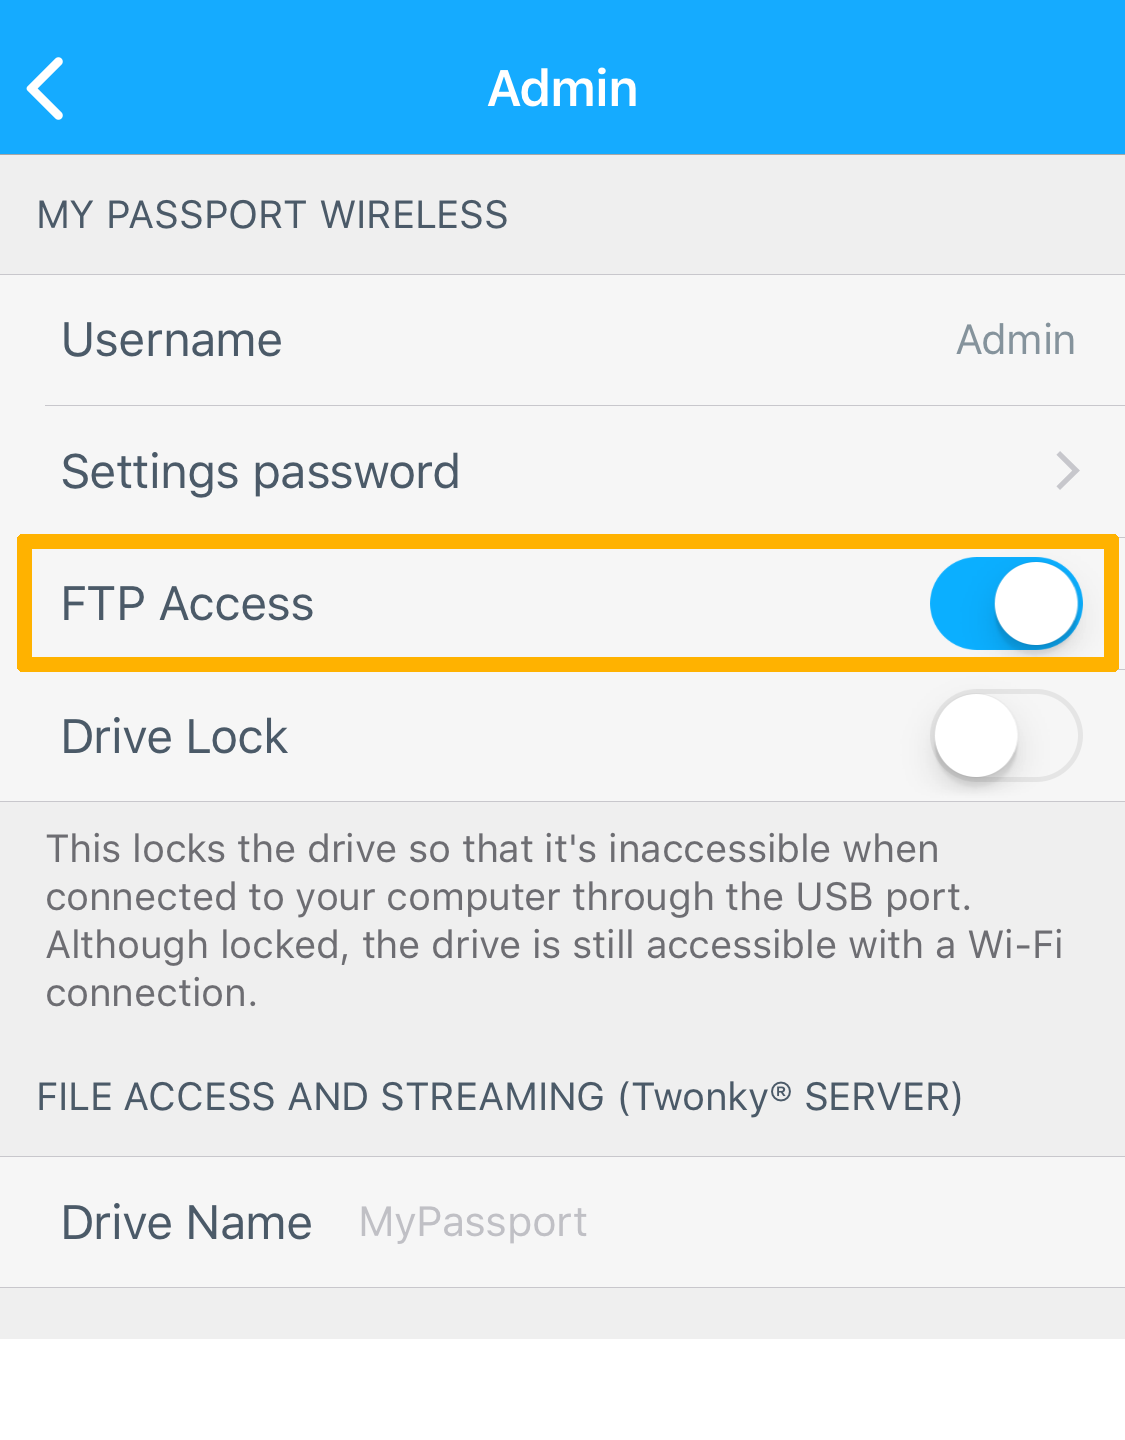
- Click Admin.
- Plough on FTP Access.
- Transfer photos: The steps for transferring photos depend on your particular photographic camera. Information technology's important that you set up a wireless connection betwixt your camera or its wireless transmitter and the My Passport Wireless Wi-Fi network.
Key info:
- Default proper name of the My Passport Wireless Wi-Fi network: MyPassport
- Default IP address: 192.168.60.one
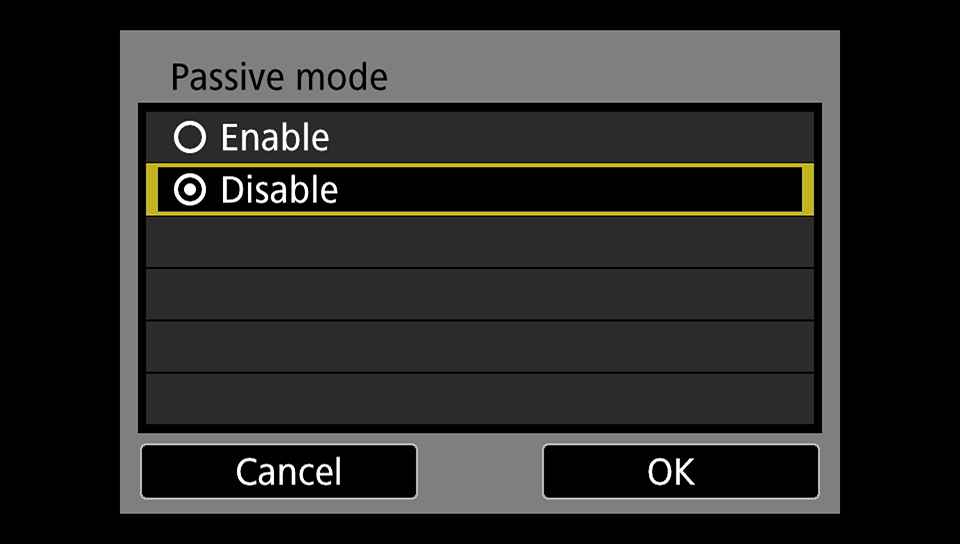
- Passive mode: Disabled
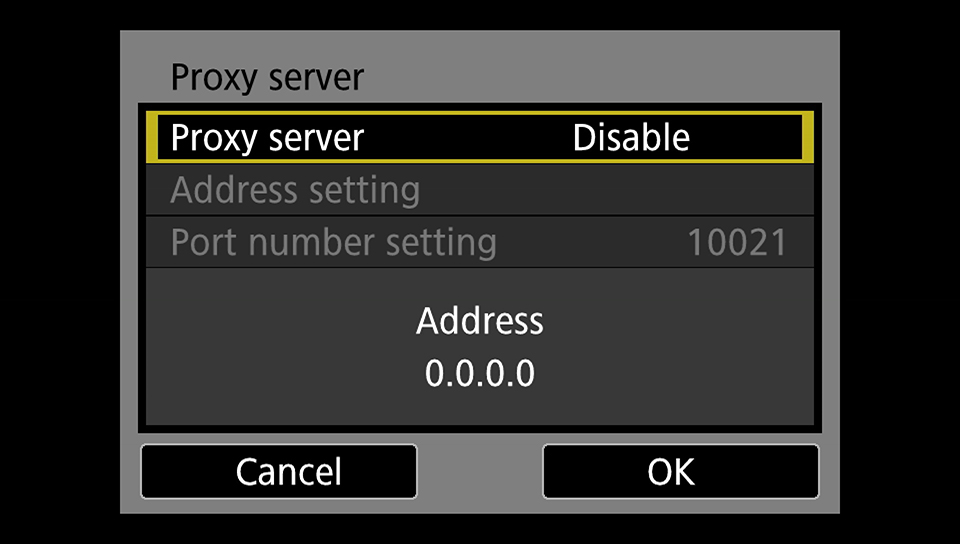
- Proxy server: Disabled
- Target folder/path (case sensitive): /Public
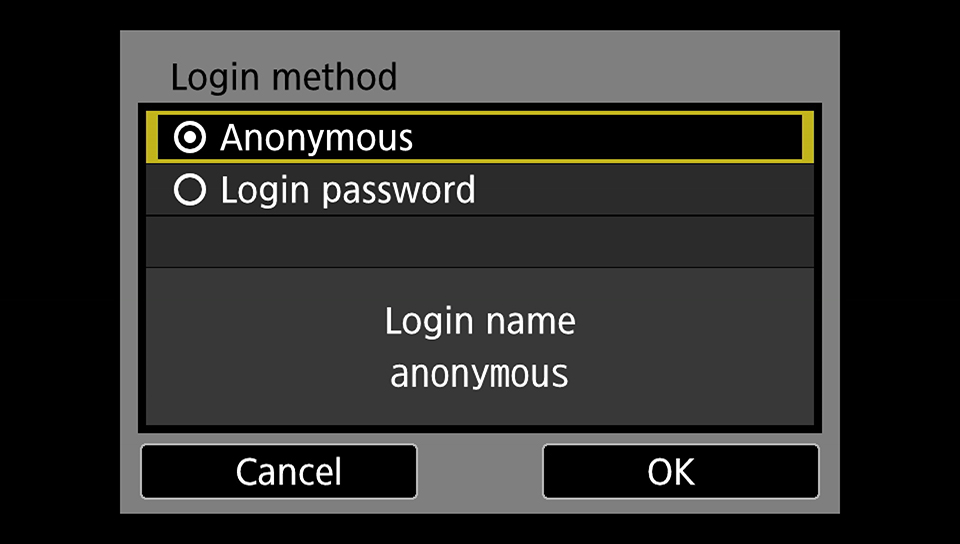
- Login method/name: Anonymous (no password required)
- If necessary, refer to the documentation for your camera.
-
Back It Up
Protect your information past backing upwards files stored on your figurer to the My Passport Wireless bulldoze.
Back up File Categories Using WD SmartWare
- Download and install the WD SmartWare software on your computer.
- Connect your computer and your My Passport Wireless bulldoze with a USB cable.
- Launch WD SmartWare and select your My Passport Wireless as the fill-in destination.
- Click the Backup tab.
- Make certain that WD SmartWare is set to perform a category backup.
- Click Advanced View and select the file categories you want to back up.
- Click Apply Changes.
- Click Enable Backup.
Back Up Files and Folders Using WD SmartWare
- Download and install the WD SmartWare software on your computer.
- Connect your computer and your My Passport Wireless drive with a USB cable.
- Launch WD SmartWare and select your My Passport Wireless as the fill-in destination.
- Click the Backup tab.
- Make certain that WD SmartWare is set up to perform a file fill-in.
- Select files and folders.
- Click Apply Changes.
- Click Enable Backup.
Dorsum Up Data with Windows Fill-in
Dorsum up data to the drive using Windows Backup - a feature in Windows 7 (Professional and Ultimate).
- Connect your figurer and your My Passport Wireless drive with a USB cable.
- On your PC, click Outset > Control Panel.
- In the Organisation and Security category, click Fill-in Your Computer.
- Click Alter Settings and follow the steps in the wizard.
- When prompted to select where yous want your backup saved, click My Passport, and then click Side by side.
- When prompted, select an pick, and then click Next.
Note: If y'all selected the option to choose files yourself, select the advisable files, and and then click Side by side. - Click Save Settings and Exit.
- Click Back Up Now.
-
Share Your Content
PC/Mac
- Get to your computer'due south Wi-Fi settings and connect to the bulldoze's network (default name: MyPassport).
- Open the My Passport Wireless dashboard by entering the URL in your browser: mypassport (Windows) or mypassport.local (Mac).
- Click Wi-Fi.
- In the Wi-Fi Network box, turn the switch On.
- Select the network you want to connect to.
- In the Wi-Fi network dialog:
- Enter a password if required.
- Select theShare content on this network checkbox to allow anyone connected to the network to admission files on your drive.
- Click OK.
iPhone/iPad
- Go to your mobile device'due south Wi-Fi settings and connect to the drive'south network (default proper noun: MyPassport).
- Launch the WD My Cloud mobile app.
- Brand sure your My Passport Wireless drive (default proper name: MyPassport) is listed as an Already Added device. To access the Already Added section, tap the menu icon in the summit-left corner of the screen.
Notation: If you lot have not previously connected to this drive, tap the bulldoze's plus sign (+) in the Found in Network section. And then tap a user account name (default: admin). - In the Already Added section, swipe the proper name of your drive and tap the settings icon.
- Tap Wi-Fi, and so plough on Connect to Net.
- Select a network and enter a Password if required.
- Plough on Share Content to allow anyone connected to the network to access files on your drive.
- Tap Bring together.
Android Smartphone/Tablet
- Go to your mobile device's Wi-Fi settings and connect to the drive'due south network (default name: MyPassport).
- Launch the WD My Deject mobile app.
- Make sure the My Passport Wireless drive (default name: MyPassport) is listed in the Devices department. To admission the Devices section, tap the card icon in the tiptop-left corner of the screen.
Note: If you accept not previously connected to this drive, tap the bulldoze's plus sign (+) in the Establish in Network section. If yous take non previously connected to this drive, tap the drive'due south plus sign (+) in the Institute in Network department. If prompted, tap a user account name (default: admin). - In the Devices section, tap the settings icon to the right of your drive.
- Tap Wi-Fi, and and so plough on Connect to Internet.
- Select a network and enter a Password if required.
- Turn on Share Content to allow anyone connected to the network to access files on your drive.
- Tap Connect.
Direct Connexion
- On your mobile device or estimator, open the list of available Wi-Fi networks.
- Connect to the My Passport Wireless Wi-Fi network (default name: MyPassport).
USB Connection
Connect your reckoner and your My Passport Wireless bulldoze with a USB cable.
The bulldoze's Wi-Fi functionality is disabled with this type of connection. -
Secure Your Drive and Its Network
Secure the My Passport Wireless Wi-Fi network
Secure access to the My Passport Wireless network with a password.
- On your calculator, open the list of Wi-Fi networks and select the My Passport Wireless drive (default proper noun: MyPassport).
- Open the My Passport Wireless dashboard by inbound the URL in your browser: mypassport (Windows) or mypassport.local (Mac).
- Click Wi-Fi.
- In the My Passport Wireless box, click the settings icon.
- Select the Security Type.
Note: Select WPA2 Personal if you know your device supports WPA2 encryption. - Enter and so ostend your Wi-Fi password.
Secure the My Passport Wireless Dashboard
Secure the My Passport Wireless dashboard used to maintain your drive.
- On your computer, open the list of Wi-Fi networks and select the My Passport Wireless bulldoze
(default name: MyPassport). - Open up the My Passport Wireless dashboard by entering the URL in your browser: mypassport (Windows) or mypassport.local (Mac).
- Click Admin.
- Turn on Settings Countersign, and then enter and confirm your password.
Lock the USB Port
Lock the bulldoze so that it's inaccessible when connected to your calculator with the USB cable.
Note: Although locked, the bulldoze is withal accessible through a Wi-Fi connection.- On your estimator, open up the listing of Wi-Fi networks and select the My Passport Wireless drive (default name: MyPassport).
- Open the My Passport Wireless dashboard by inbound the URL in your browser: mypassport (Windows) or mypassport.local (Mac).
- Click Hardware.
- Turn on Drive Lock.
-
Stream Content to Media Players and Other DLNA Devices
Utilize the My Passport Wireless bulldoze as your domicile's media server to stream photos, music and videos to DLNA-compatible devices.
- Go to your computer's Wi-Fi settings and connect to the My Passport Wireless network. Default name is MyPassport.
- Open the My Passport Wireless dashboard by entering the URL in your browser: mypassport (Windows) or mypassport.local (Mac).
- Click Media.
- Turn on Streaming.
- Click Wi-Fi.
- In the Wi-Fi Network box, turn the switch On.
- Select your home network.
- In the Connect to Wi-Fi dialog:
- Enter a password if required.
- Select theShare content on this network checkbox to allow anyone connected to the network to access files on your drive.
- Click OK.
- Play your content:
From a media player
Follow these general steps to prepare media players (including WD Tv set and WD Media Players), digital picture show frames, Blu-Ray players, network-connected TVs and digital media adapters to admission media stored on your My Passport Wireless bulldoze: - Follow the instructions provided with your media player to proceed through the initial setup or installation of drivers.
- Using the navigation feature on your player, scan and find the My Passport Wireless drive on your network.
To get the name of your drive: On the dashboard, click Admin and check the Device Name. - Depending on your actor, you lot might need to access a settings/network setup folio in the user interface to link the player with the drive. Come across your player's instructions for specific details.
From a DLNA-uniform device
Follow the instructions provided by the device manufacturer to connect it to your Wi-Fi network so you can access the content on your My Passport Wireless bulldoze. -
Access Your Content
- Make sure that:
- You installed the WD My Cloud mobile app.
- Your mobile device is connected to the My Passport Wireless Wi-Fi network.
- Launch the WD My Deject mobile app.
- Make sure the My Passport Wireless bulldoze (default proper noun: MyPassport) is listed every bit an available device.
Note: If information technology isn't, tap the drive'due south plus sign (+) in the Found in Network section. If prompted, tap a user account proper name (default: admin). - Navigate to your content and tap to view or play.
From a Calculator - Using a Wireless Connexion
- Go to your figurer's Wi-Fi settings and connect to the drive's network (default proper noun: MyPassport).
- Open up Windows Explorer (Windows) or the Finder (Mac).
- Access your content:
- Windows: In the left pane of Windows Explorer, click Network and so double-click MyPassport.
- Mac: In the left pane of the Finder, in the SHARED section, click MyPassport.
- Navigate to your content and tap to view or play.
From a Estimator - Using a USB Cable
- Connect your My Passport Wireless drive to your computer using a USB cable.
- Open Windows Explorer (PC) or the Finder (Mac).
- Access your content:
- Windows PC: In the left pane of Windows Explorer, click the My Passport Wireless bulldoze.
- Mac: In the left pane of the Finder, go to the Devices section and click the My Passport Wireless bulldoze.
- Navigate to your content and tap to view or play.
- Make sure that:
Mutual Questions:
-
How to add together content to your bulldoze from a reckoner
From a Computer - Using a USB Cablevision
Copy files from your computer to your My Passport Wireless drive using a USB cable.
This is the fastest way to get content onto your drive.- Connect your My Passport Wireless drive to your computer using a USB cable.
- Open Windows Explorer (PC) or the Finder (Mac).
- Admission the drive:
- Windows PC: In the left pane of Windows Explorer, click the My Passport Wireless drive.
- Mac: In the left pane of the Finder, become to the Devices section and click the My Passport Wireless drive.
- Elevate files from your computer to the drive.
From a Computer - Using a Wireless Connection
Wirelessly copy files from your estimator to your My Passport Wireless drive.- Go to your figurer's Wi-Fi settings and connect to the My Passport Wireless network. Default proper name is MyPassport.
- Open Windows Explorer (PC) or the Finder (Mac).
- Access the bulldoze:
- Windows PC: In the left pane of Windows Explorer, click Network then click MyPassport.
- Mac: In the left pane of the Finder, in the SHARED section, click MyPassport.
- Drag files from your computer to the bulldoze.
-
How to add together content to your bulldoze from an iPhone or iPad
Upload photos and videos from your Camera Roll to your My Passport Wireless drive.
- Make sure the WD My Cloud app is installed on your iPhone or iPad.
- In the WD My Cloud app, tap Public at the bottom of the left pane.
- In the peak right corner of the Public pane, tap the 3 horizontal dots and then tap Add Photograph.
- Tap Camera Whorl.
- Select photos and tap the upload icon.
-
How to add content to your bulldoze from an Android smartphone or tablet
Upload photos, videos, music, and files to your My Passport Wireless bulldoze.
- Make sure the WD My Cloud app is installed on your Android device.
- In the WD My Cloud app, tap the action icon (three vertical squares) in the top right corner, and then tap Upload.
- Tap a source (Gallery or Music).
- Select files and tap the upload icon.
-
How to add content to your bulldoze from an SD carte
From an SD Card – Using Your Reckoner
Import all or selected files on an SD card to your drive.- Go to your computer's Wi-Fi settings and connect to the My Passport Wireless network. Default name is MyPassport.
- Open Windows Explorer (PC) or the Finder (Mac).
- Access the drive:
- Windows PC: In the left pane of Windows Explorer, click Network and then click MyPassport.
- Mac: In the left pane of the Finder, in the SHARED section, click MyPassport.
- Insert the SD card into your My Passport Wireless drive.
The SD card contents will be bachelor in the SD share. - Elevate files from the SD card to the My Passport Wireless drive.
From an SD Card – Using the WD My Cloud Mobile App (iOS)
Import all files on an SD carte to your drive using the WD My Cloud mobile app.- Make sure the WD My Cloud app is installed on your mobile device.
- Insert the SD card into the My Passport Wireless bulldoze.
- On your mobile device, launch the WD My Cloud mobile app.
- Tap the carte du jour icon in the top left corner.
- In the Already Added section, swipe MyPassport and tap the settings icon.
- Tap SD Card, and then tap Import.
From an SD Bill of fare – Using the WD My Cloud Mobile App (Android)
Import all files on an SD card to your drive using the WD My Deject mobile app.- Brand sure the WD My Cloud app is installed on your mobile device.
- Insert the SD menu into the My Passport Wireless drive.
- On your mobile device, launch the WD My Cloud mobile app.
- Tap the menu icon in the superlative left corner.
- In the Devices section, tap the settings icon.
- Tap SD Card Import, and and so tap Import.
-
How to add content to your drive from a Wi-Fi camera
Transfer photos from your Wi-Fi compatible camera to your My Passport Wireless drive.
- Make certain your reckoner is connected to the My Passport Wireless Wi-Fi network.
- Open a browser window and enter the URL to launch the My Passport Wireless dashboard:
- Windows: mypassport
- Mac: mypassport.local
- Click Admin.
- Turn on FTP Access.
- Transfer photos: The steps for transferring photos depend on your particular camera. Information technology's important that y'all set up a wireless connectedness between your camera or its wireless transmitter and the My Passport Wireless Wi-Fi network.
Key info:
- Default name of the My Passport Wireless Wi-Fi network: MyPassport
- Default IP address: 192.168.60.1
- Passive way: Disabled
- Proxy server: Disabled
- Target folder/path (case sensitive): /Storage
- Login method/name: Anonymous (no password required)
- If necessary, refer to the documentation for your camera.
-
Share Your Content
PC/Mac
- Go to your computer'southward Wi-Fi settings and connect to the bulldoze's network (default proper noun: MyPassport).
- Open the My Passport Wireless dashboard by entering the URL in your browser: mypassport (Windows) or mypassport.local (Mac).
- Click Wi-Fi.
- In the Wi-Fi Network box, turn the switch On.
- Select the network you lot want to connect to.
- In the Wi-Fi network dialog:
- Enter a password if required.
- Select theShare content on this network checkbox to allow anyone connected to the network to access files on your drive.
- Click OK.
iPhone/iPad
- Go to your mobile device's Wi-Fi settings and connect to the drive'due south network (default proper name: MyPassport).
- Launch the WD My Cloud mobile app.
- Make certain your My Passport Wireless drive (default proper name: MyPassport) is listed as an Already Added device. To access the Already Added section, tap the menu icon in the top-left corner of the screen.
Note: If you take not previously continued to this drive, tap the drive's plus sign (+) in the Found in Network section. Then tap a user account proper noun (default: admin). - In the Already Added department, swipe the name of your drive and tap the settings icon.
- Tap Wi-Fi, and then turn on Connect to Internet.
- Select a network and enter a Password if required.
- Turn on Share Content to allow anyone connected to the network to access files on your drive.
- Tap Join.
Android Smartphone/Tablet
- Go to your mobile device'due south Wi-Fi settings and connect to the drive'south network (default proper noun: MyPassport).
- Launch the WD My Cloud mobile app.
- Brand certain the My Passport Wireless drive (default name: MyPassport) is listed in the Devices section. To admission the Devices section, tap the menu icon in the top-left corner of the screen.
Notation: If you have not previously connected to this drive, tap the drive'southward plus sign (+) in the Found in Network section. If you have not previously continued to this drive, tap the bulldoze's plus sign (+) in the Found in Network section. If prompted, tap a user account name (default: admin). - In the Devices section, tap the settings icon to the right of your drive.
- Tap Wi-Fi, then turn on Connect to Internet.
- Select a network and enter a Password if required.
- Turn on Share Content to allow anyone connected to the network to access files on your bulldoze.
- Tap Connect.
Direct Connection
- On your mobile device or computer, open the list of available Wi-Fi networks.
- Connect to the My Passport Wireless Wi-Fi network (default name: MyPassport).
USB Connection
Connect your computer and your My Passport Wireless drive with a USB cablevision.
The drive's Wi-Fi functionality is disabled with this type of connection. -
Secure your drive and its network
Secure the My Passport Wireless Wi-Fi network
Secure access to the My Passport Wireless network with a countersign.
- On your computer, open the list of Wi-Fi networks and select the My Passport Wireless bulldoze (default proper name: MyPassport).
- Open the My Passport Wireless dashboard past entering the URL in your browser: mypassport (Windows) or mypassport.local (Mac).
- Click Wi-Fi.
- In the My Passport Wireless box, click the settings icon.
- Select the Security Type.
Note: Select WPA2 Personal if yous know your device supports WPA2 encryption. - Enter and then confirm your Wi-Fi password.
Secure the My Passport Wireless dashboard
Secure the My Passport Wireless dashboard used to maintain your drive.
- On your computer, open the list of Wi-Fi networks and select the My Passport Wireless bulldoze
(default name: MyPassport). - Open up the My Passport Wireless dashboard by entering the URL in your browser: mypassport (Windows) or mypassport.local (Mac).
- Click Admin.
- Turn on Settings Countersign, and then enter and confirm your countersign.
Lock the USB port
Lock the drive so that it'due south inaccessible when connected to your computer with the USB cable.
Annotation: Although locked, the drive is even so accessible through a Wi-Fi connection.- On your computer, open the list of Wi-Fi networks and select the My Passport Wireless bulldoze (default name: MyPassport).
- Open the My Passport Wireless dashboard by inbound the URL in your browser: mypassport (Windows) or mypassport.local (Mac).
- Click Hardware.
- Turn on Drive Lock.
-
Stream content to media players and other DLNA devices
Apply the My Passport Wireless bulldoze as your home'southward media server to stream photos, music and videos to DLNA-compatible devices.
- Go to your computer's Wi-Fi settings and connect to the My Passport Wireless network. Default name is MyPassport.
- Open the My Passport Wireless dashboard by entering the URL in your browser: mypassport (Windows) or mypassport.local (Mac).
- Click Media.
- Turn on Streaming.
- Click Wi-Fi.
- In the Wi-Fi Network box, turn the switch On.
- Select your home network.
- In the Connect to Wi-Fi dialog:
- Enter a password if required.
- Select theShare content on this network checkbox to allow anyone connected to the network to access files on your drive.
- Click OK.
- Play your content:
From a media player
Follow these general steps to fix media players (including WD TV and WD Media Players), digital picture frames, Blu-Ray players, network-continued TVs and digital media adapters to access media stored on your My Passport Wireless drive:
- Follow the instructions provided with your media player to go on through the initial setup or installation of drivers.
- Using the navigation feature on your player, scan and find the My Passport Wireless drive on your network.
To get the proper name of your drive: On the dashboard, click Admin and check the Device Name. - Depending on your player, yous might need to access a settings/network setup folio in the user interface to link the thespian with the bulldoze. Encounter your actor's instructions for specific details.
From a DLNA-uniform device
Follow the instructions provided by the device manufacturer to connect information technology to your Wi-Fi network and then you can access the content on your My Passport Wireless drive. -
Access Your Content
- Brand sure that:
- You installed the WD My Deject mobile app.
- Your mobile device is continued to the My Passport Wireless Wi-Fi network.
- Launch the WD My Cloud mobile app.
- Make sure the My Passport Wireless drive (default name: MyPassport) is listed as an available device.
Annotation: If it isn't, tap the drive's plus sign (+) in the Found in Network department. If prompted, tap a user account name (default: admin). - Navigate to your content and tap to view or play.
From a Calculator - Using a Wireless Connectedness
- Go to your computer's Wi-Fi settings and connect to the drive'south network (default name: MyPassport).
- Open up Windows Explorer (Windows) or the Finder (Mac).
- Access your content:
- Windows: In the left pane of Windows Explorer, click Network and then double-click MyPassport.
- Mac: In the left pane of the Finder, in the SHARED section, click MyPassport.
- Navigate to your content and tap to view or play.
From a Reckoner - Using a USB Cable
- Connect your My Passport Wireless drive to your computer using a USB cable.
- Open Windows Explorer (PC) or the Finder (Mac).
- Access your content:
- Windows PC: In the left pane of Windows Explorer, click the My Passport Wireless drive.
- Mac: In the left pane of the Finder, go to the Devices department and click the My Passport Wireless drive.
- Navigate to your content and tap to view or play.
- Brand sure that:
-
How to install Plex Media Server
Apply the My Passport Wireless Pro drive with the Plex Media Server to stream photos, music and videos to Plex-compatible devices.
- Go to your computer's Wi-Fi settings and connect to the My Passport Wireless Pro network. Default proper noun is MyPassport.
- Open the My Passport Wireless Pro dashboard by inbound the URL in your browser: http://mypassport (Windows) or http://mypassport.local (Mac)
- Brand certain the My Passport Wireless Pro is continued to the internet
- Click "Media"
- Under Plex Media Server section, click "Download"
- After download, the Plex Media Server will automatically install
- After install, click Configure to manage the Plex Media Server
For more info or support on Plex Media Server, delight visit http://back up.plex.telly
-
How to automatically archive FiLMiC Pro videos
Requires:
- Uniform Android or iOS phone or tablet
- My Passport Wireless SSD or My Passport Wireless Pro*
Brand sure your device has the latest firmware via the Drive Settings bill of fare in the My Deject app. Click here for downloads - Upwards-to-appointment WD My Deject app installed on your iPhone, iPad or iPod Touch.
- FiLMiC Pro app for Android or iOS
- Install the FiLMiC Pro app on your iOS or Android device.
- Ensure the WD My Cloud app is installed on your iPhone, iPad or iPod Touch from the App Store and you have performed the standard drive setup.
- Await in Settings > Wi-Fi on your iPhone, iPad or iPod Affect to wirelessly connect your mobile device to the Wi-Fi network of your My Passport Wireless SSD or Pro. Additional assist can be found in step 3 in this short guide on our Back up site.
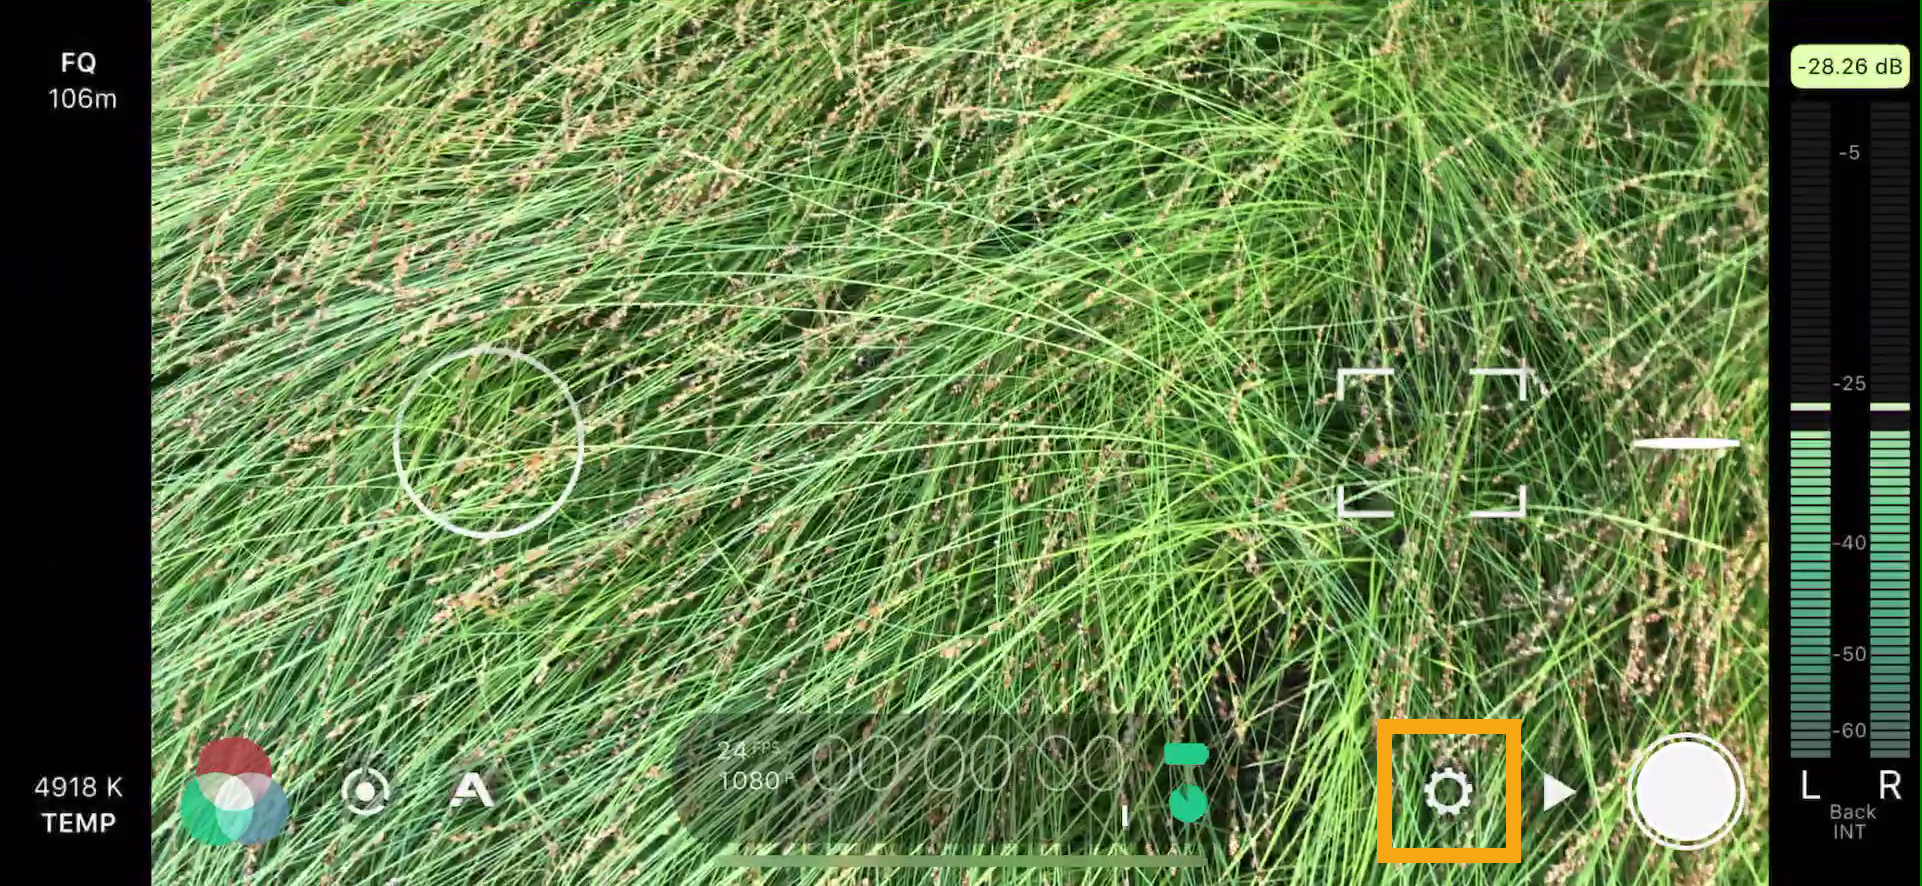
- Open the FiLMiC Pro app and tap on the gear icon.
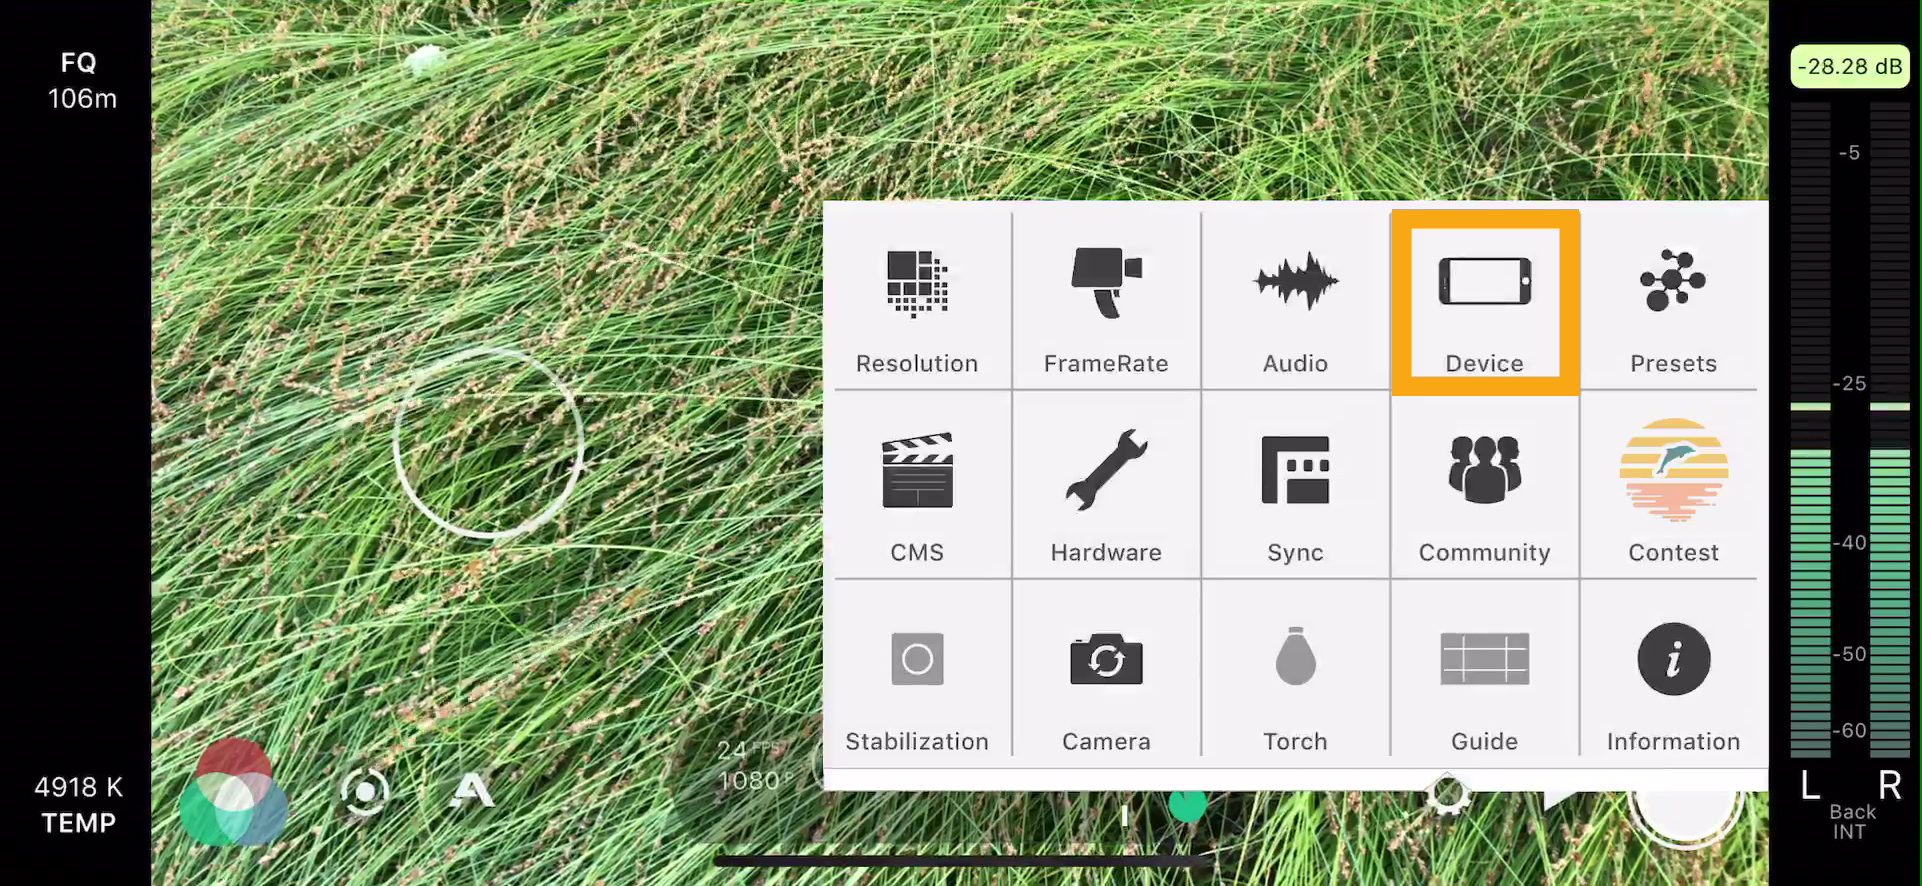
- Tap on "Device."
- Set "Relieve to Camera Roll" to OFF (its default setting.)
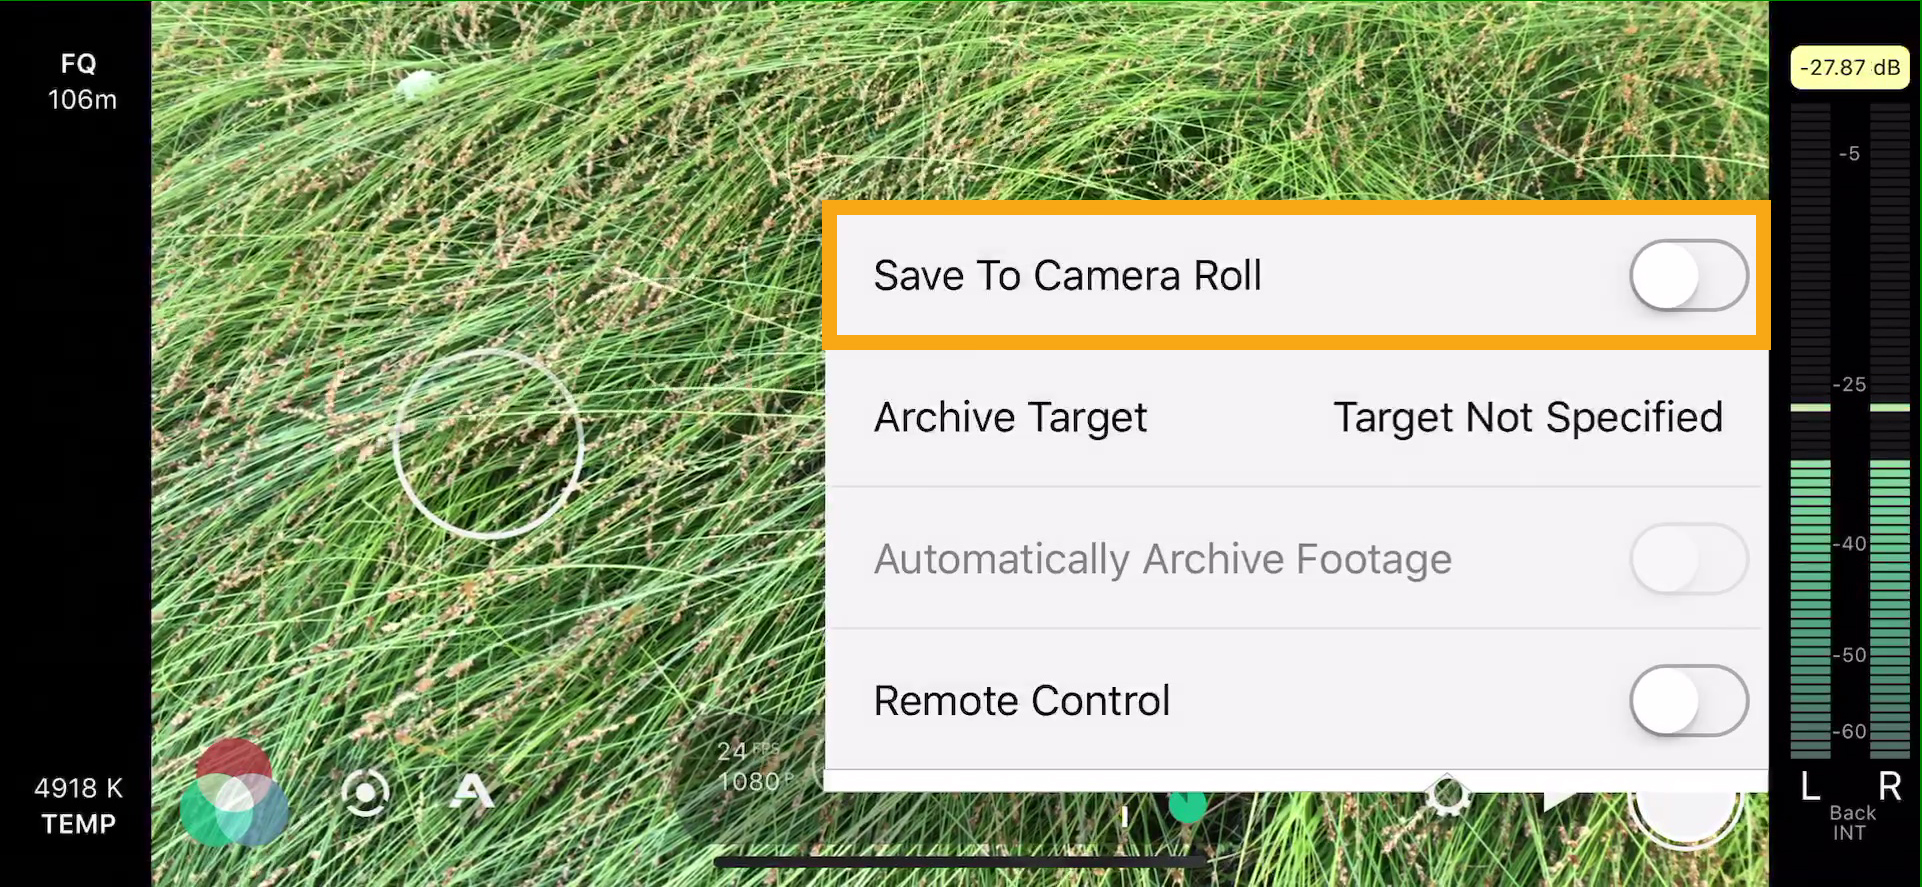
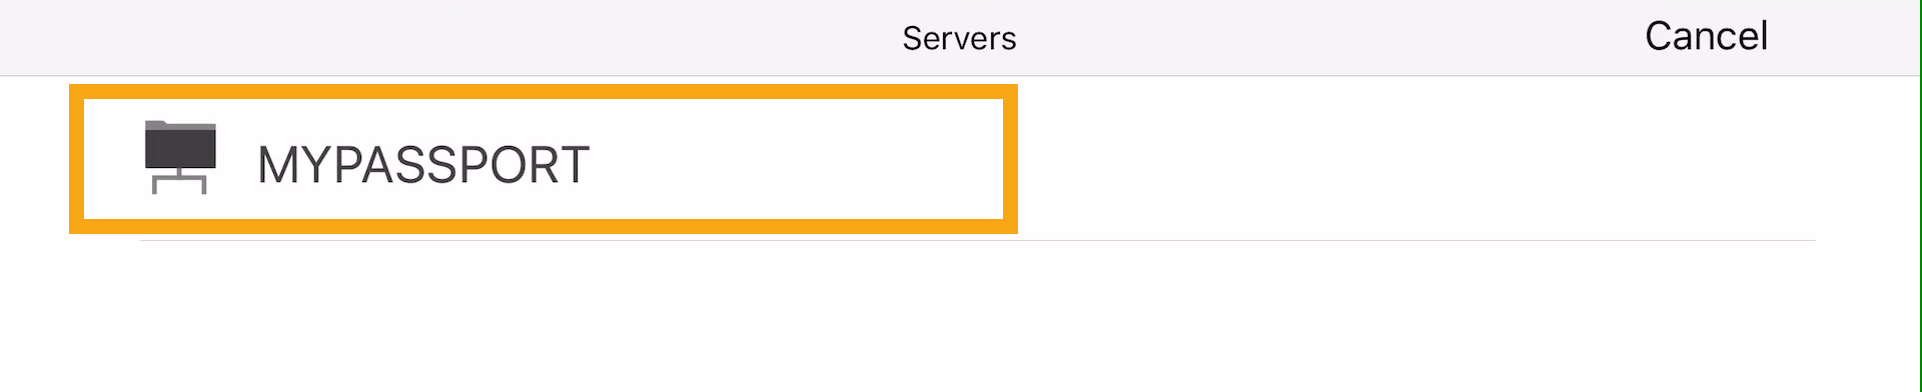
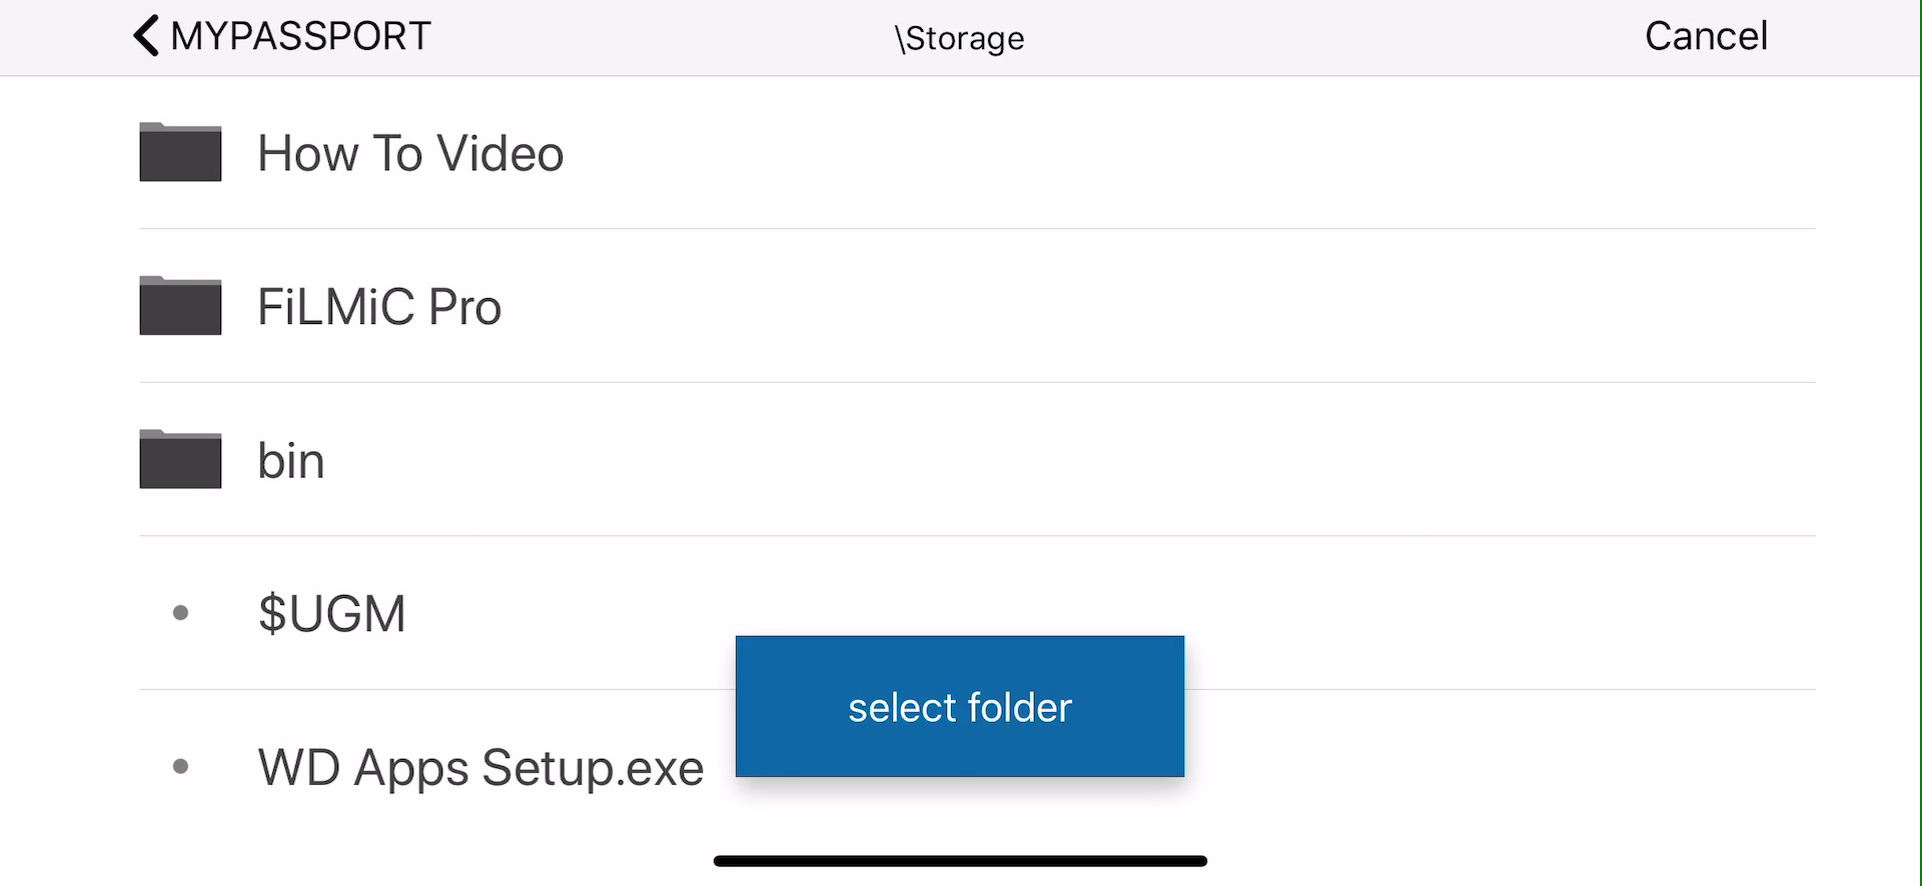
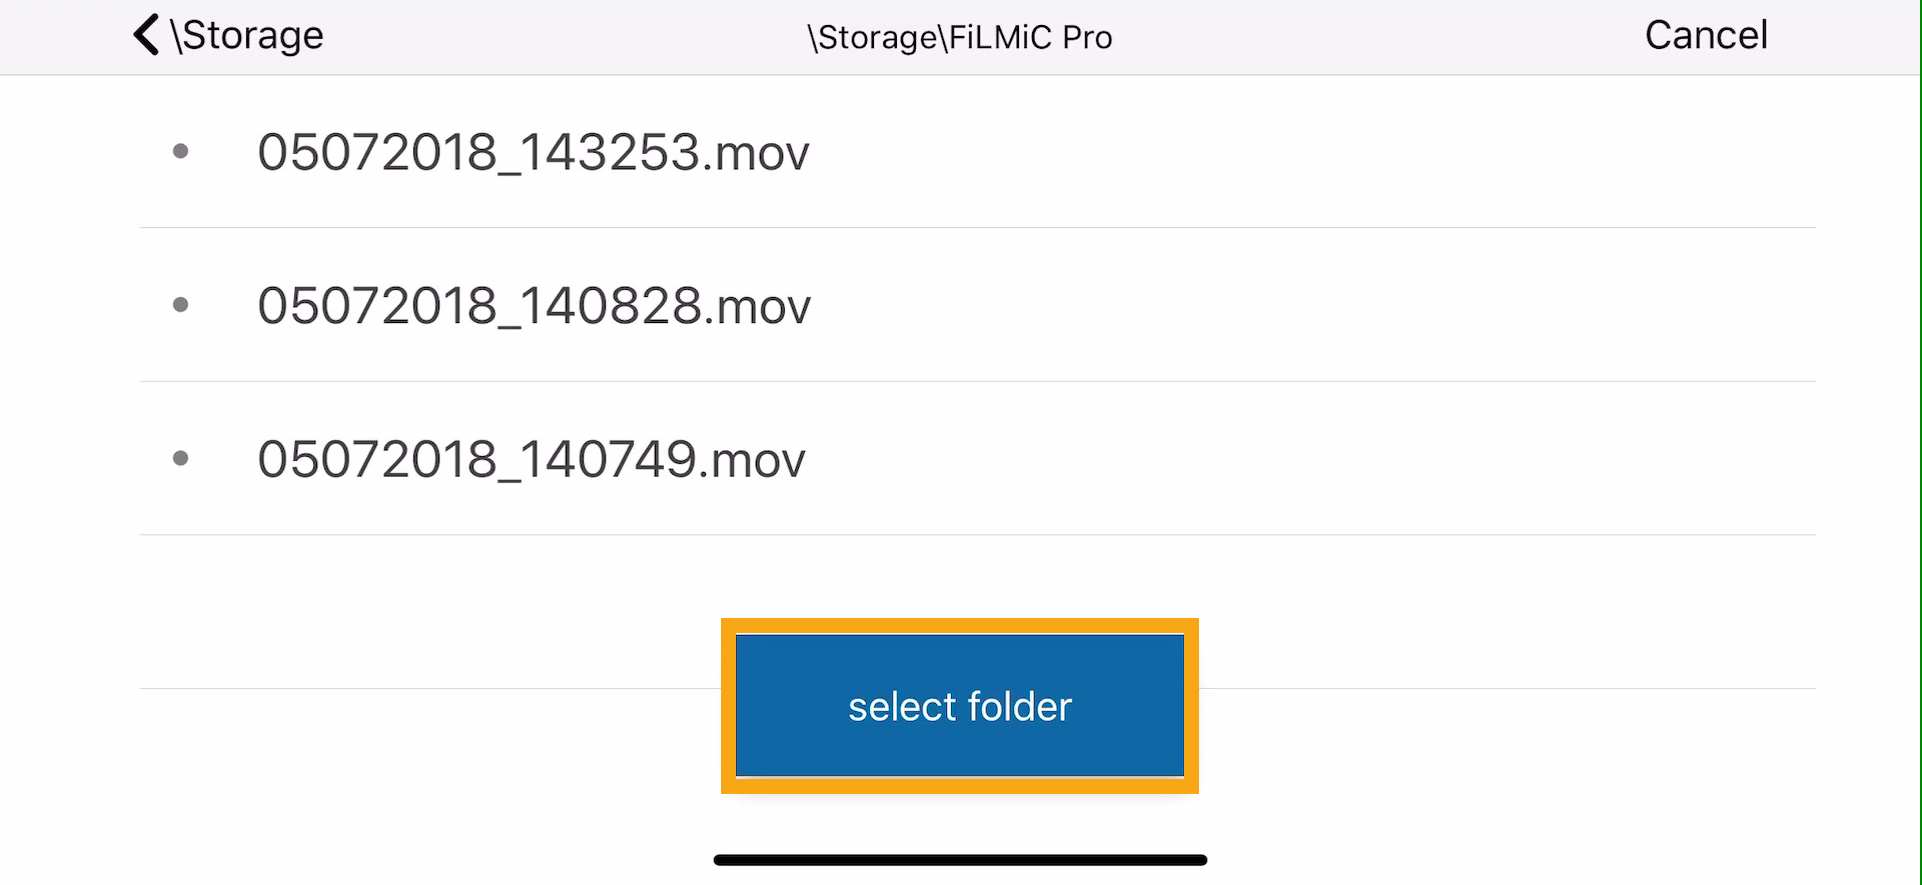
- Tap on "Archive Target," then tap on MYPASSPORT. Tap on "Storage." Tap on the folder you would like your videos saved to, then tap "select folder."
NOTE: FiLMiC Pro does non currently support folder creation on My Passport Wireless devices. If yous would like to save content to a unique folder, as shown here, that folder must exist created first via the My Cloud app.

- Set "Automatically Archive Footage" to ON.
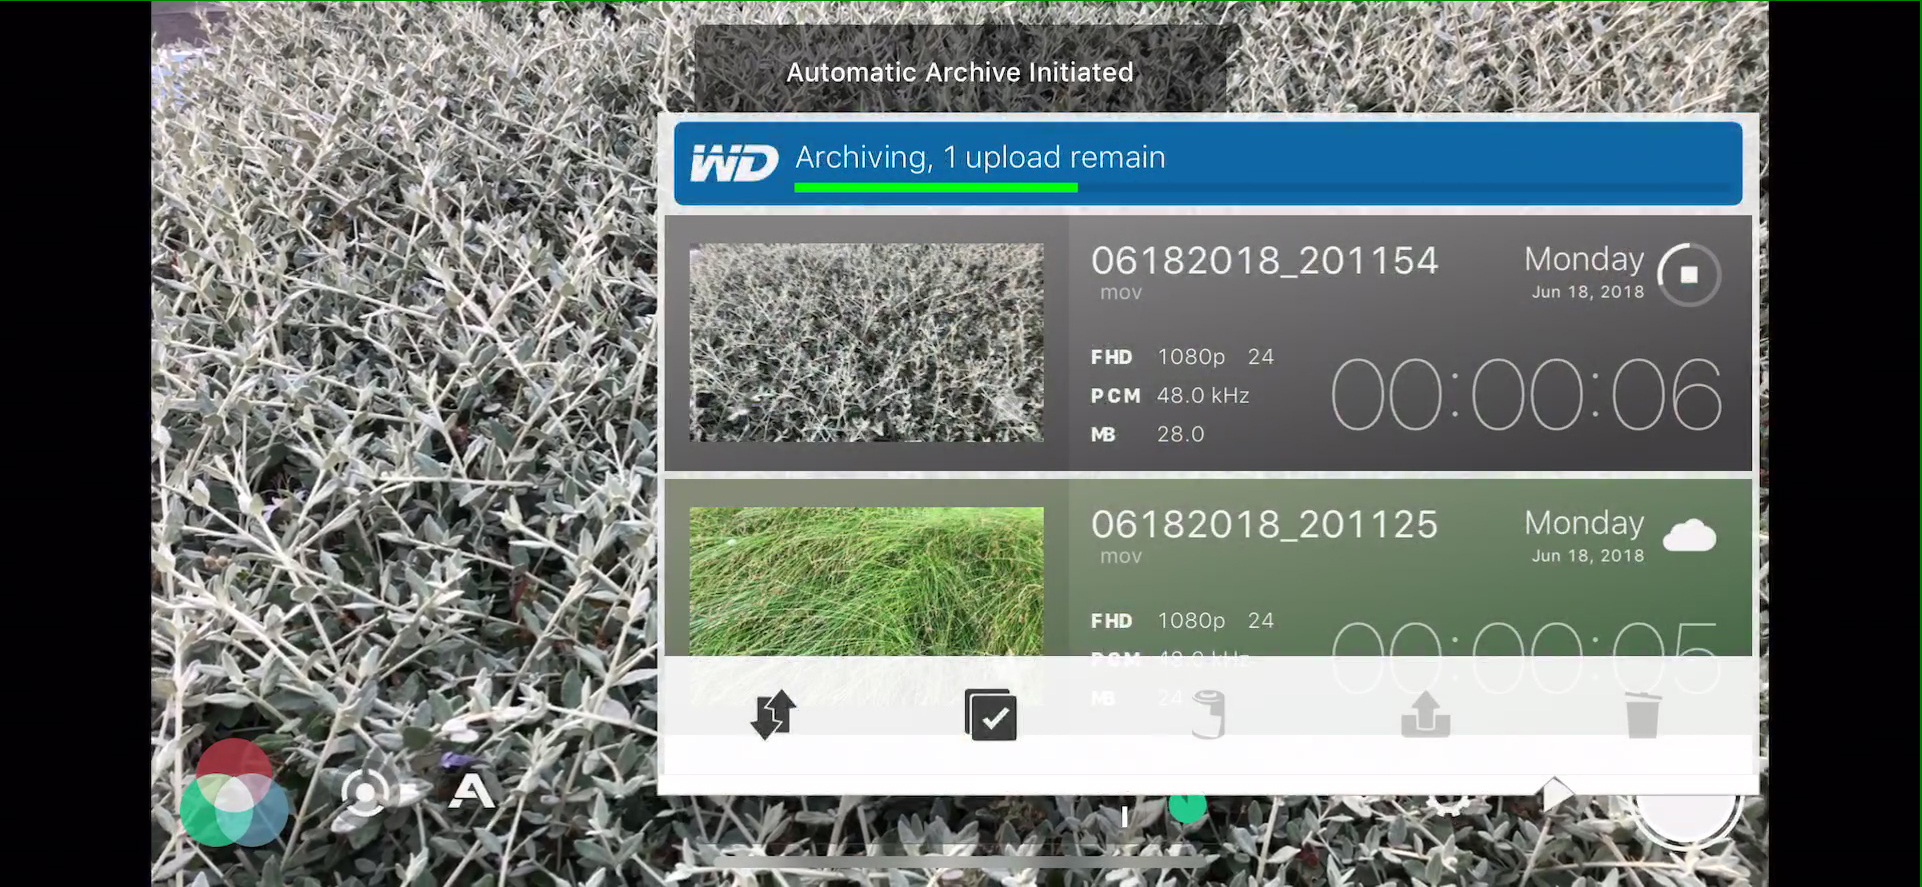
- se FiLMiC Pro every bit you commonly would. As you tape footage, the video is kickoff saved to the internal memory of your iOS or Android device.
If you are wirelessly connected to a My Passport Wireless device, your video will be automatically copied in the background to the drive once you finish recording each take.
A notification will appear to indicate when archiving is consummate.


- To encounter which videos have been copied likewise every bit the progress of current backups, tap the play icon adjacent to the gear icon.

-
How to wirelessly tether compatible Canon DSLRs
Compatible DSLRs: Canon 5D Mk IV; Catechism 5D Mk III with WFT-E7A adapter; Canon 1DX Mk II with WFT-E8A adapter; Catechism 1DX with WFT-E6A adapter
- Turn on the bulldoze and connect to the "My Passport" network with iPhone, iPad or Android device.
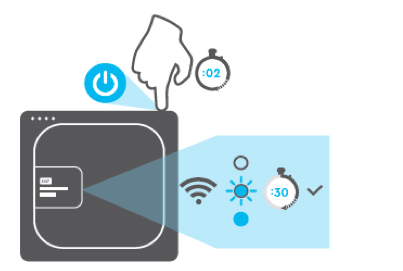
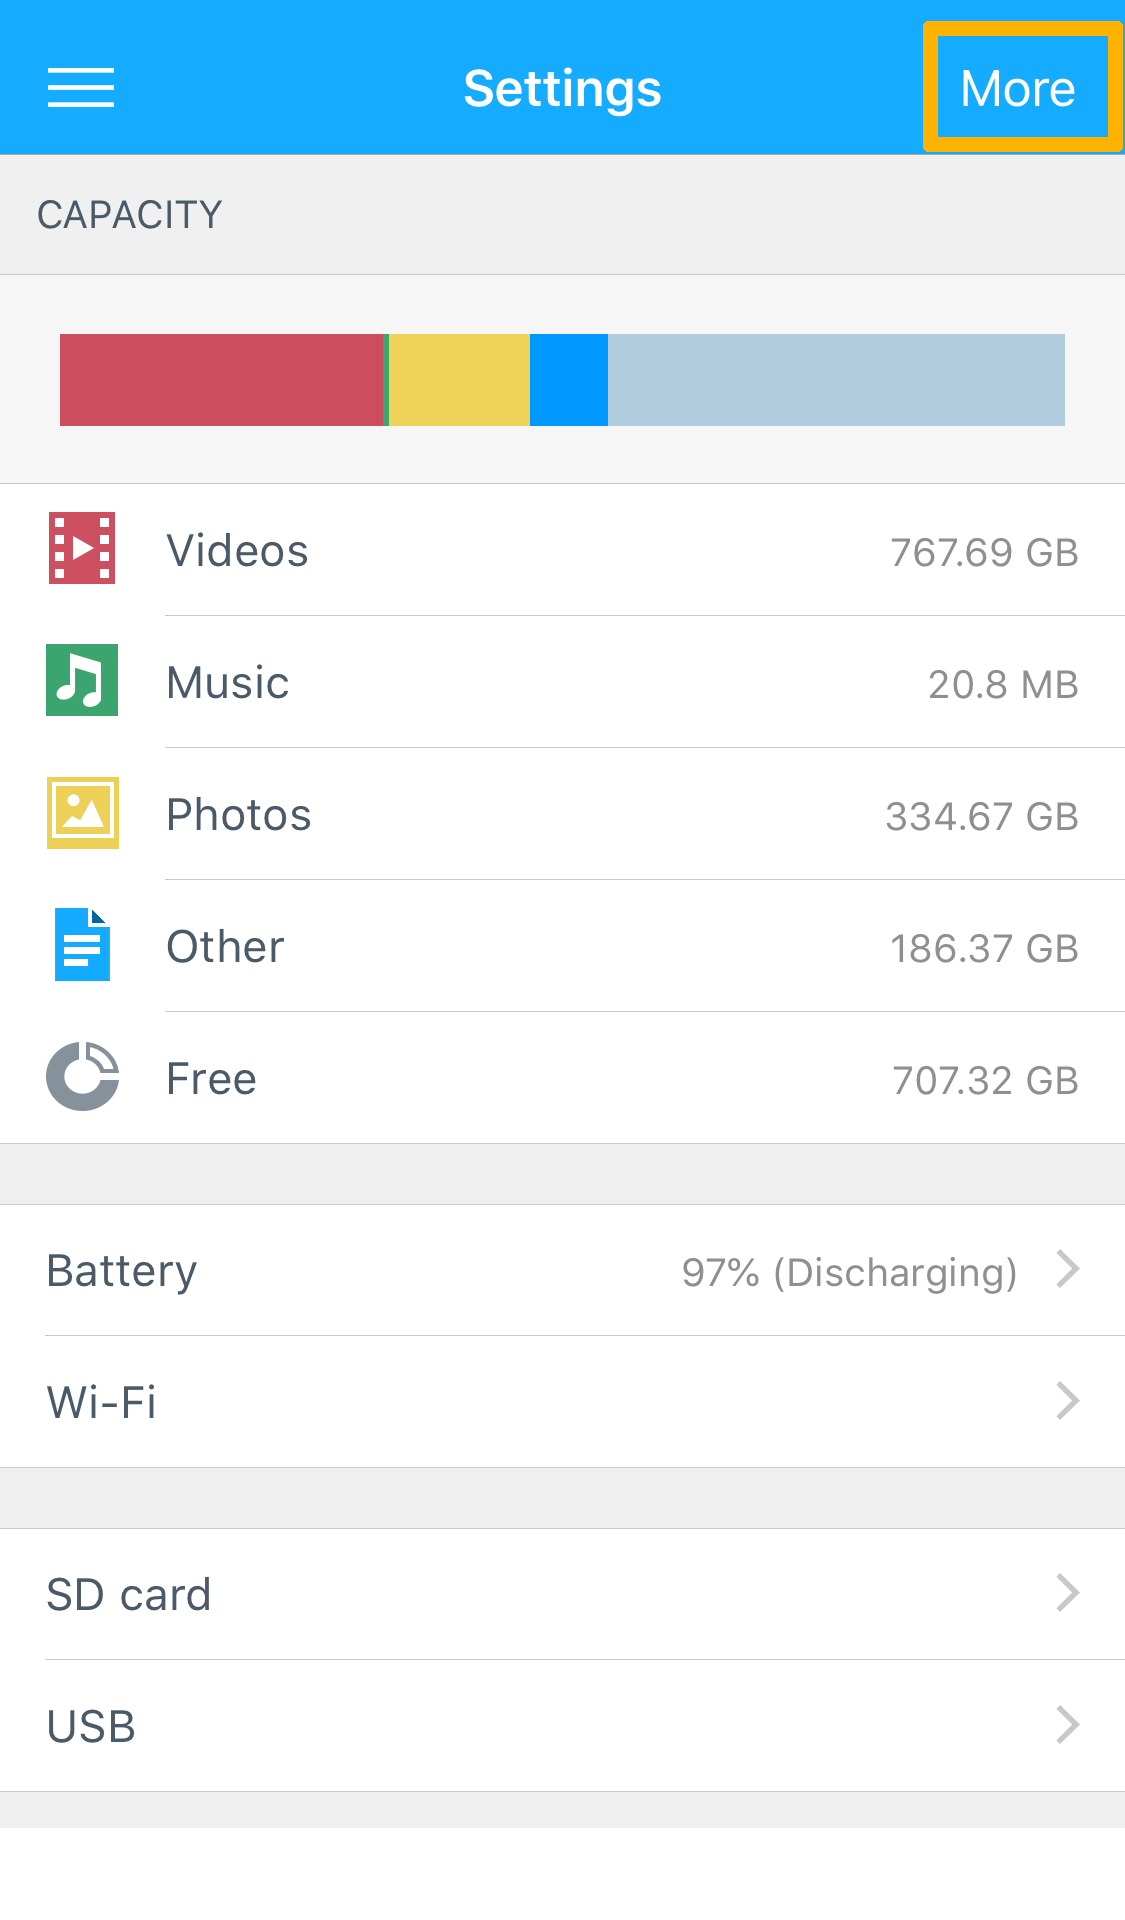
- Set the device with the My Deject app, per the standard setup instructions. Once continued to the My Passport Wireless device, tap the settings icon.
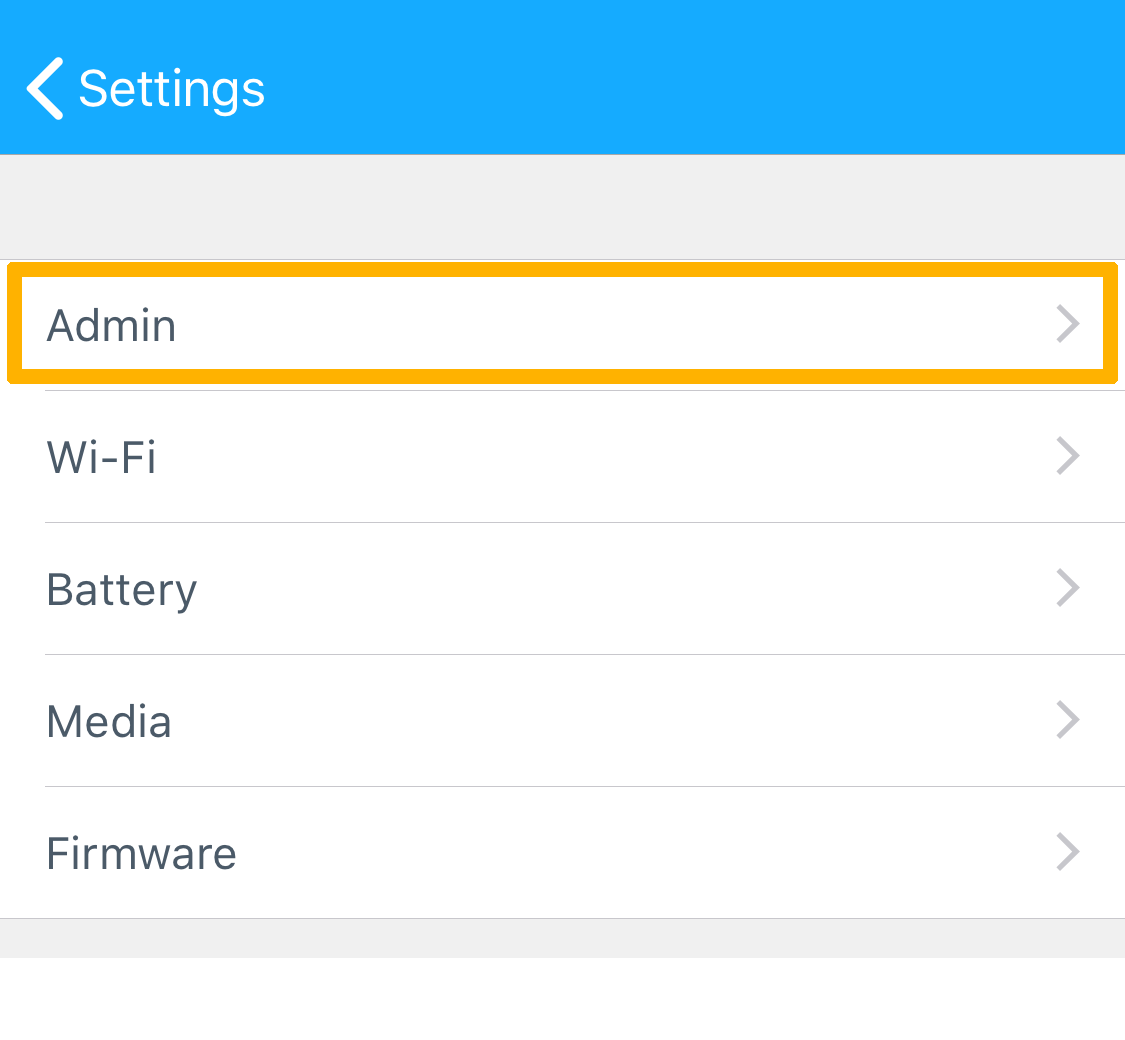
- Tap "More than" in the upper right, so "Admin," and then set "FTP Access" to "On."
1-time Setup Instructions for Canon 5D Mark Four
Please discover these settings to configure other compatible Canon cameras that employ a WFT adapter.
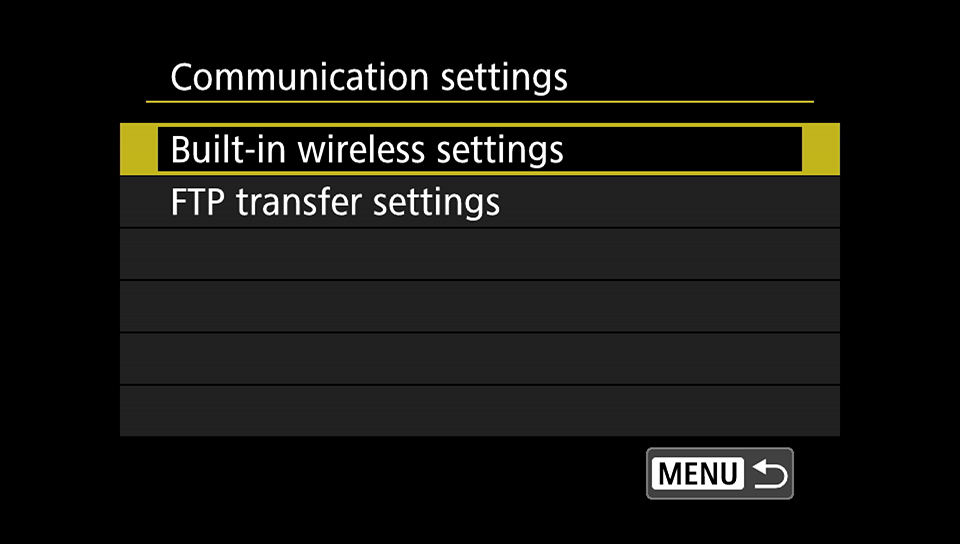
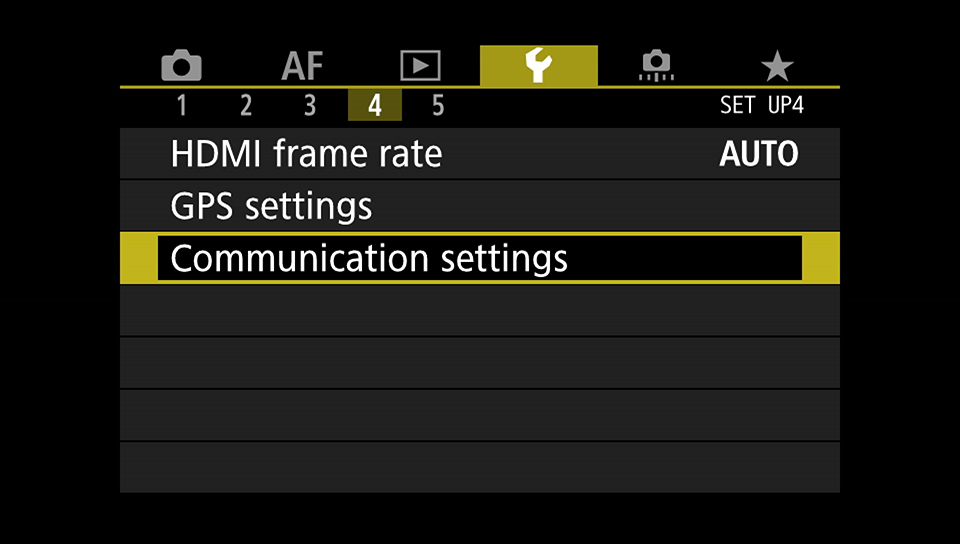
- Go to folio 4 of wrench settings, and tap "Communication Settings".

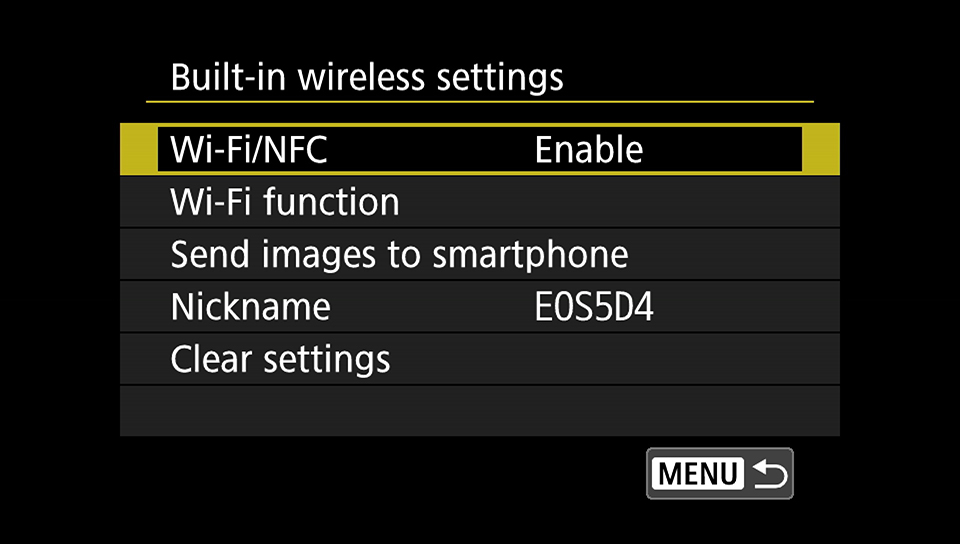
- Tap "Built-in wireless settings".
- Set "Wi-Fi/NFC" = "Enable".
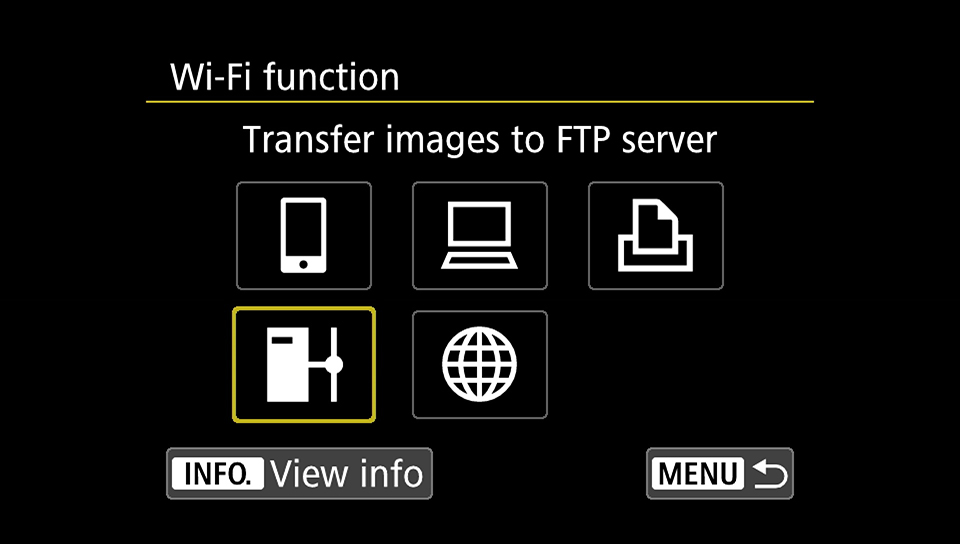
- Tap "Wi-Fi function", and and so "Transfer images to FTP server".
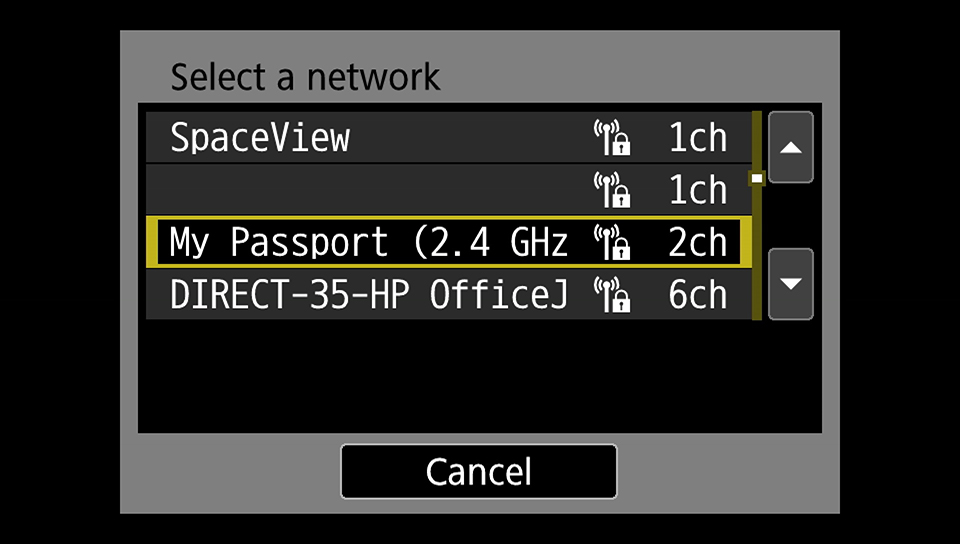
- Find the "My Passport" network, and type in the Wi-Fi password. (The default password is printed on the sticker that comes on the confront of the drive.)
- Utilise the default options on the next 2 screens:
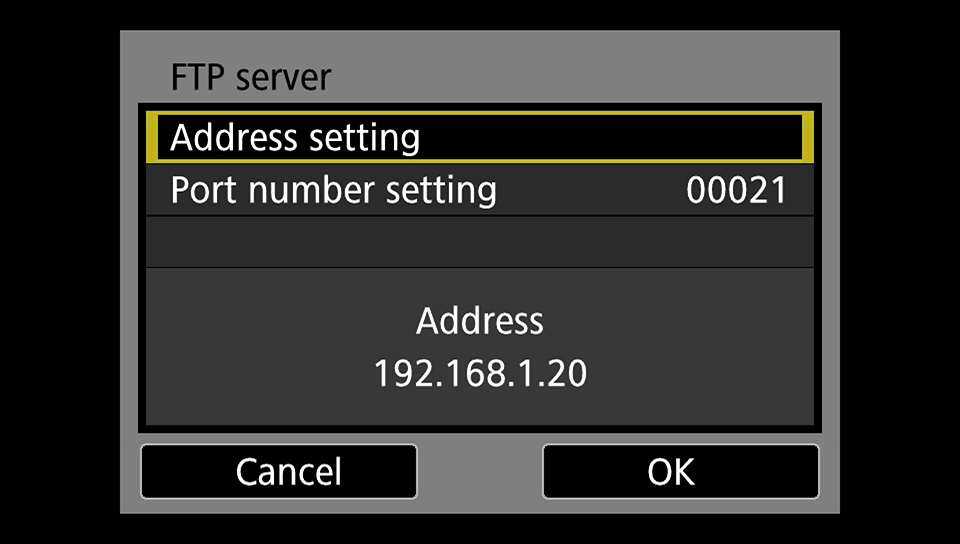
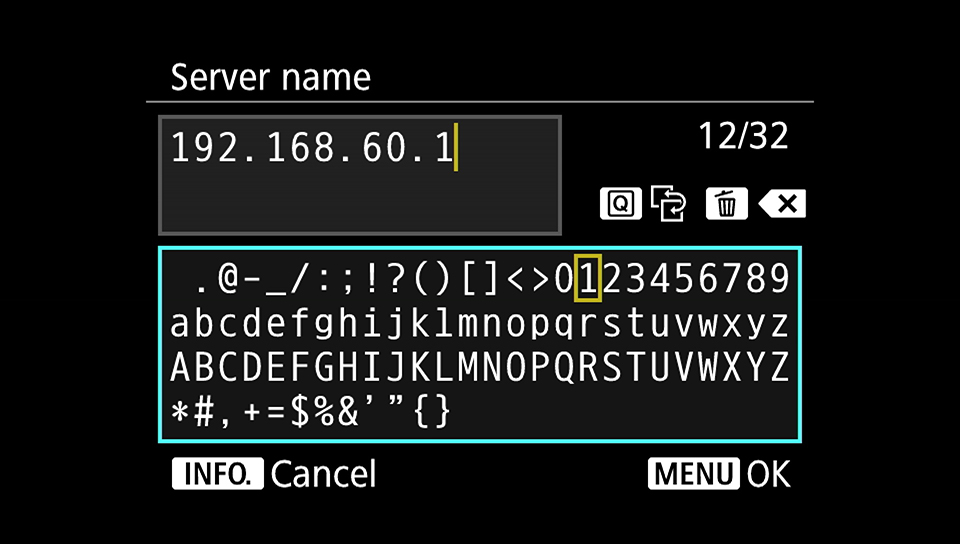
- On the FTP server screen, tap on "Address setting" and modify the "Server name" to 192.168.60.1. Leave port number as 00021.
- Use the default options on the next iii screens:
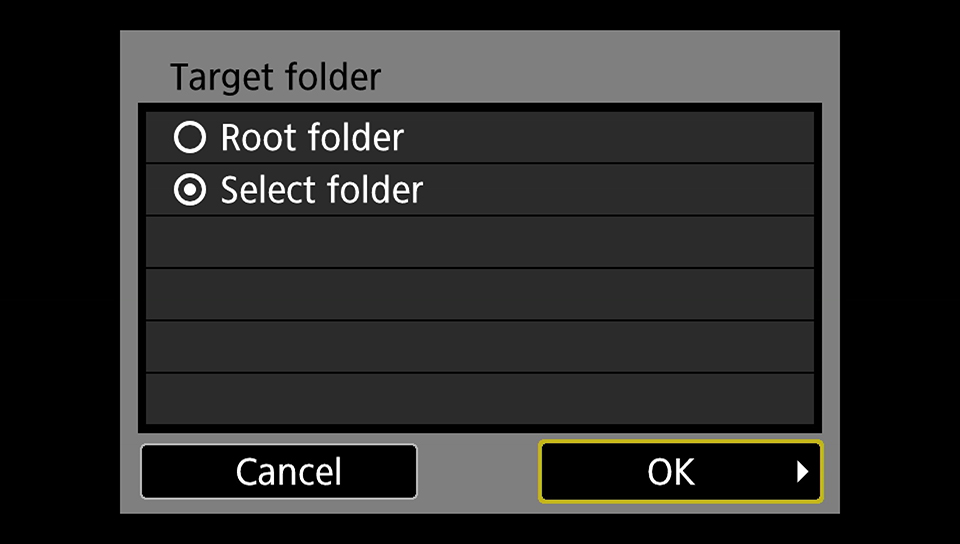
- On "Target folder," tap "Select folder". Blazon in "/Storage/" and a folder name. "Storage" is case sensitive and must be typed exactly as shown.
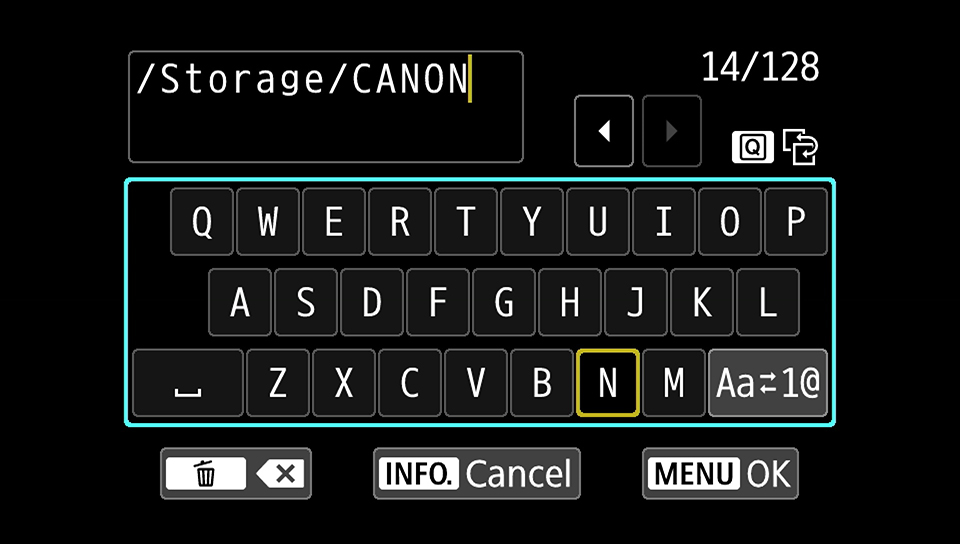
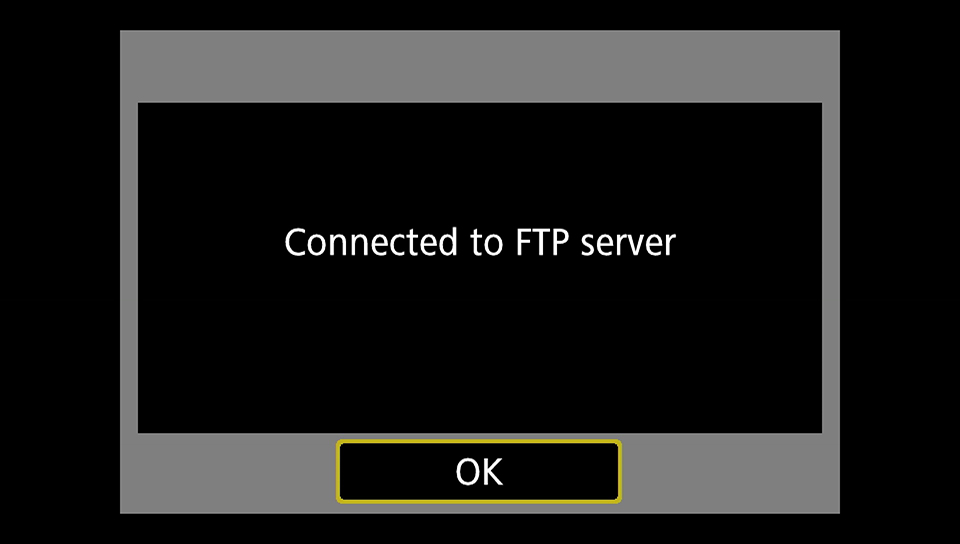
- If you receive an fault, ensure no typos in steps 7 and ix. When both are powered on, the bulldoze and camera volition now automatically connect to each other.
- To set up up automated wireless backup, render to the screens in steps 1 and 2.
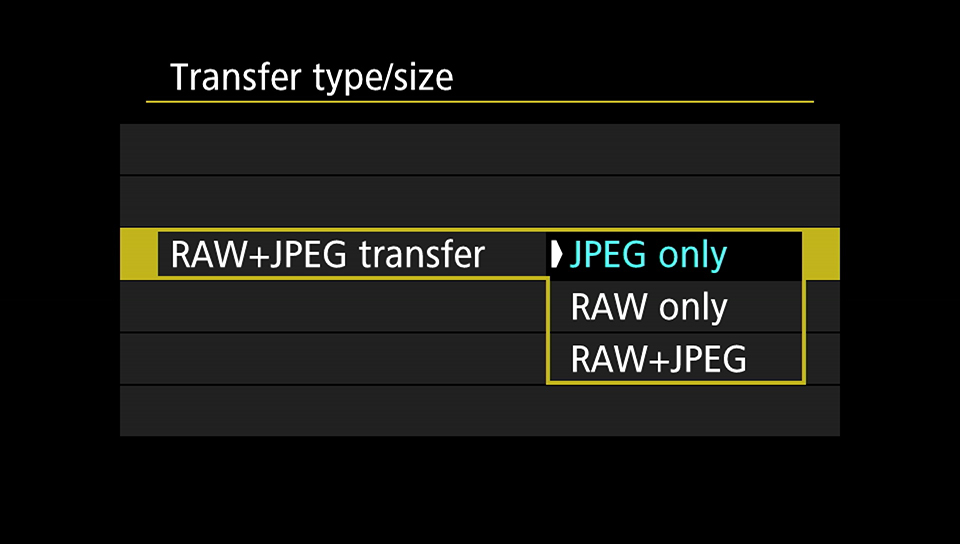
Tap on "FTP transfer settings"
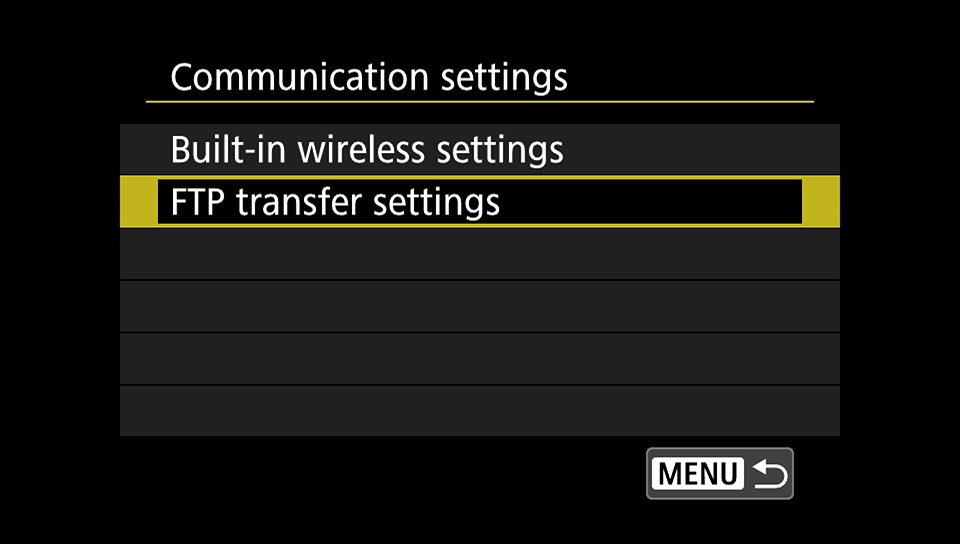
You can use whatsoever of the default options on the "FTP transfer settings" screen. Yet, we recommend always setting your camera to shoot RAW+JPEG to the menu(south) inside the camera, with full-resolution RAWs and then a JPEG of lower resolution. We set up "Transfer type/size" in "FTP transfer settings" to "JPEG but" for RAW+JPEG transfer, to get fast JPEG previews sent to the bulldoze, while keeping RAWs saved to the card.
- Connect to your My Passport Wireless' Wi-Fi network from your iPhone, iPad, or Android device, and use WD'south free My Cloud app to access and preview your images anywhere. No internet connection or laptop needed.
- Turn on the bulldoze and connect to the "My Passport" network with iPhone, iPad or Android device.
-
How to wirelessly tether compatible Nikon DSLRs
1-time setup instructions for My Passport Wireless SSD or My Passport Wireless Pro
- Turn on the drive and connect to the "My Passport" network with iPhone, iPad or Android device.
- Set up the device with the My Deject app, per the standard setup instructions. One time connected to the My Passport Wireless device, tap the settings icon.
- Tap "More" in the upper right, then "Admin," and then set "FTP Access" to "On."
- Click back to the My Passport Wireless drive, then tap on "Storage" in the main window.
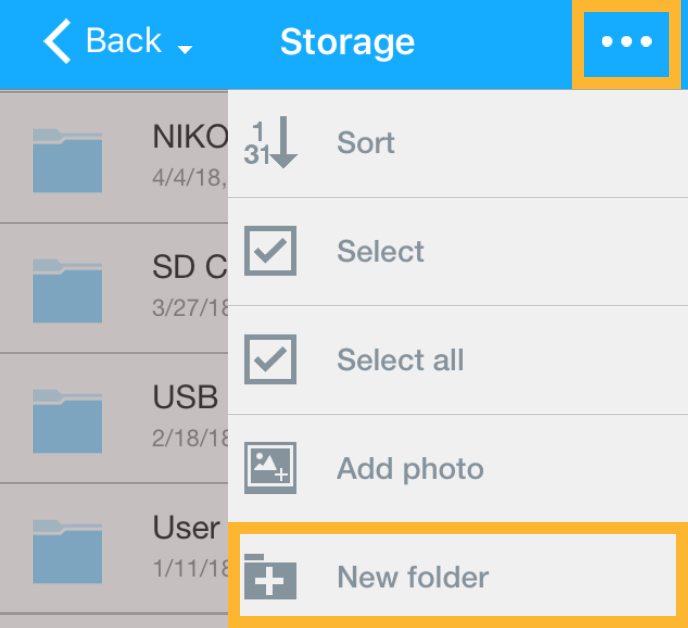
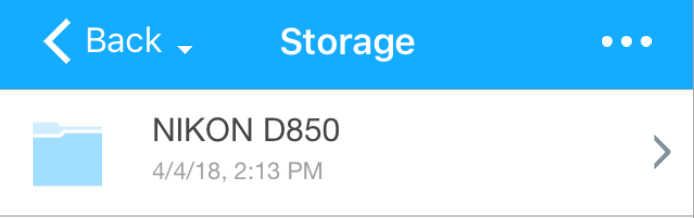
You volition need to create a folder for the camera to send the images to. Create a new binder; for this tutorial, nosotros named the binder "NIKON D850."
To add a new folder with the My Cloud app for iOS/Android, tap the three dots in the card bar, then tap "New folder":
The new folder should appear nether the "Storage" header, as seen here:
- Turn on the drive and connect to the "My Passport" network with iPhone, iPad or Android device.
-
Setting upward Nikon D850 cameras with WT-7/WT-7A adapters to let tethering with the My Passport Wireless devices
I-fourth dimension setup instructions using the connection magician
Please discover these settings to configure other uniform Nikon cameras that use a WT adapter. To view instructions for manual setup, click here.
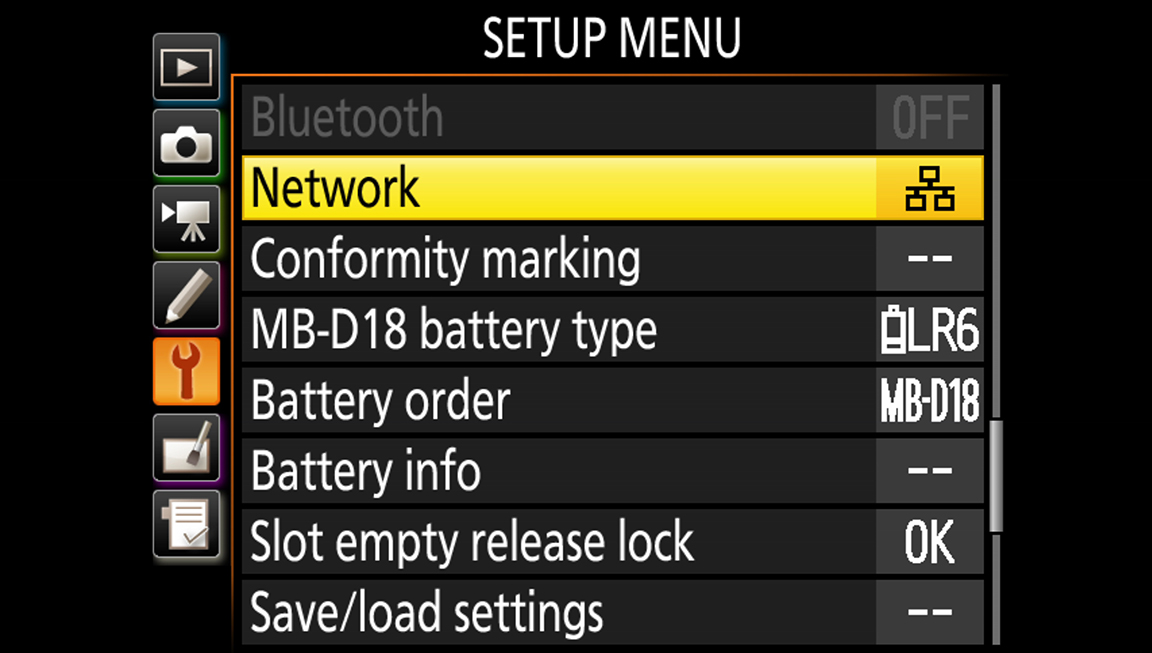
- Push the card push and navigate to the Setup Carte (with an icon of a wrench).
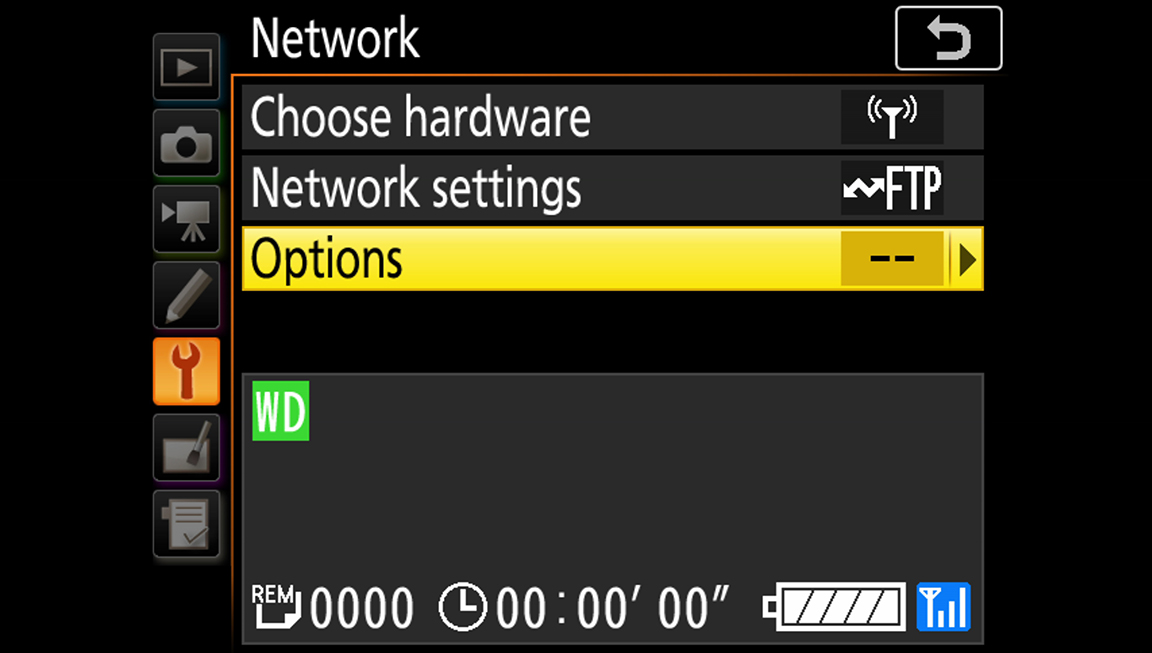
In this bill of fare, scroll down to and tap on "Network."
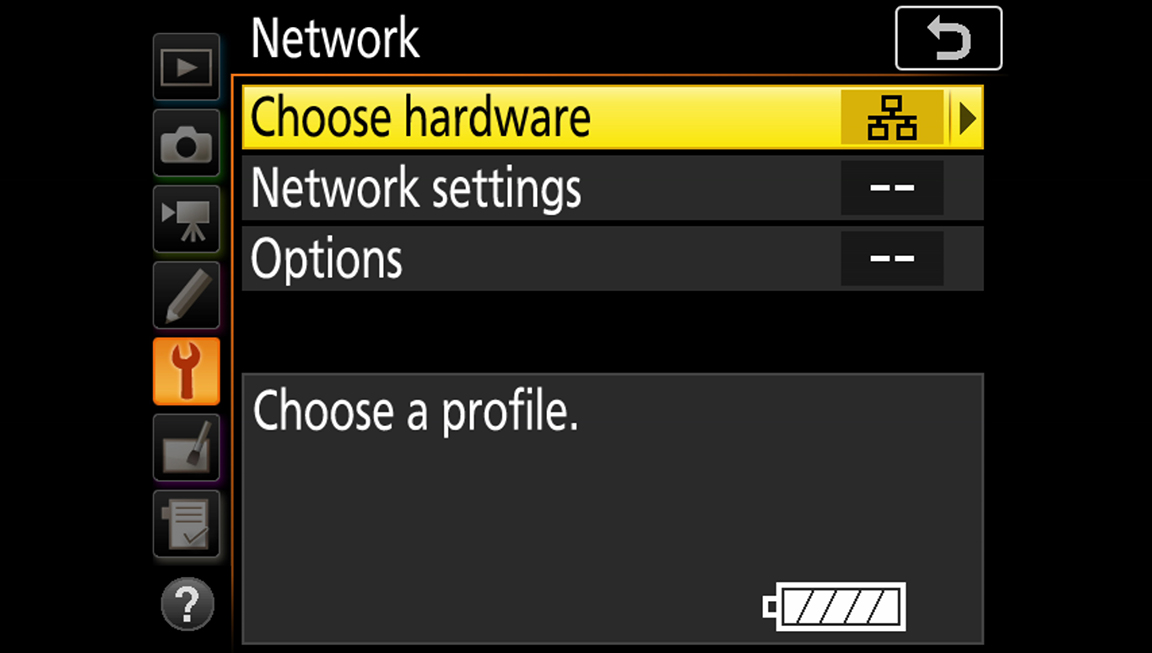
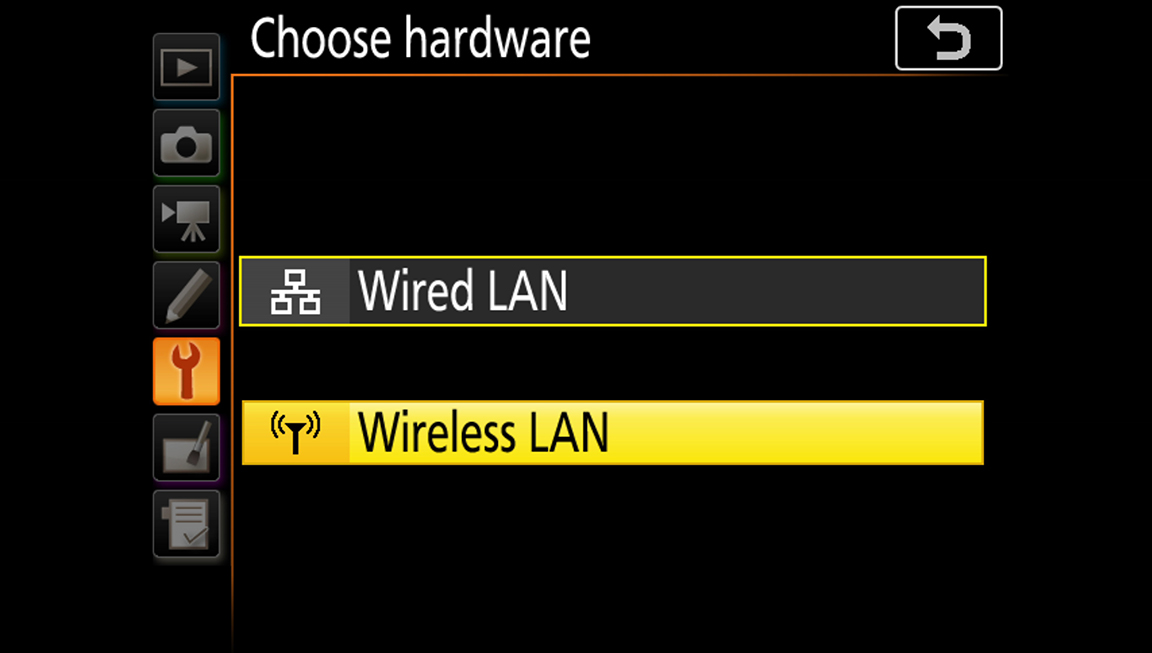
- In the "Network" page, kickoff tap "Choose hardware" and select "Wireless LAN."
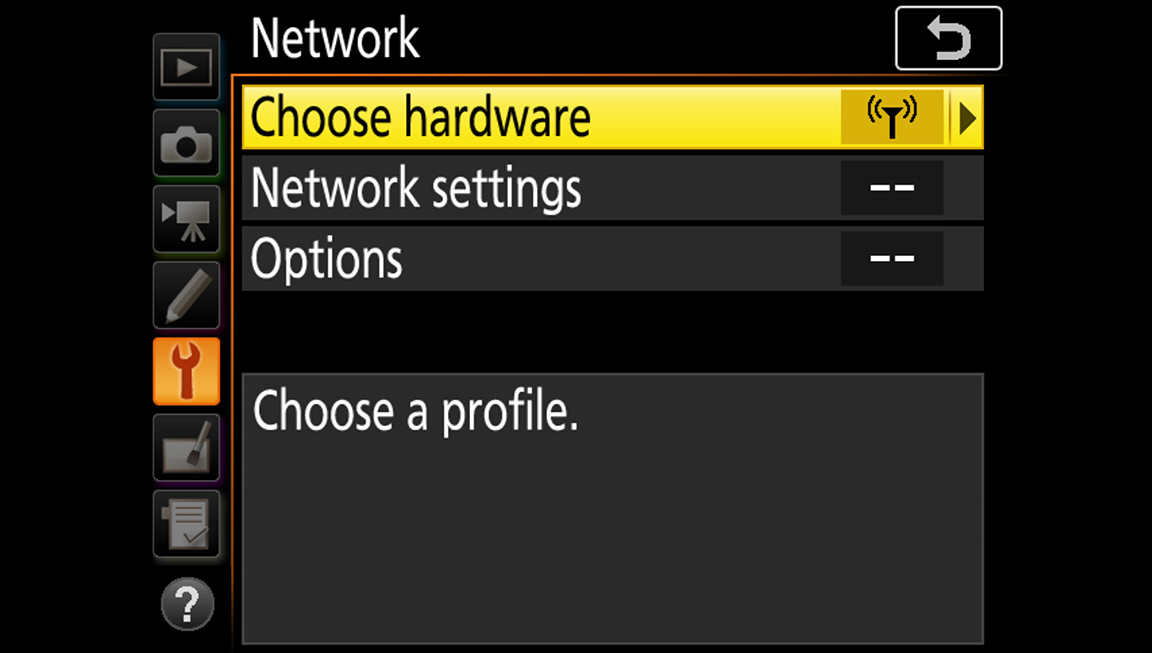
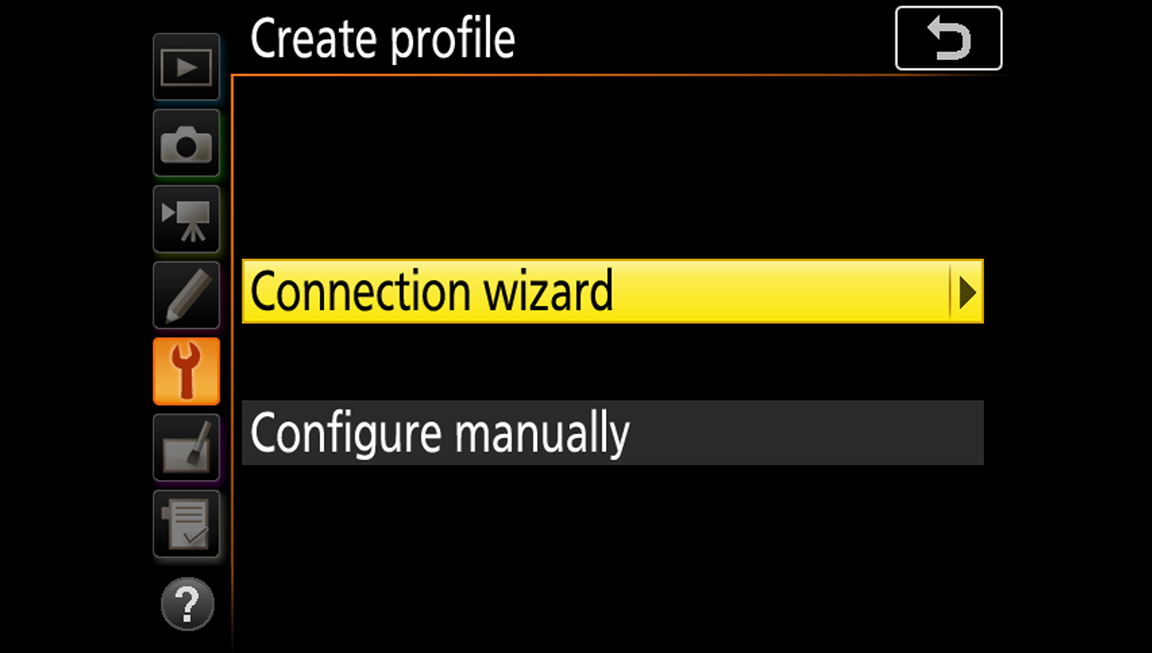
- Tap "Network settings," then tap "Create profile."
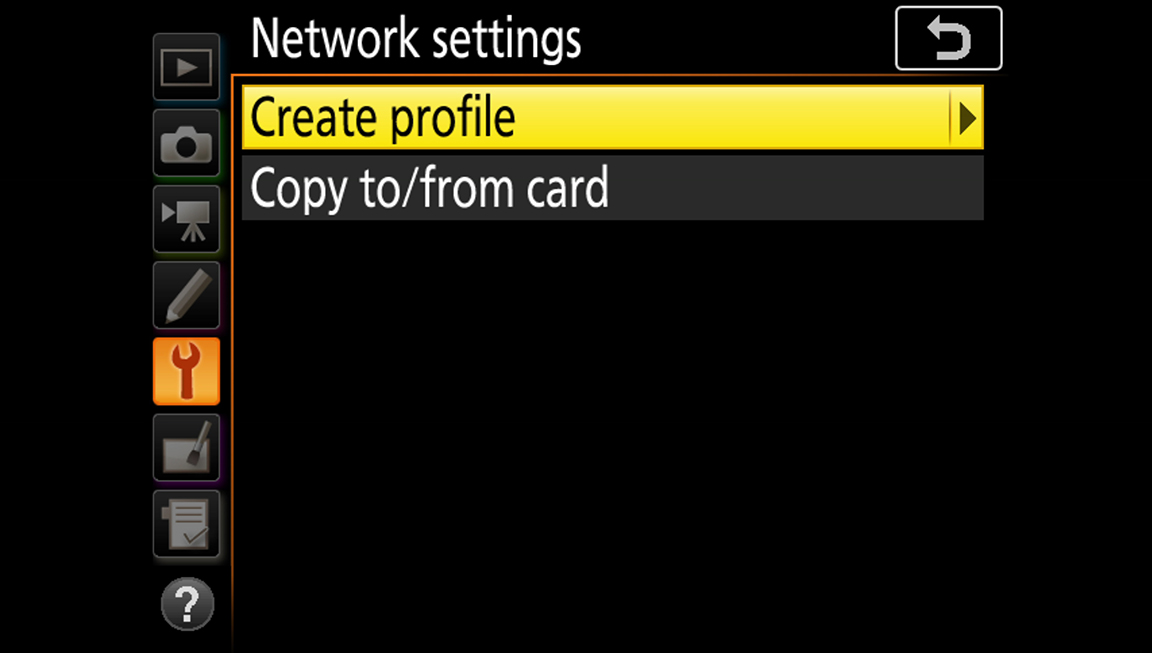
Adjacent, tap "Connection magician."
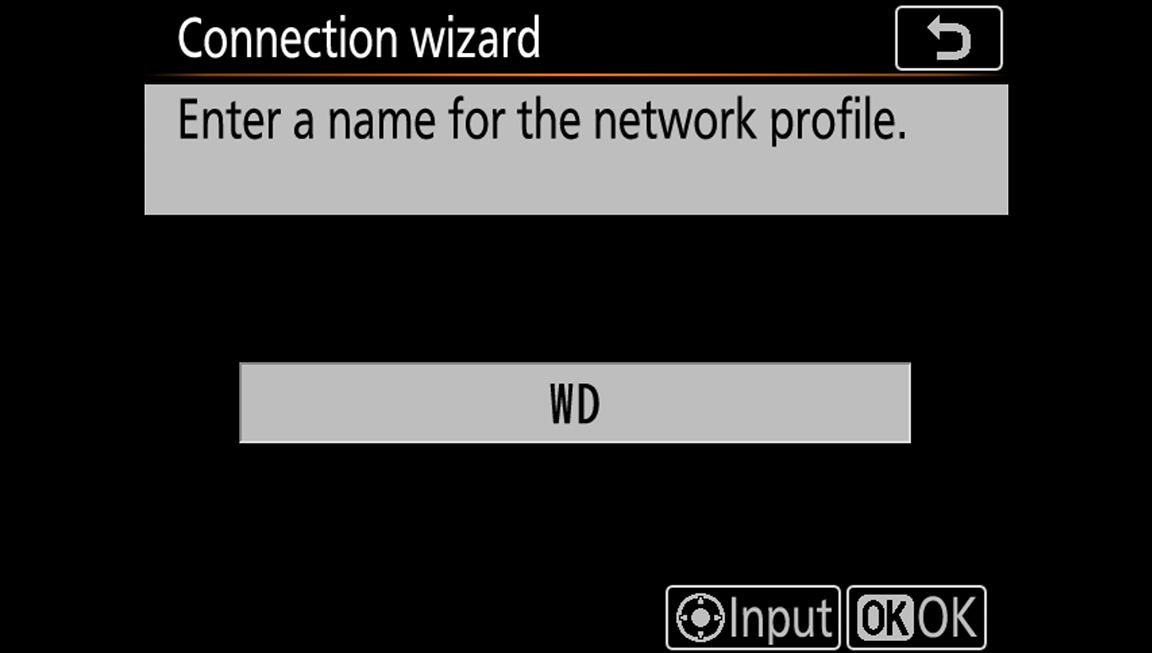
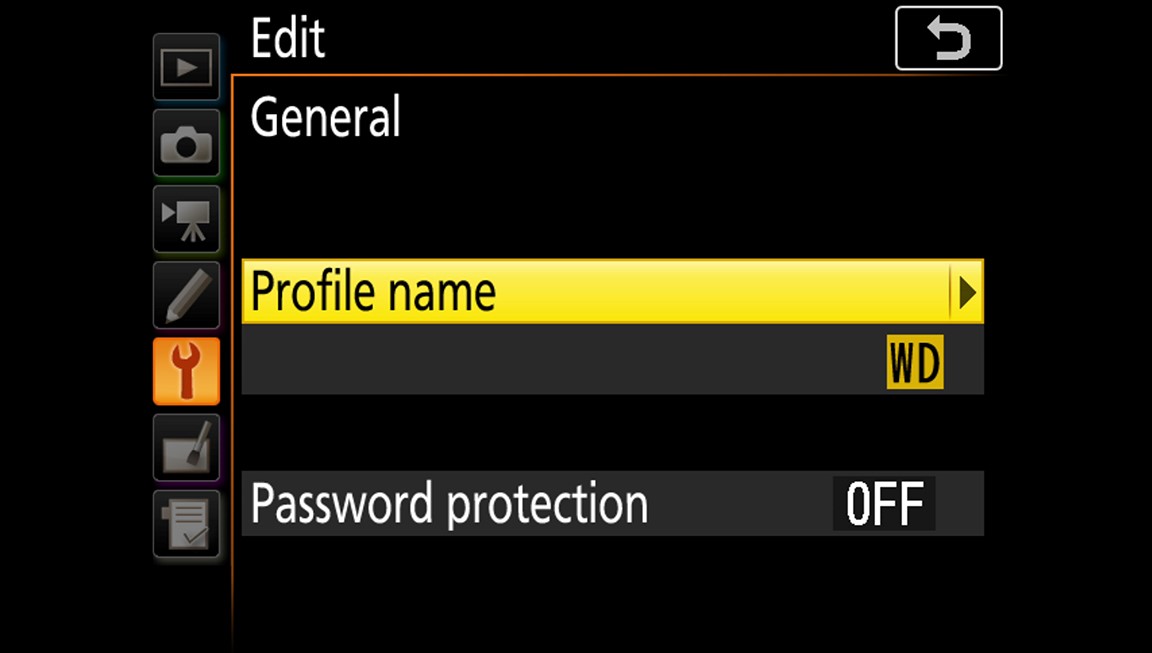
- Tap "FTP upload", then enter a name for the network profile.

The default is "WLAN," but nosotros've renamed it to "WD" here.
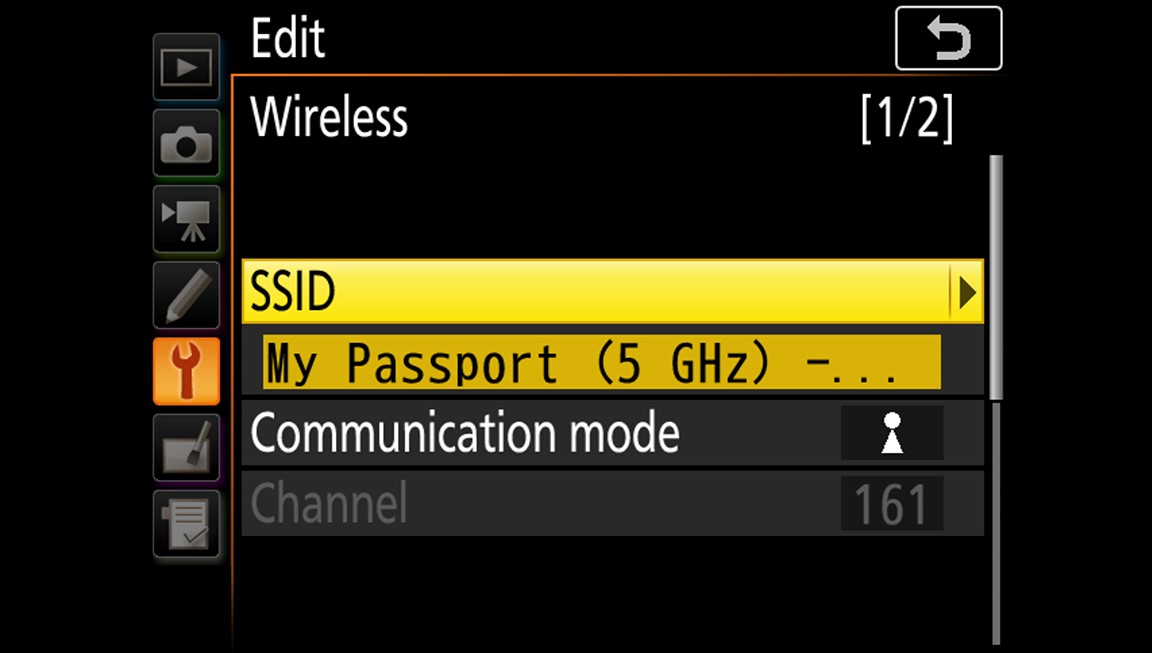
- On the next screen, tap "Search for wireless network".
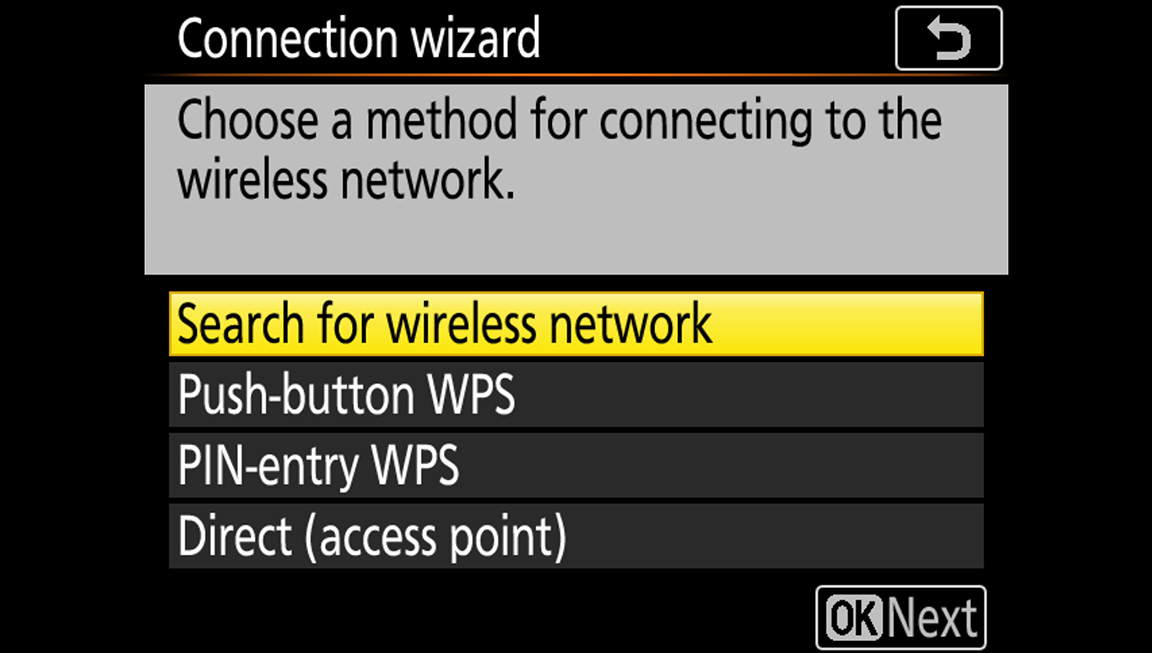
Select the 5 GHz version of the "My Passport" network. This is the selection that will give you the fastest transfer speeds as long as the drive is within 1-two meters of your camera.
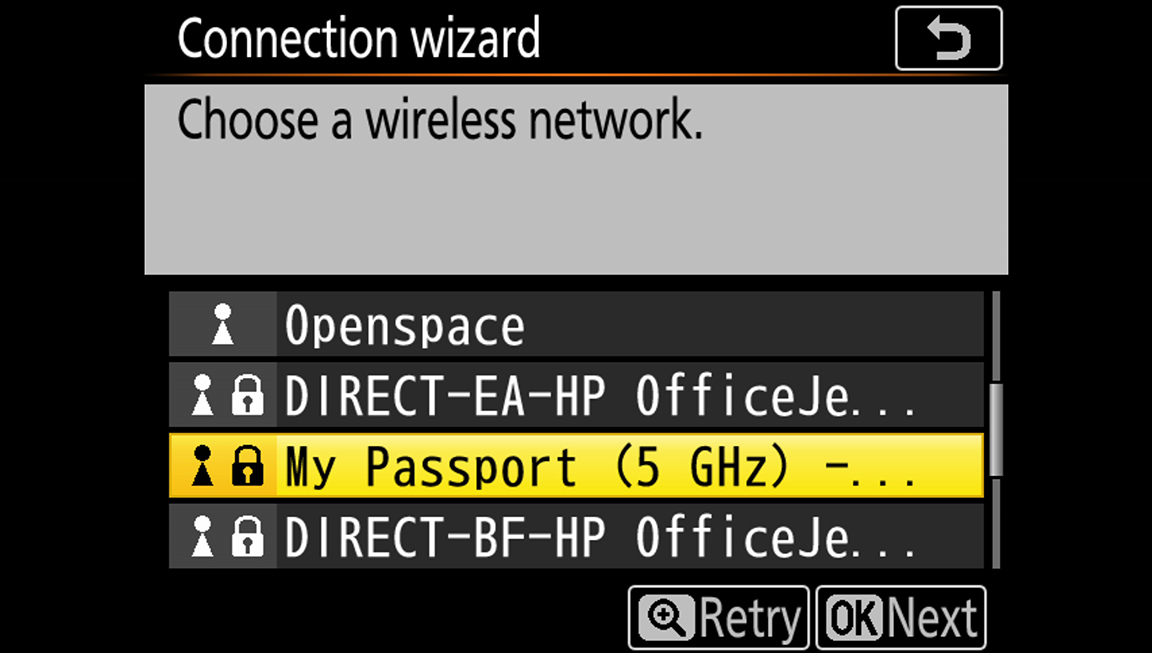
Enter the Wi-Fi password for the My Passport Wireless. (The default password is printed on the sticker that comes on the face of the drive and is present in the quick first guide in the original box. For more data on finding the default password, click here: Default Wi-Fi password on a My Passport Wireless Pro and SSD.)
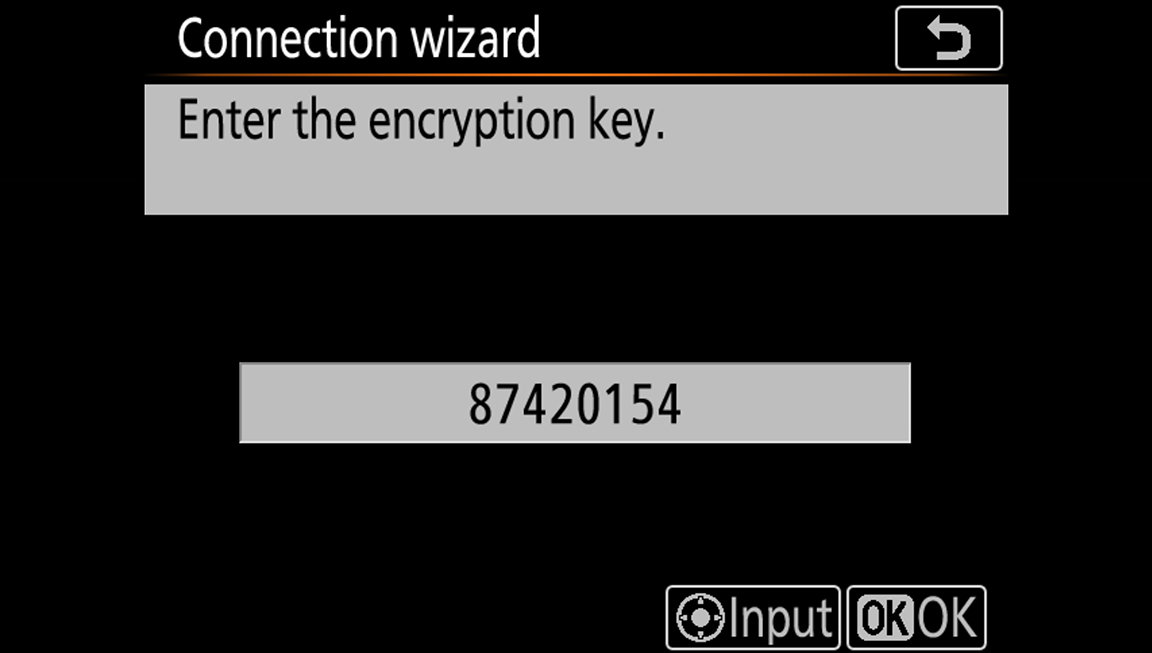
If you entered your password correctly, you will be presented with the following screen:
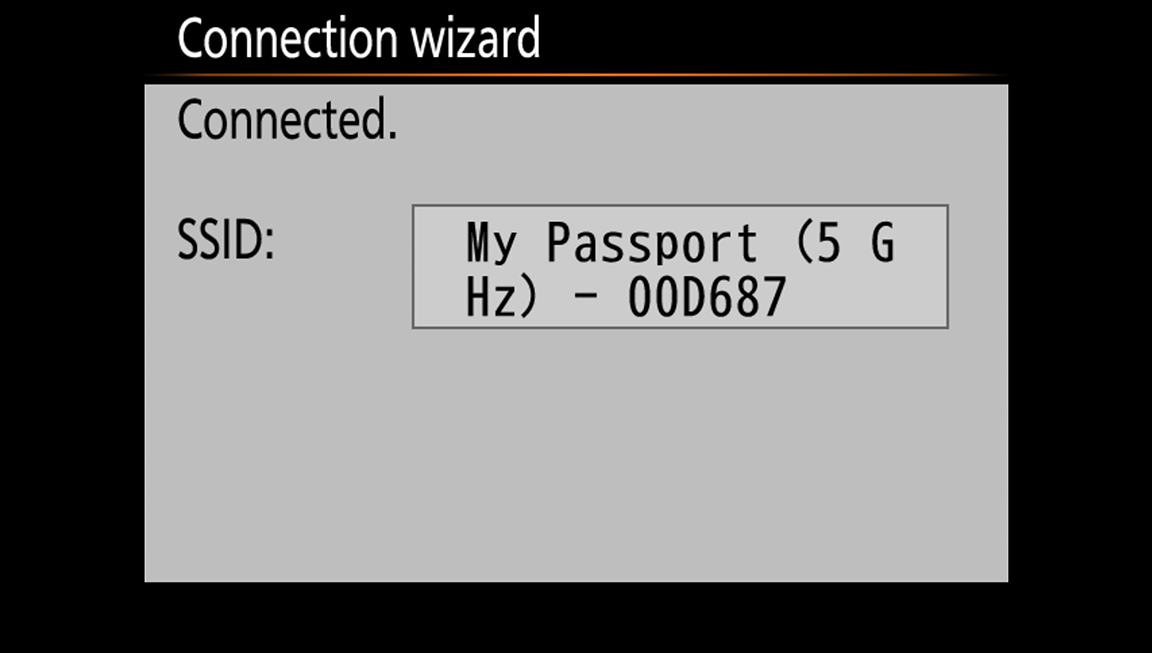
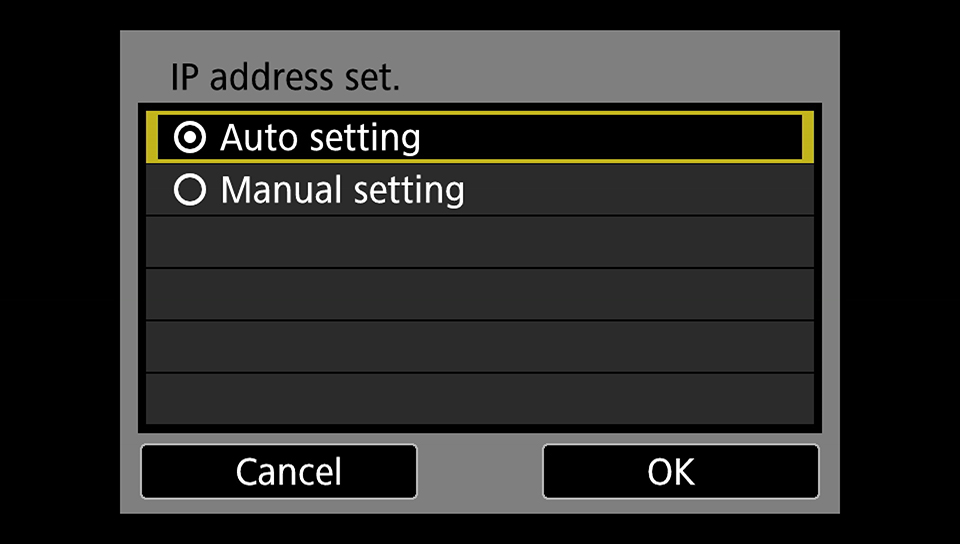
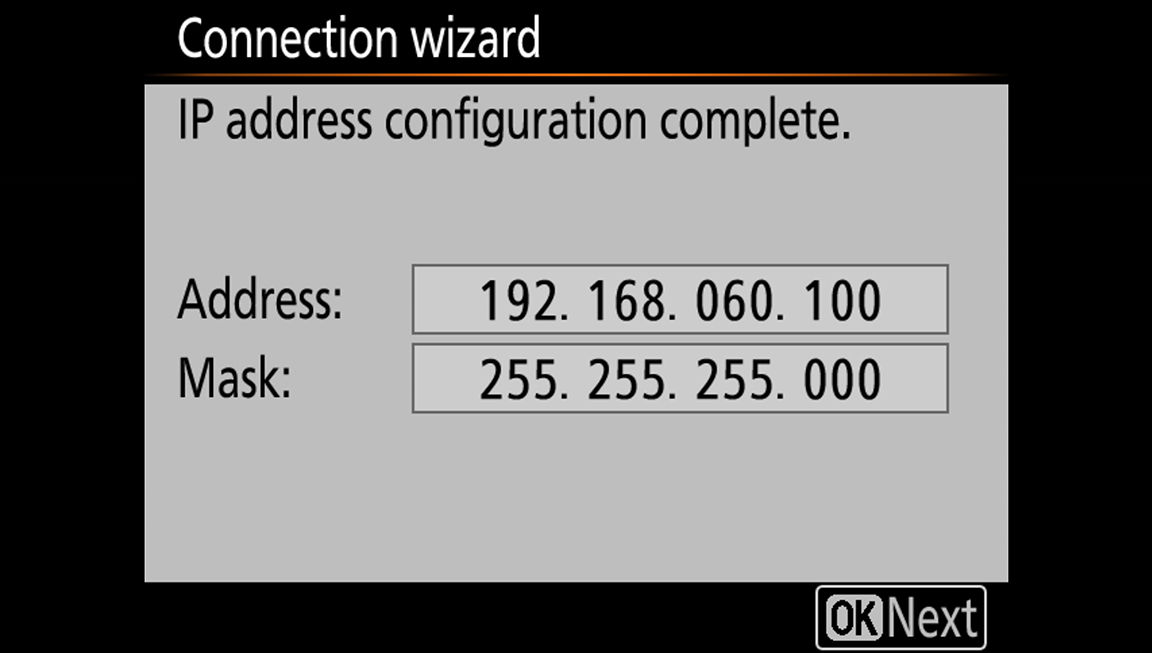
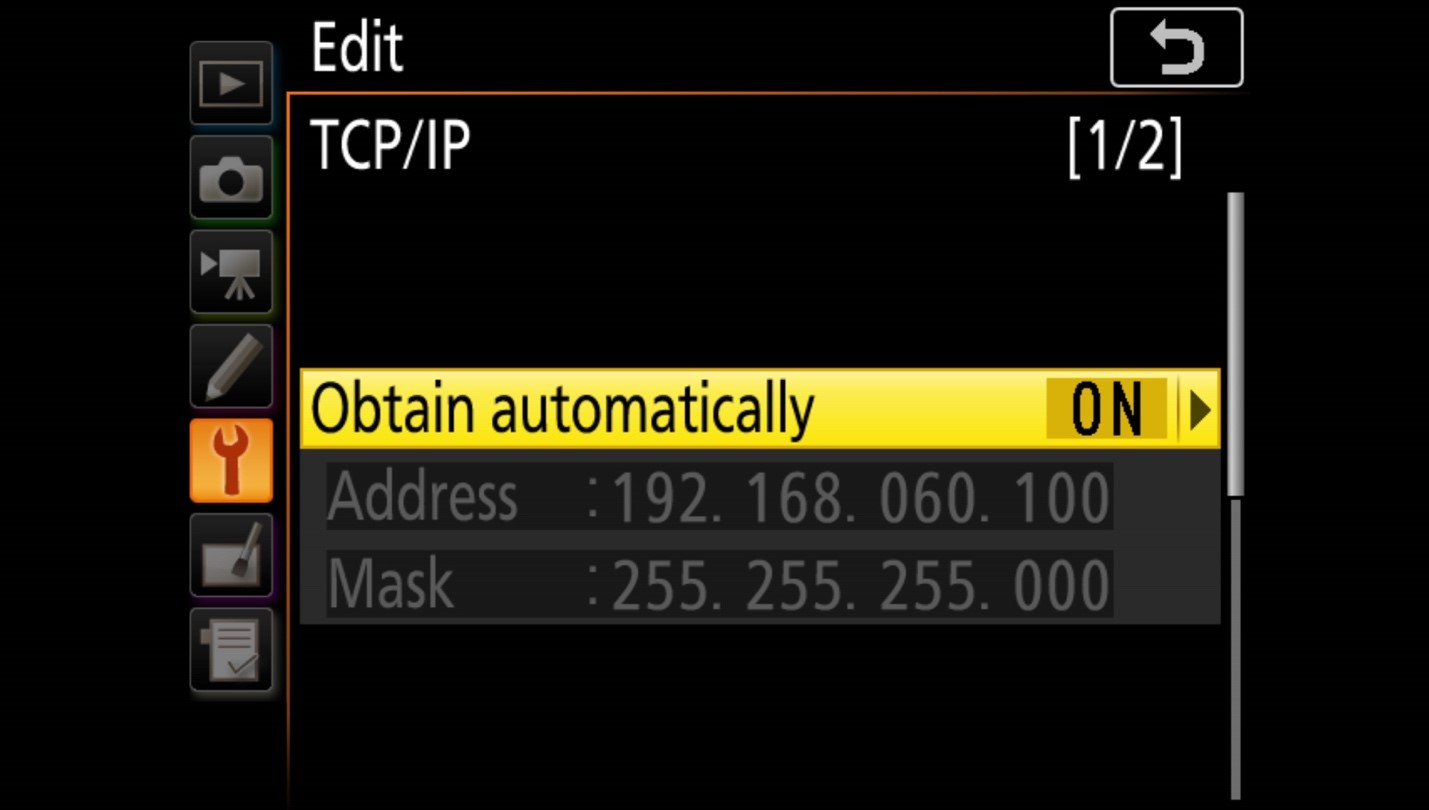
- On the next screen, click "Obtain automatically."
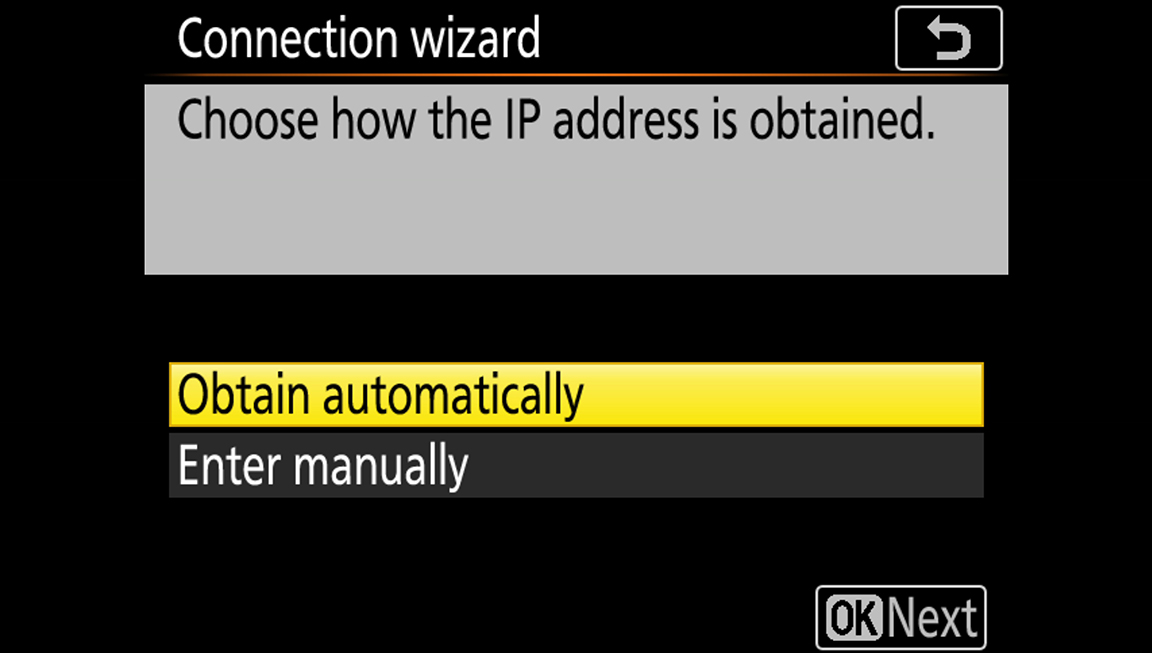
And y'all will be presented with the post-obit settings. Your exact IP accost may differ from what is shown beneath.
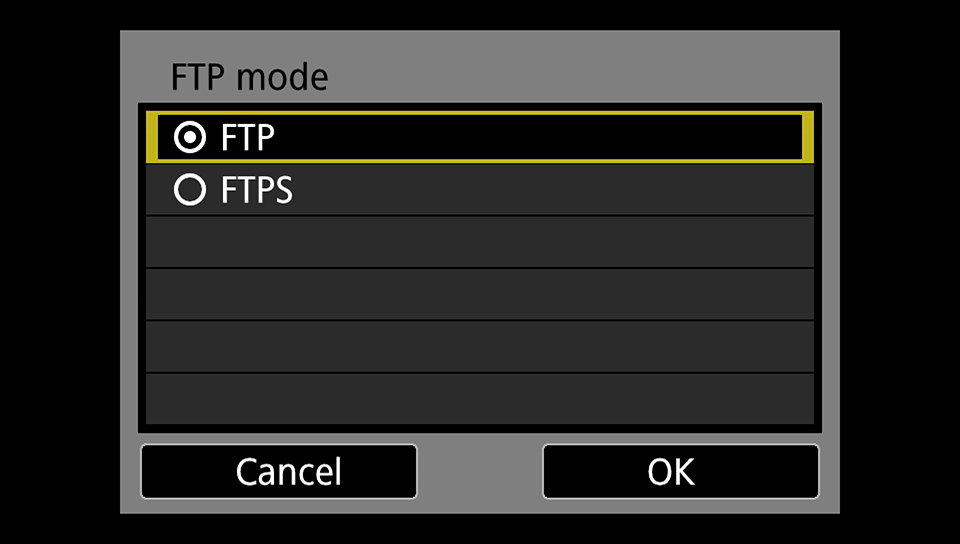
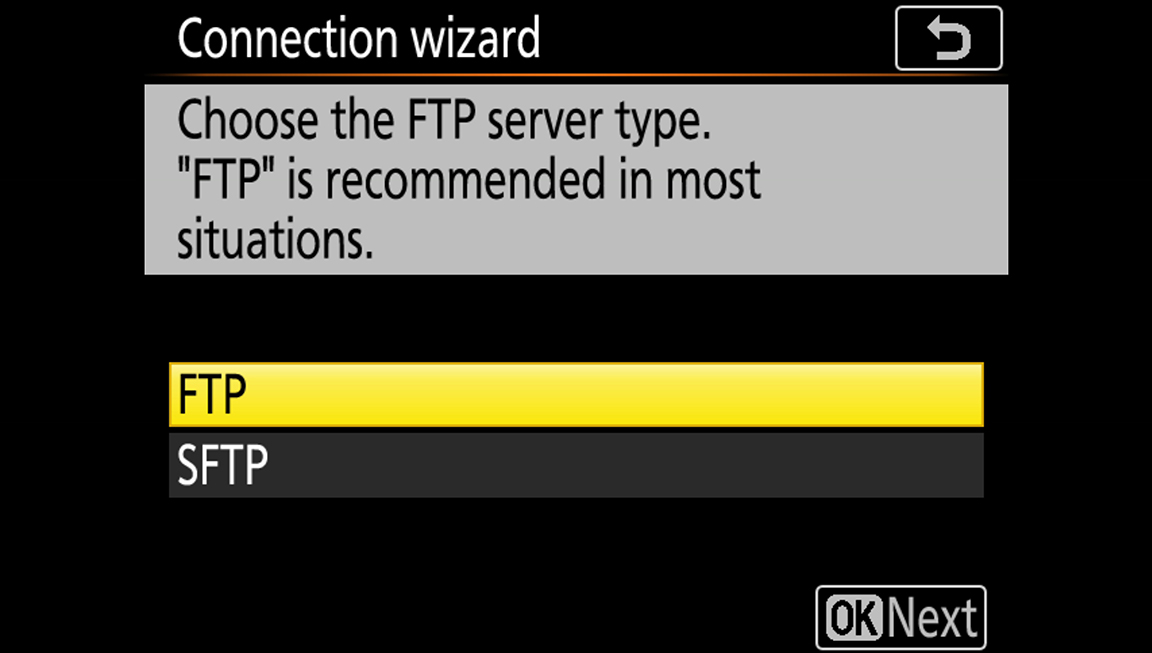
- On the next screen, click "FTP".
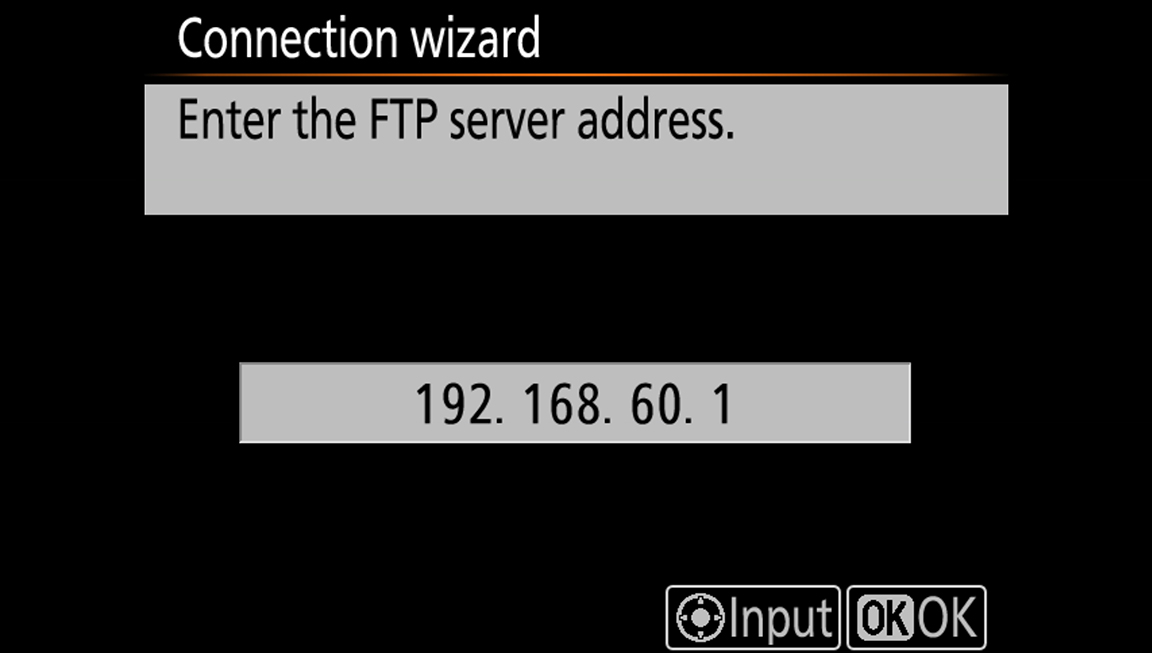
Enter the FTP server accost exactly as shown : 192.168.threescore.1
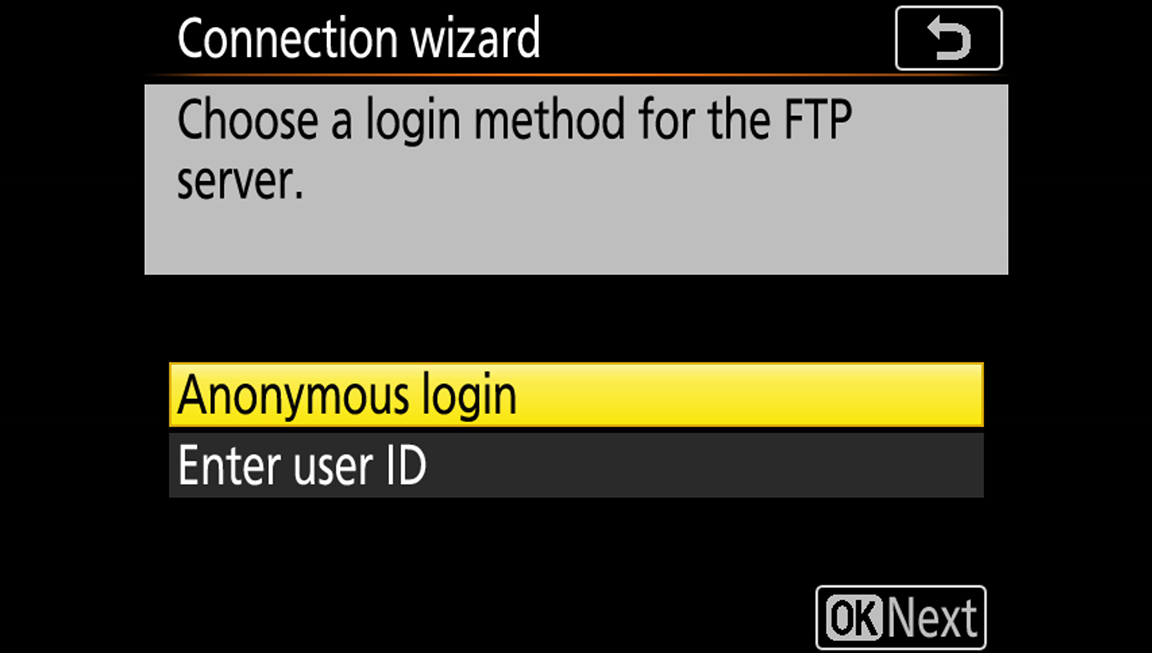
Click "Anonymous login" for the FTP server login method.
- Click "Enter folder name".
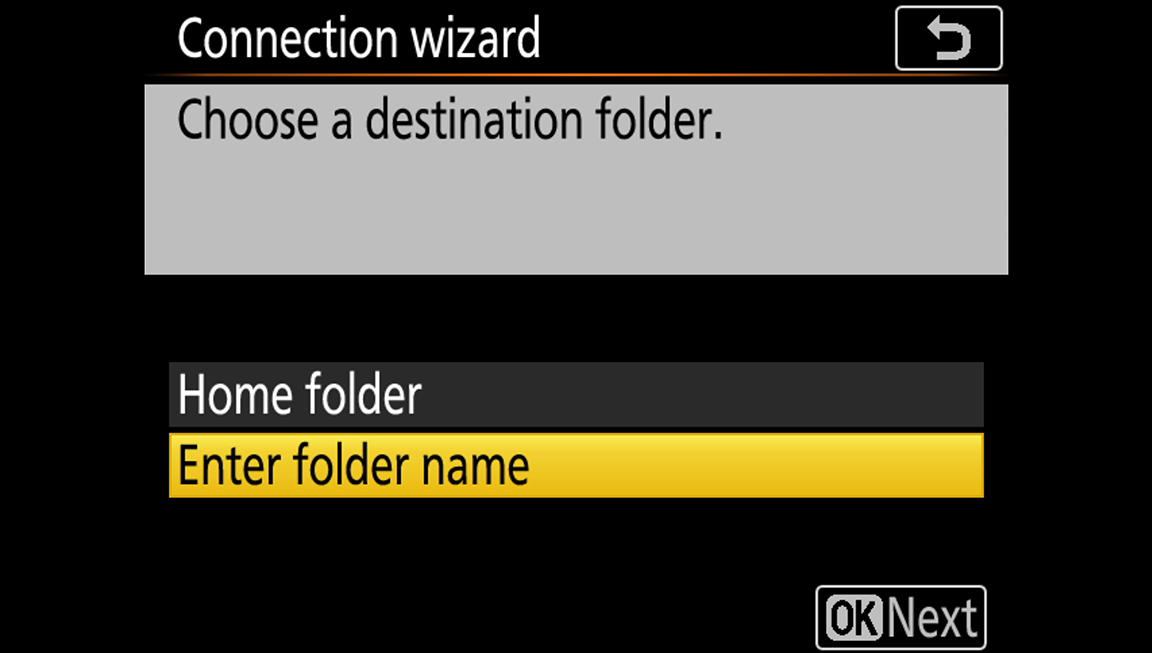
Recall the new folder you created in stride four of the setup instructions for your My Passport Wireless bulldoze.
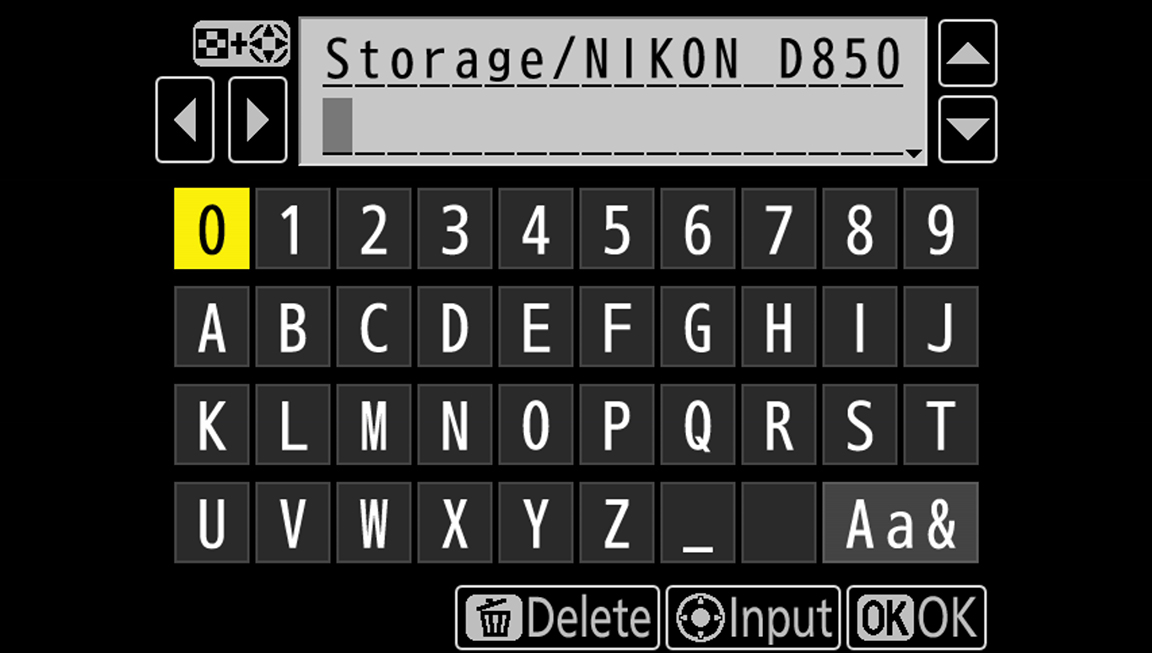
Type in Storage/ and then that folder name exactly as you typed information technology when creating the folder in the My Cloud app.
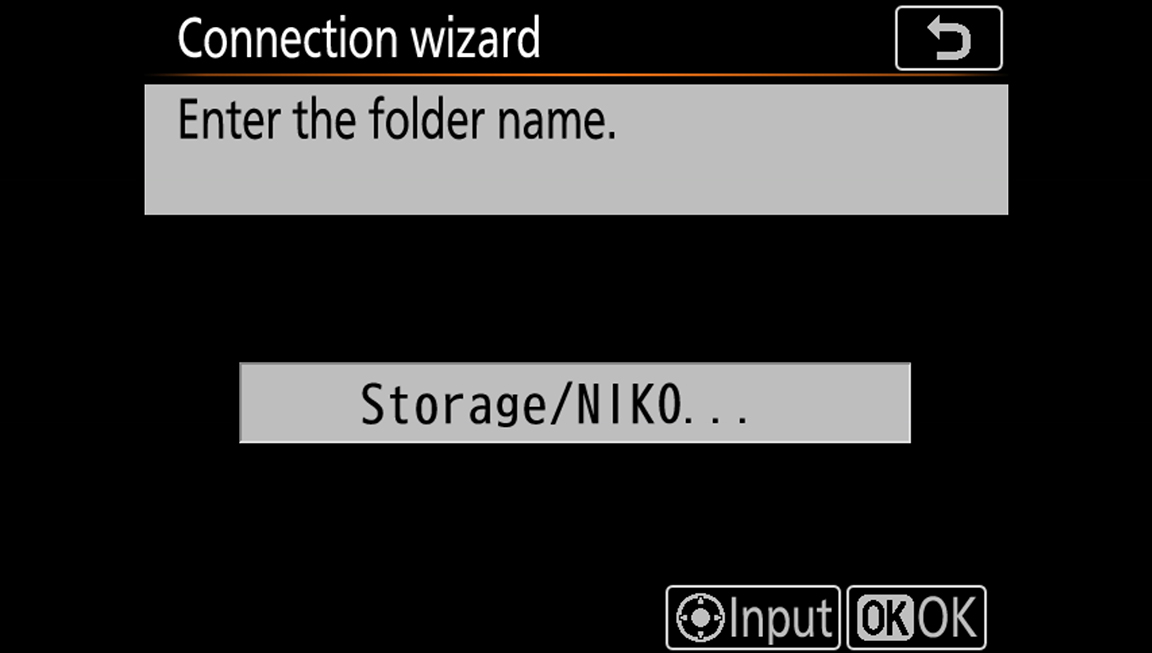
Any mis-typed or omitted characters hither will consequence in errors that volition crusade the wireless tethering experience to fail. Because we named our folder "NIKON D850" before, we will type in Storage/NIKON D850
After clicking "OK", the confirmation screen may truncate your folder name. As long as you entered it correctly earlier, this truncation volition not affect your experience.
- If you completed all steps in a higher place correctly, y'all will be greeted with the post-obit screen. Click "Connect and exit wizard."
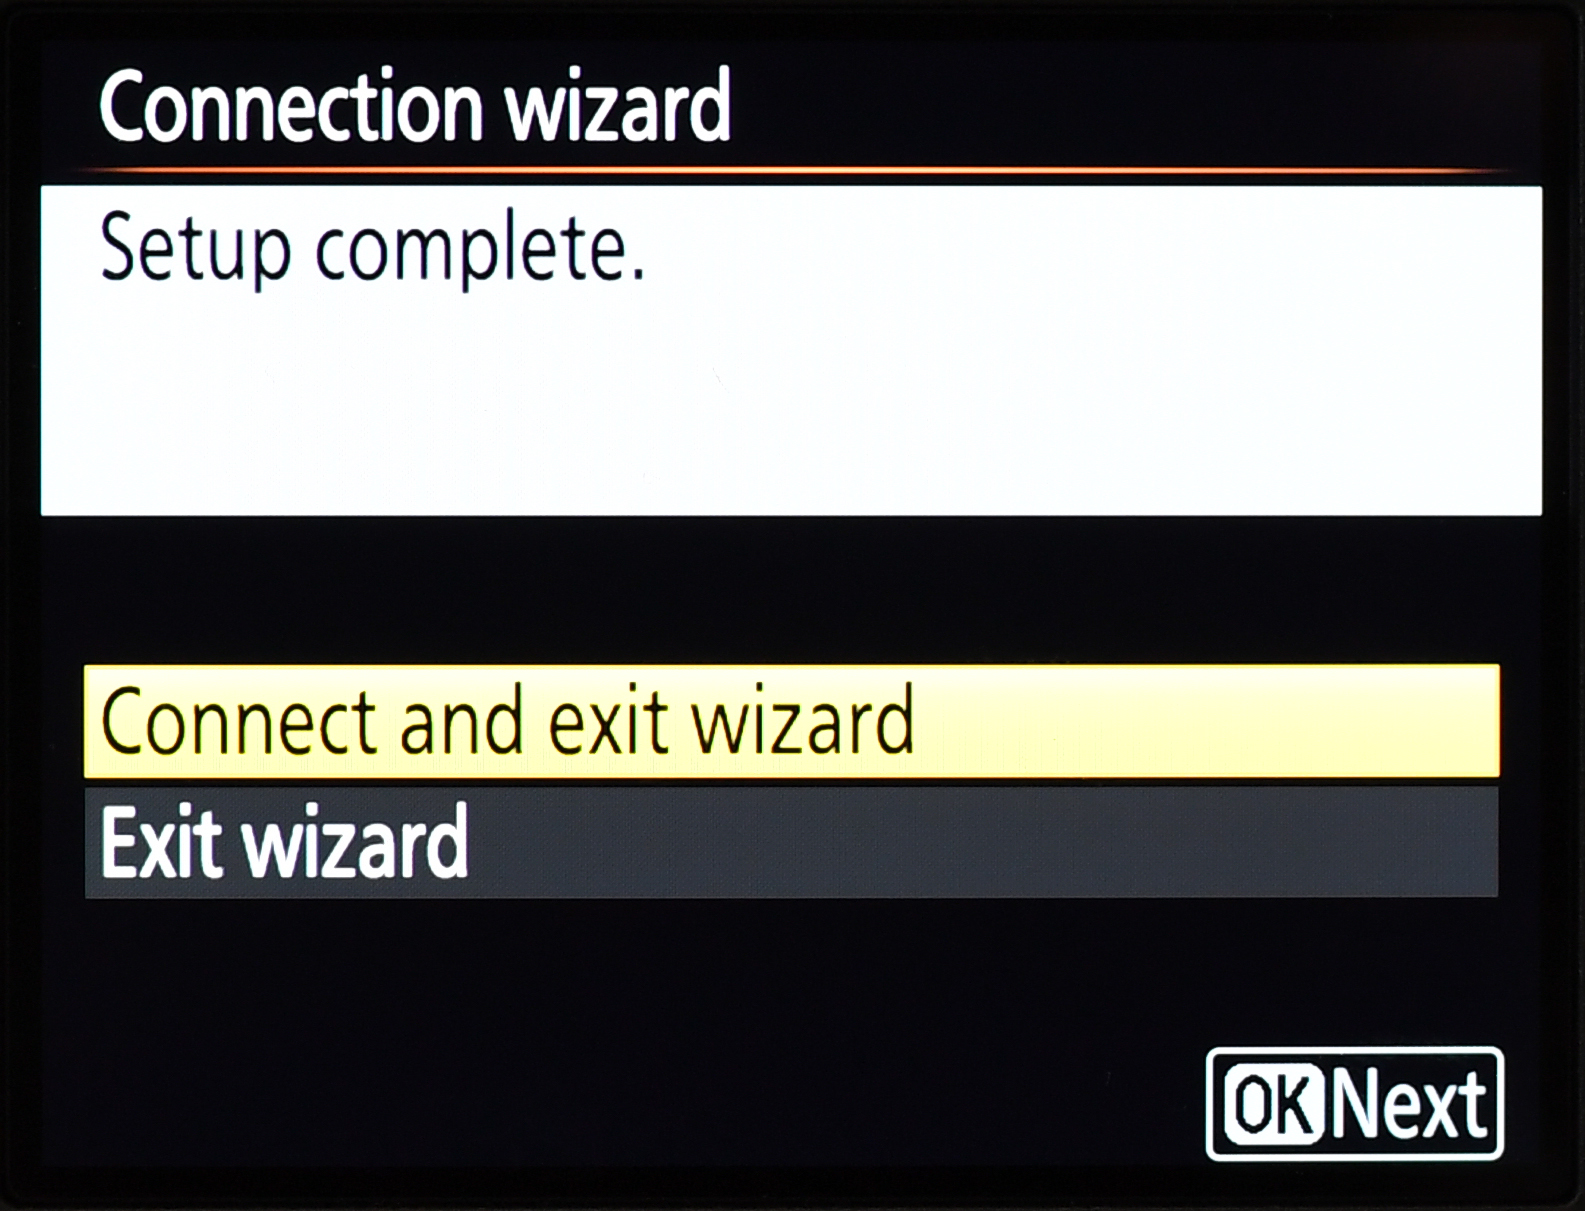
- On the following screen, you should run across the proper noun of your network profile (from step 4 of the Nikon setup) in green highlight, too equally information on bespeak strength and battery life remaining in your wireless adapter.
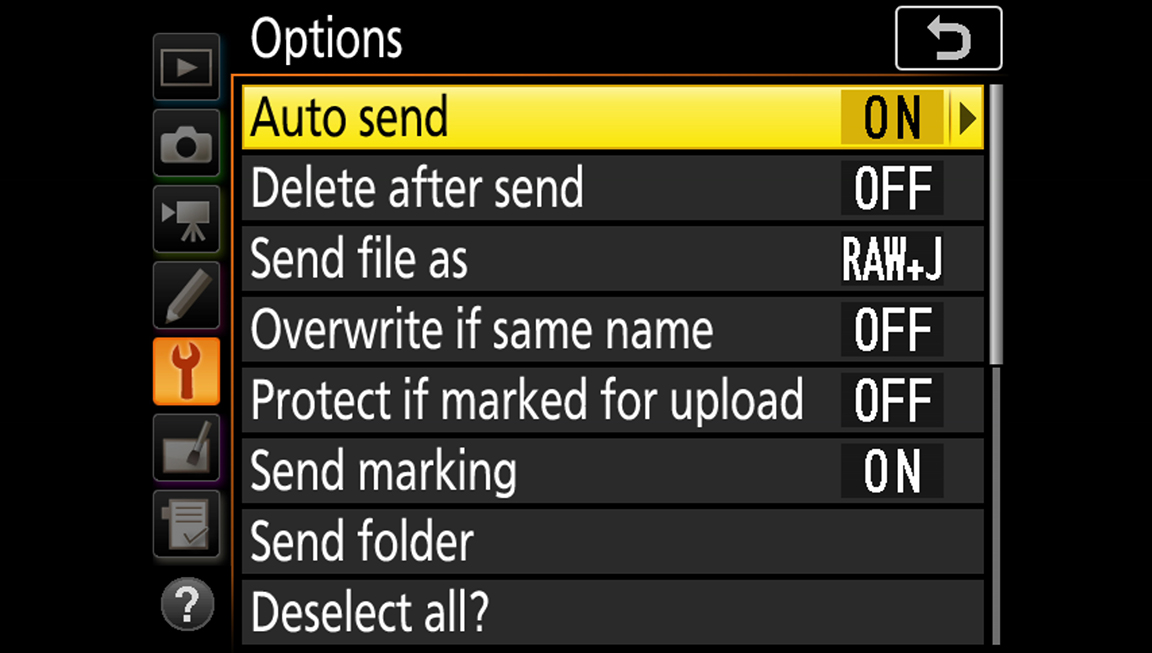
Click on "Options."
- We like to set "Auto transport" to ON. Equally yous shoot photos on your Nikon camera, this setting will automatically send those images from the memory card to your My Passport Wireless.
Note that there is also an option here to "Delete afterwards send." This setting volition delete the epitome from your carte subsequently it is sent to the My Passport Wireless. While this will help preserve space on your retentivity cards, we recommend keeping this setting turned to "OFF" as nosotros ever prefer to have a fill-in versus a single copy of our work when we are in the field.
"Transport marking" will add metadata to the image file of the appointment/time of upload to the My Passport Wireless. It tin can exist prepare OFF or ON, without impacting the overall experience.
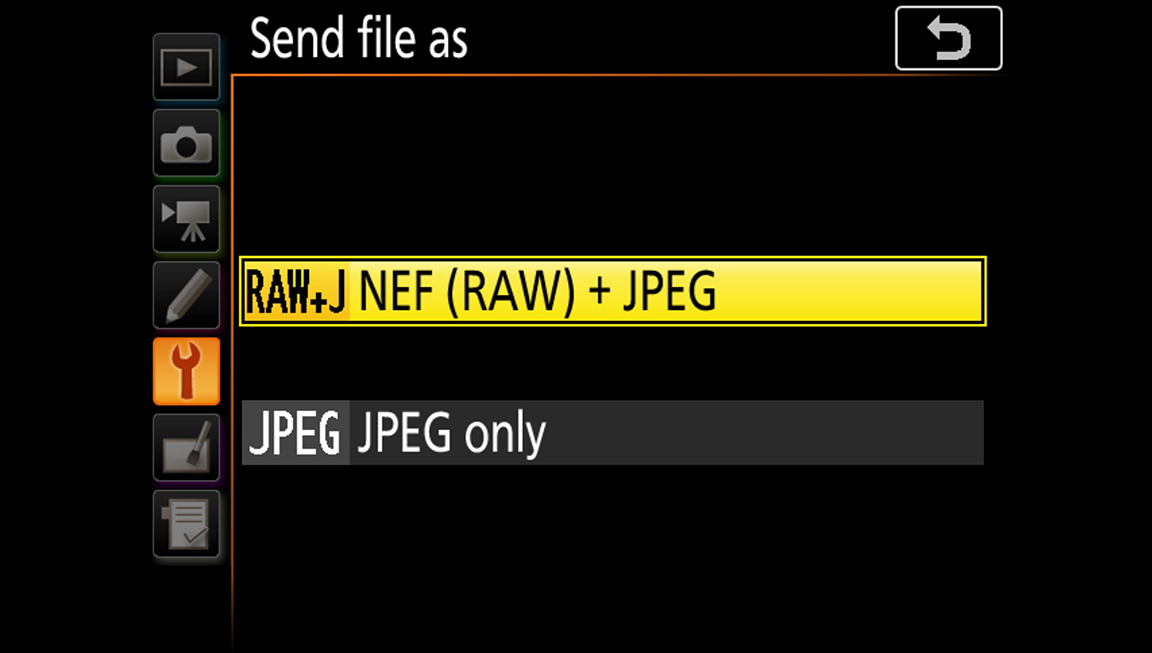
In "Ship file as," we recommend the choice best suited for your utilise case. For easy, card-gratuitous backups as yous shoot, nosotros recommend "RAW+J." Notation that, because this will send more information in each transmission, it may deplete the battery life of your camera and/or wireless adapter and My Passport Wireless more quickly.
If you are shooting rapid succession burst mode and are looking to utilize this feature for quick, mobile-ready total screen previews of your composition, then "JPEG but" may exist sufficient of you.
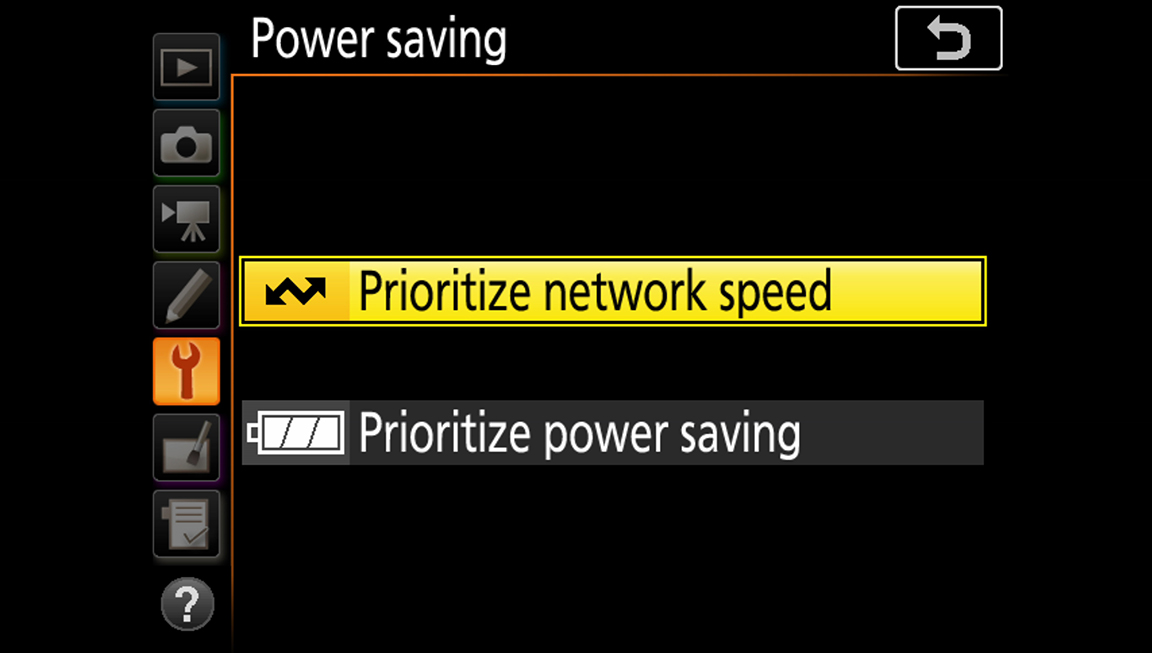
Scrolling further in the "Options" menu reveals additional settings.
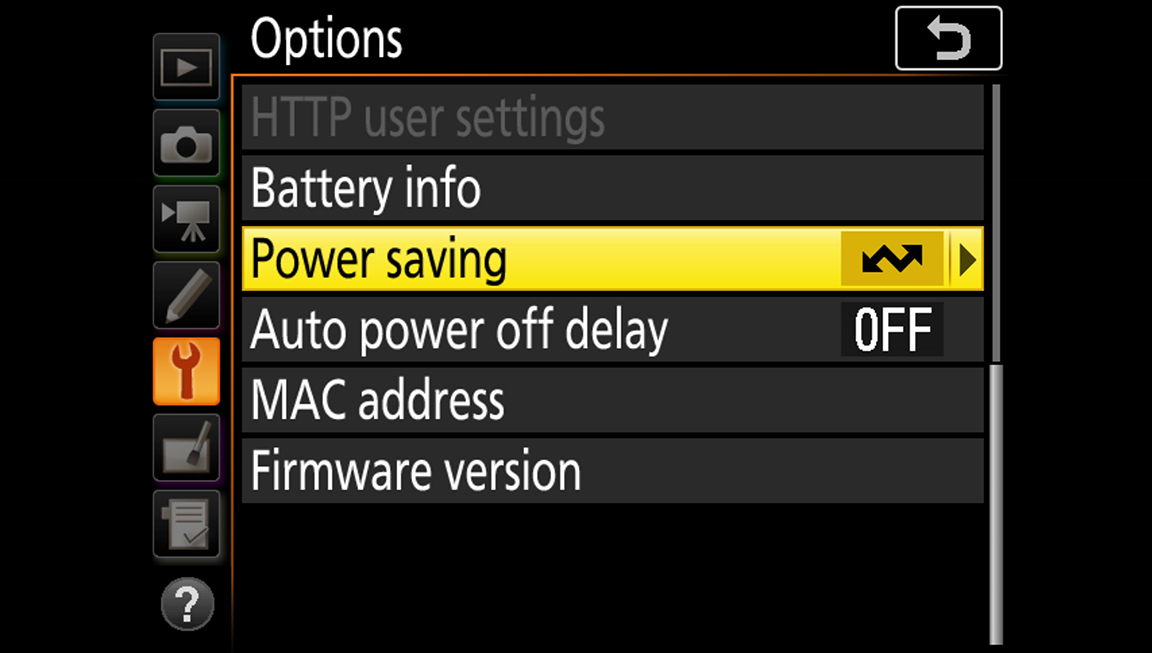
On "Power saving," for the highest-speed performance, we recommend "Prioritize network speed." If long battery life is disquisitional and slower transfer speeds are acceptable (such as during fourth dimension lapse photography, capturing in unmarried shot mode, etc.), and so "Prioritize power saving" may aid extend the bombardment life of the batteries in your photographic camera and/or wireless adapter.
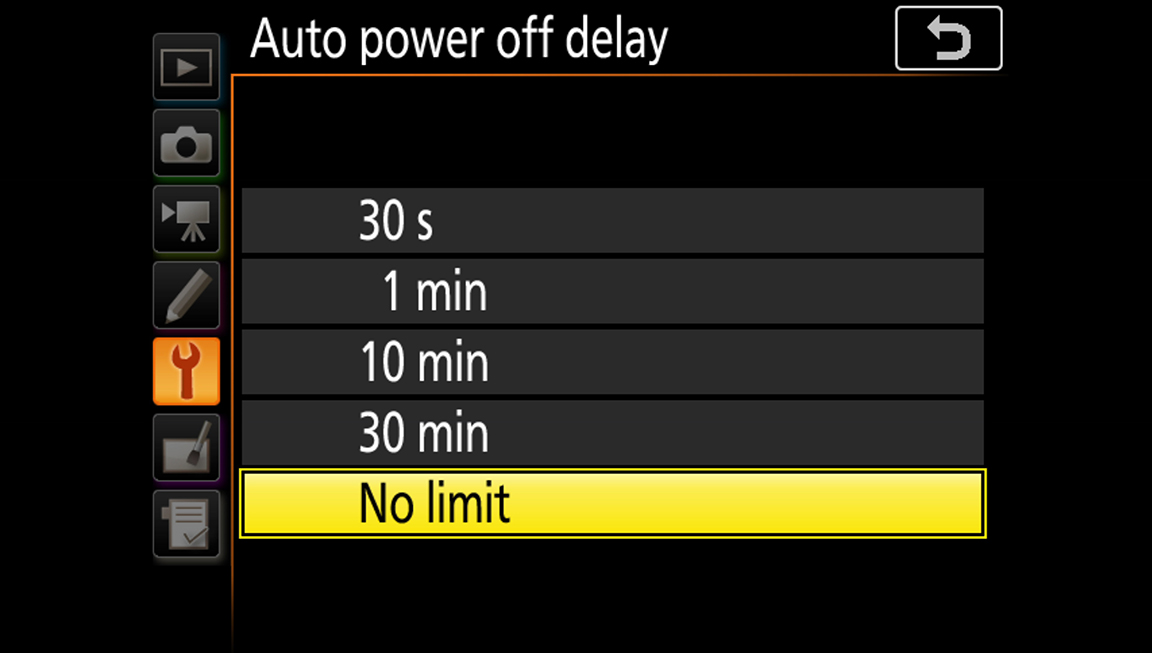
We also set "Auto power off filibuster" to "No limit" to ensure the camera and wireless connection are e'er fix.
- As you take photos while wirelessly tethered to a My Passport Wireless, you may click dorsum to the "Network" menu to now see transfer condition, including name of file currently being sent and number of photos remaining to exist sent (in the lower left corner). In our experience, the timer in the heart tends to over-estimate the full time needed to transmit all photos in the backlog.
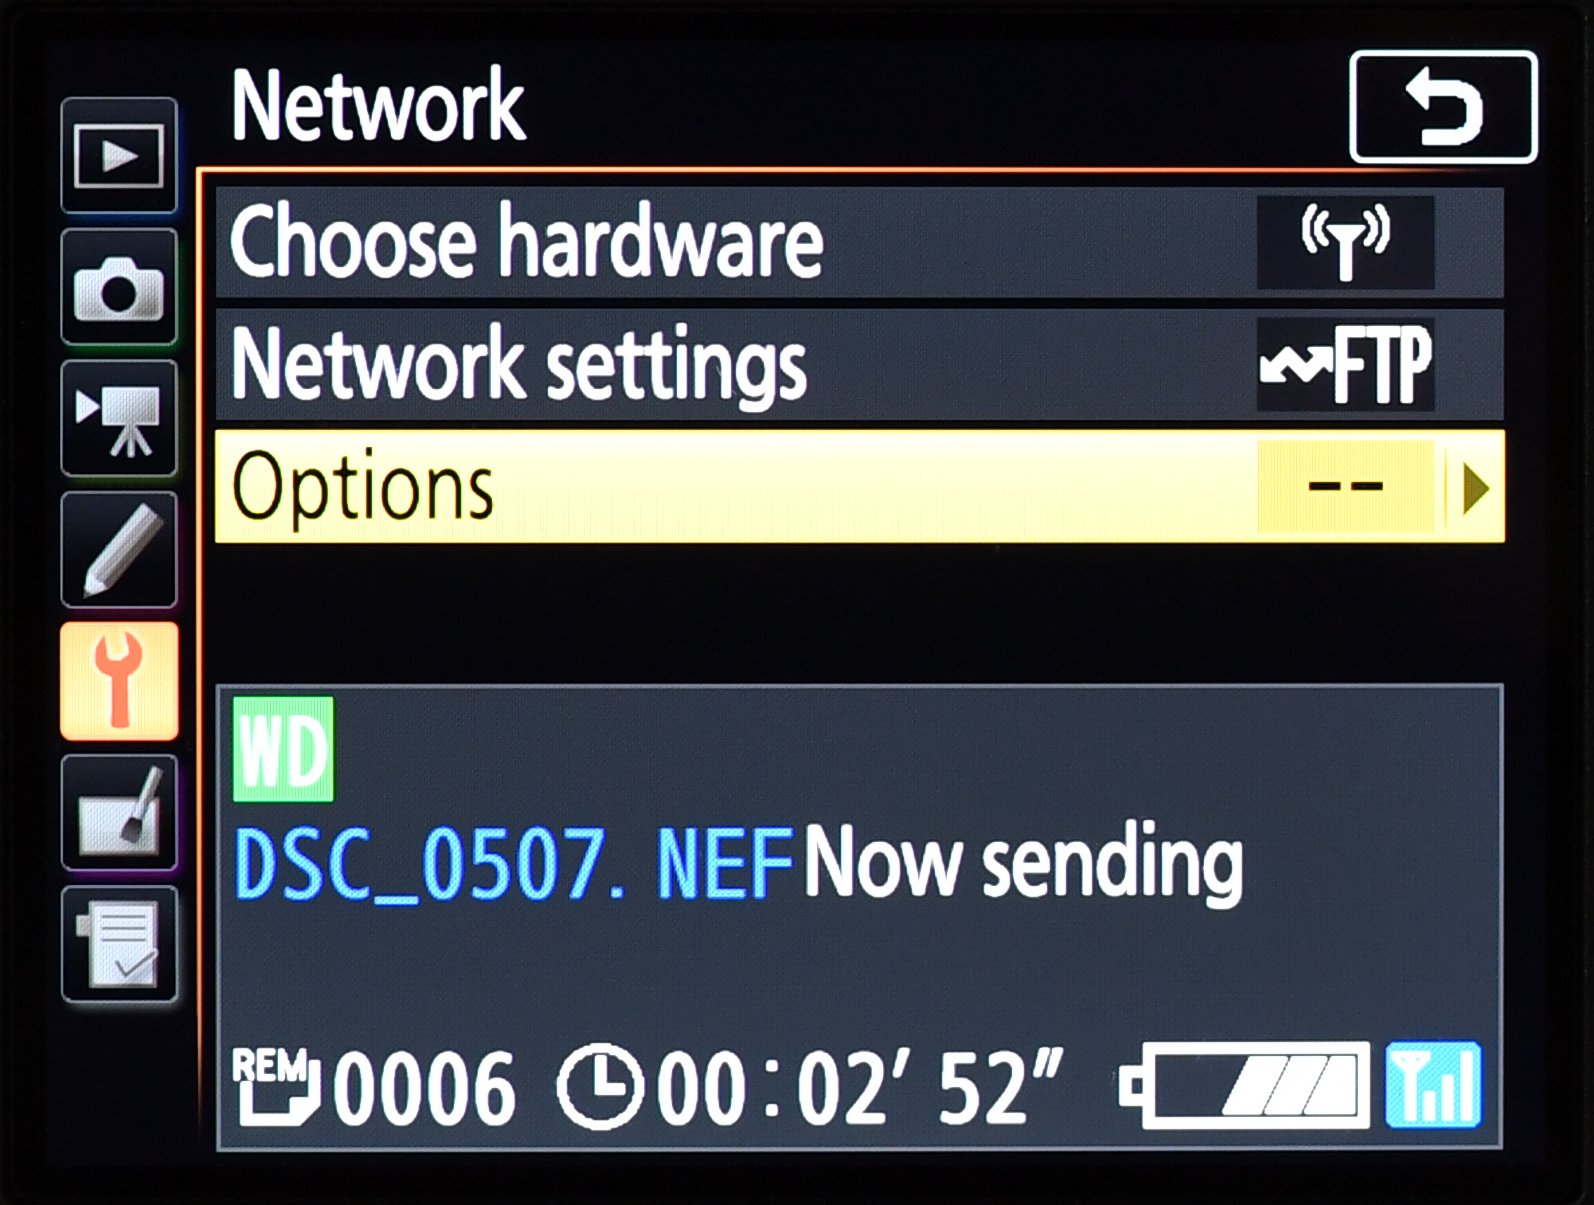
If connection is lost betwixt the Nikon camera and the My Passport Wireless (due to leaving the wireless range or a shutdown of the drive), the Nikon camera will display the name of your profile (from step four) in red and will show a "Wireless error" message in this department. However, the backlog volition be maintained; only plow the Nikon camera off and then dorsum on and re-power and/or bring the My Passport Wireless back in range of the Nikon camera, and they will reconnect automatically. The Nikon volition so resume transmission of any remaining images in the excess, also every bit new images that you shoot from so onwards. - Connect to your My Passport Wireless bulldoze'due south Wi-Fi network from your iPhone, iPad, or Android device, and use WD'south free My Cloud app to admission and preview your RAW and JPEG images anywhere. No internet connection or laptop needed. Click here to download for iPhone/iPad or here for Android.
One-time manual setup instructions
If you prefer to setup Nikon camera and WT accompaniment with My Passport Wireless SSD manually (and non via the Nikon wizard), follow these steps:
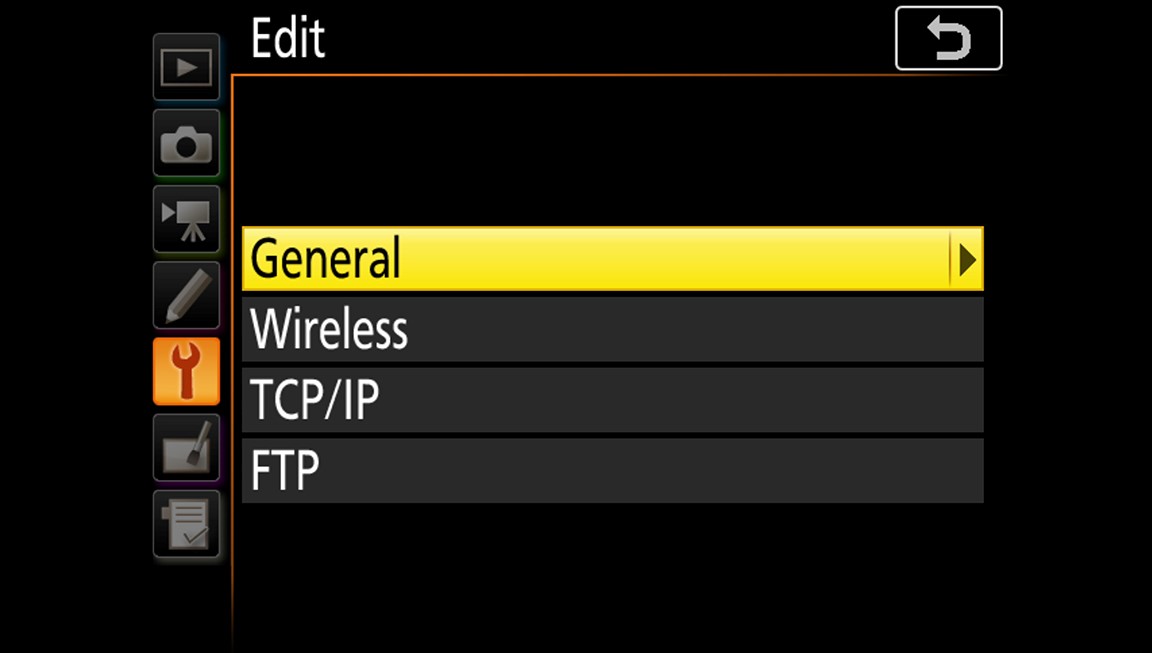
- At the beginning of the manual setup process, at that place volition be iv items to configure: General, Wireless, TCP/IP, and FTP.
- In "General," yous may alter the profile name. Nosotros set "Password protection" to be "OFF."
- In "Wireless," enter the network name exactly as it appears in your smartphone or tablet's "Wi-Fi" settings. Exist aware of instance sensitivity and spaces. (For this step, you may wish to change the Wi-Fi SSID of the My Passport Wireless drive to something shorter – please refer to the user manual for instructions)
Set communication manner to "Infrastructure."
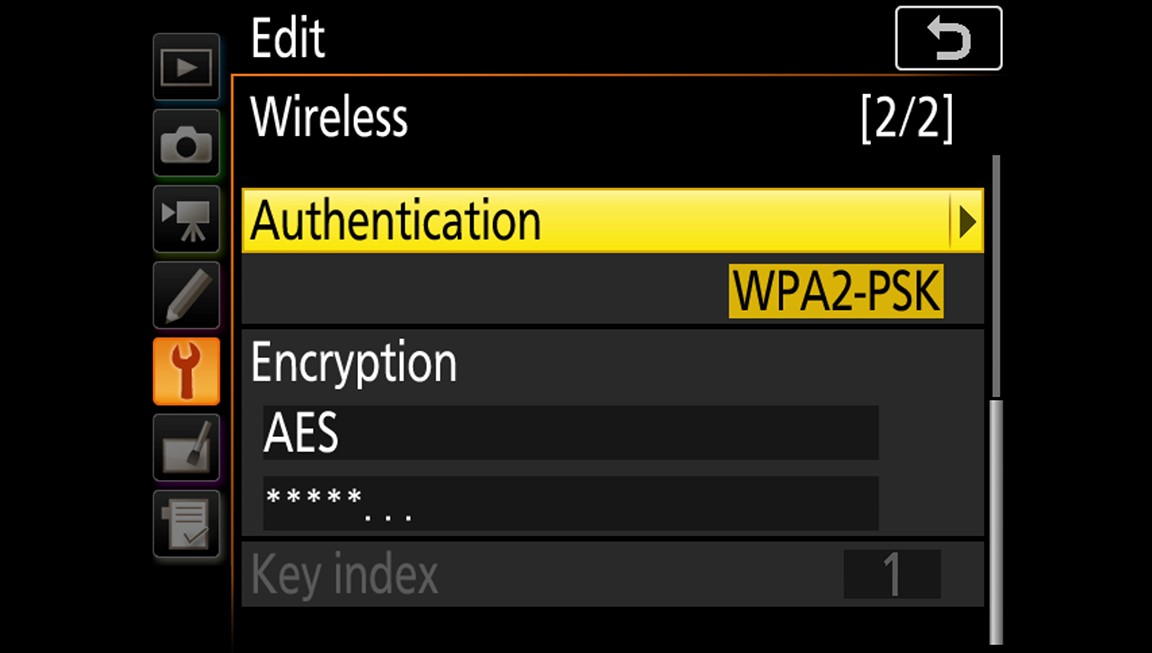
Set "Authentication" to "WPA2-PSK", and for the encryption primal, enter the countersign for the Wi-Fi network created by the My Passport Wireless. (The default password is found on the sticker that is adhered to the top of the drive out of the box, or in the Quick Start Guide)
- In TCP/IP, ready "Obtain automatically" to "ON".
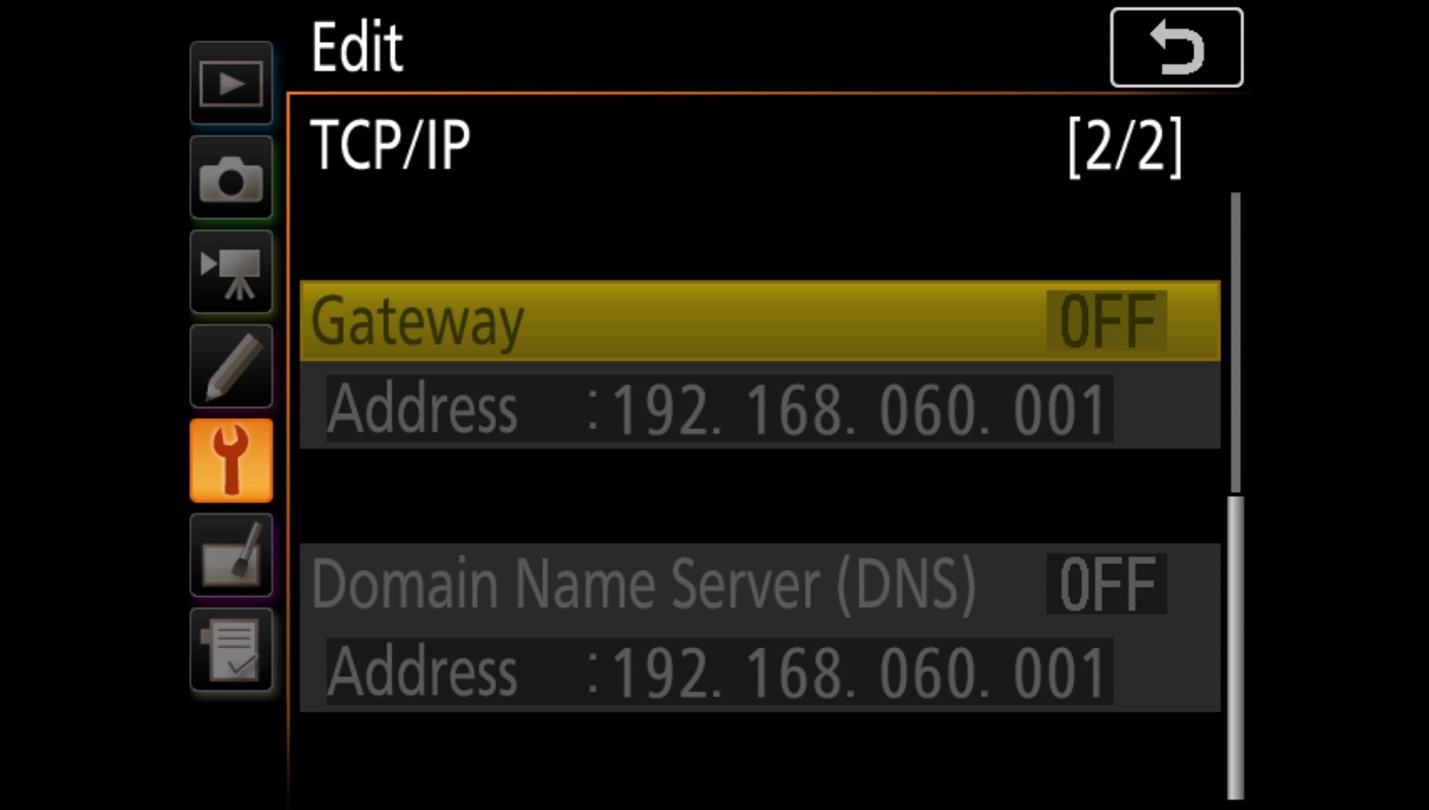
- In "FTP," enter 192.168.threescore.1 for the "Address." For the "Folder," enter the proper noun of the binder you created when setting up the My Cloud app. Exit "Port" as the default "21."
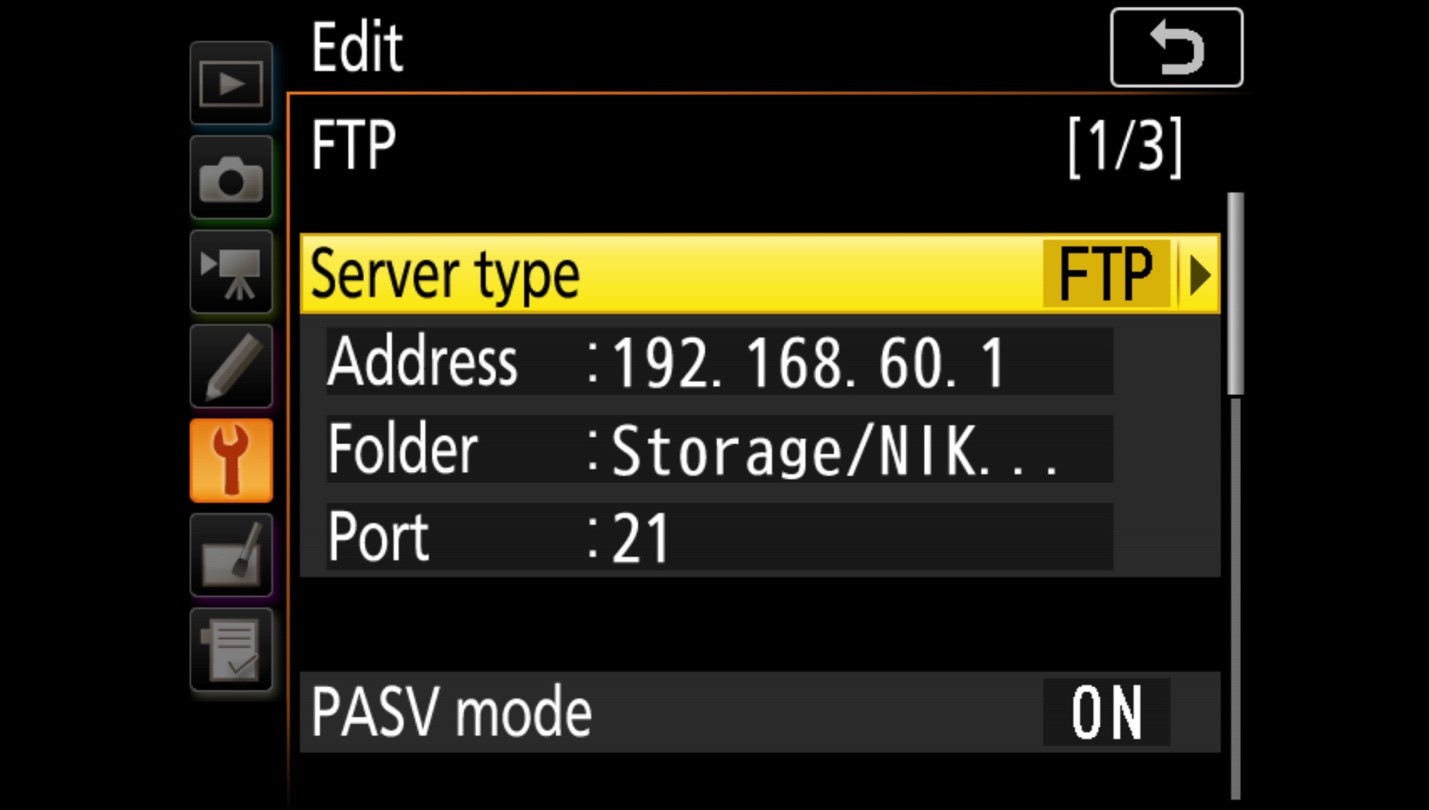
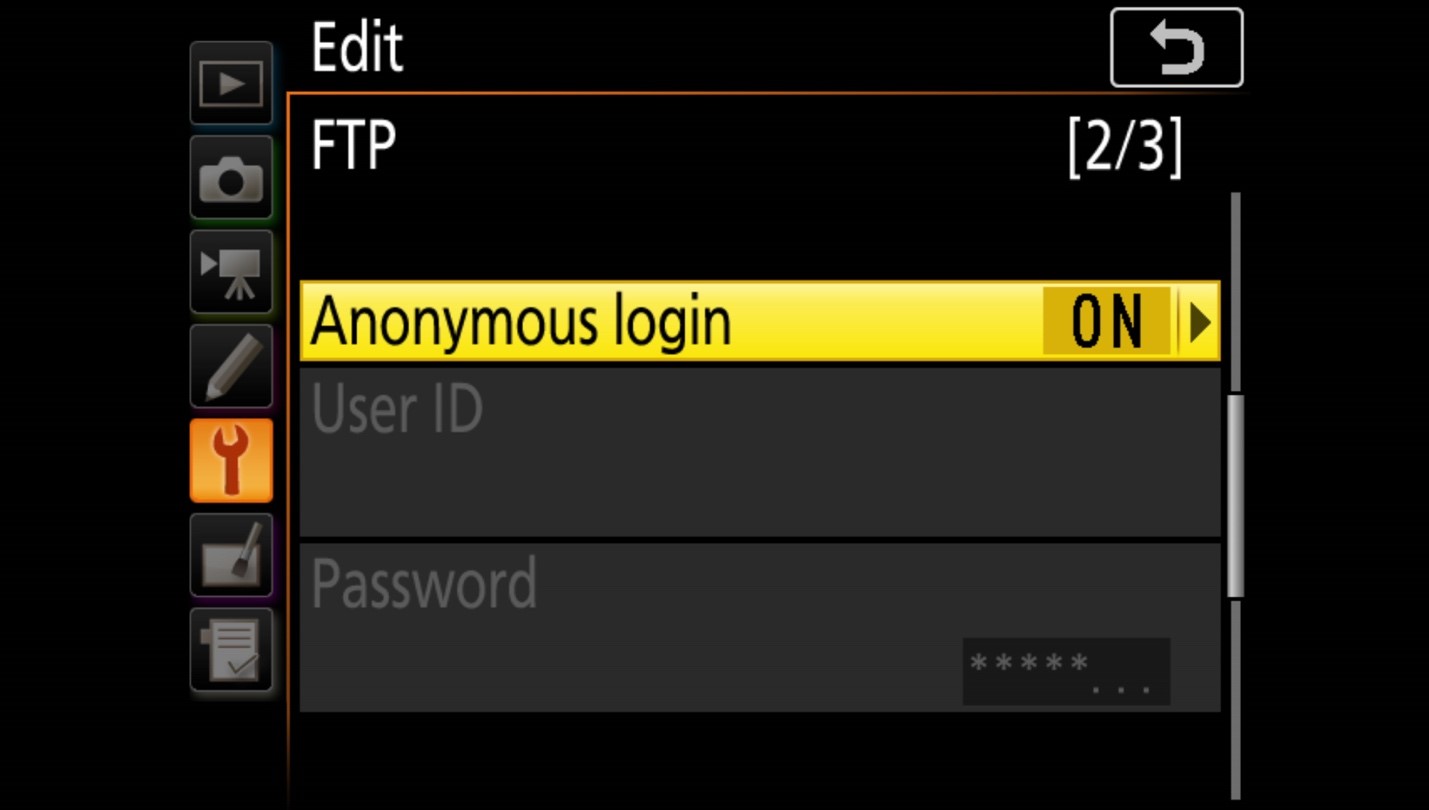
"Anonymous login" should be set to "ON".
"Proxy server" should be set to "OFF."

- Tap the back arrow twice to return to the original screen.
- Push the card push and navigate to the Setup Carte (with an icon of a wrench).
-
Compatibile Nikon adapters
Nikon Wireless Transmitters Cameras Nikon WT-4A #25365 Nikon WT-5A #27046 Nikon WD-6A #27161 Nikon WD-7A #27173 D3 ✓ D3S ✓ D3X ✓ D4 ✓ ✓ D4S ✓ ✓ D5 ✓ ✓ D300 ✓ D300S ✓ D500 ✓ * ✓ D700 ✓ D750 ✓ ✓ * ✓ D7000 ✓ ✓ D7100 ✓ D7200 ✓ ✓ * ✓ D800 ✓ ✓ D800E ✓ ✓ D810 ✓ * ✓ D810A ✓ ✓ * ✓ D850 ✓ * ✓ *Requires UT-i Communication Unit adapter. (The WT-6 Wireless Transmitter plugs into the UT-1, and the UT-i plugs into the photographic camera.)
-
How to import multiple RAW images into Adobe Lightroom CC from My Passport Wireless SSD or Pro
- Ensure the WD My Cloud app is installed on your iPhone, iPad or iPod Bear on from the App Shop and y'all have performed the standard drive setup
- Install the Adobe Lightroom CC app on your iPhone, iPad or iPod Touch from the App Shop. Sign into your Adobe Creative Cloud account in the iOS Lightroom CC app on your mobile device. For more data on signing into Lightroom CC, click hither.
- Look in Settings > Wi-Fi on your iPhone, iPad or iPod Touch to wirelessly connect your mobile device to the Wi-Fi network of your My Passport Wireless Pro or SSD. Additional help tin be found in pace 3 in this brusque guide on our Back up site.
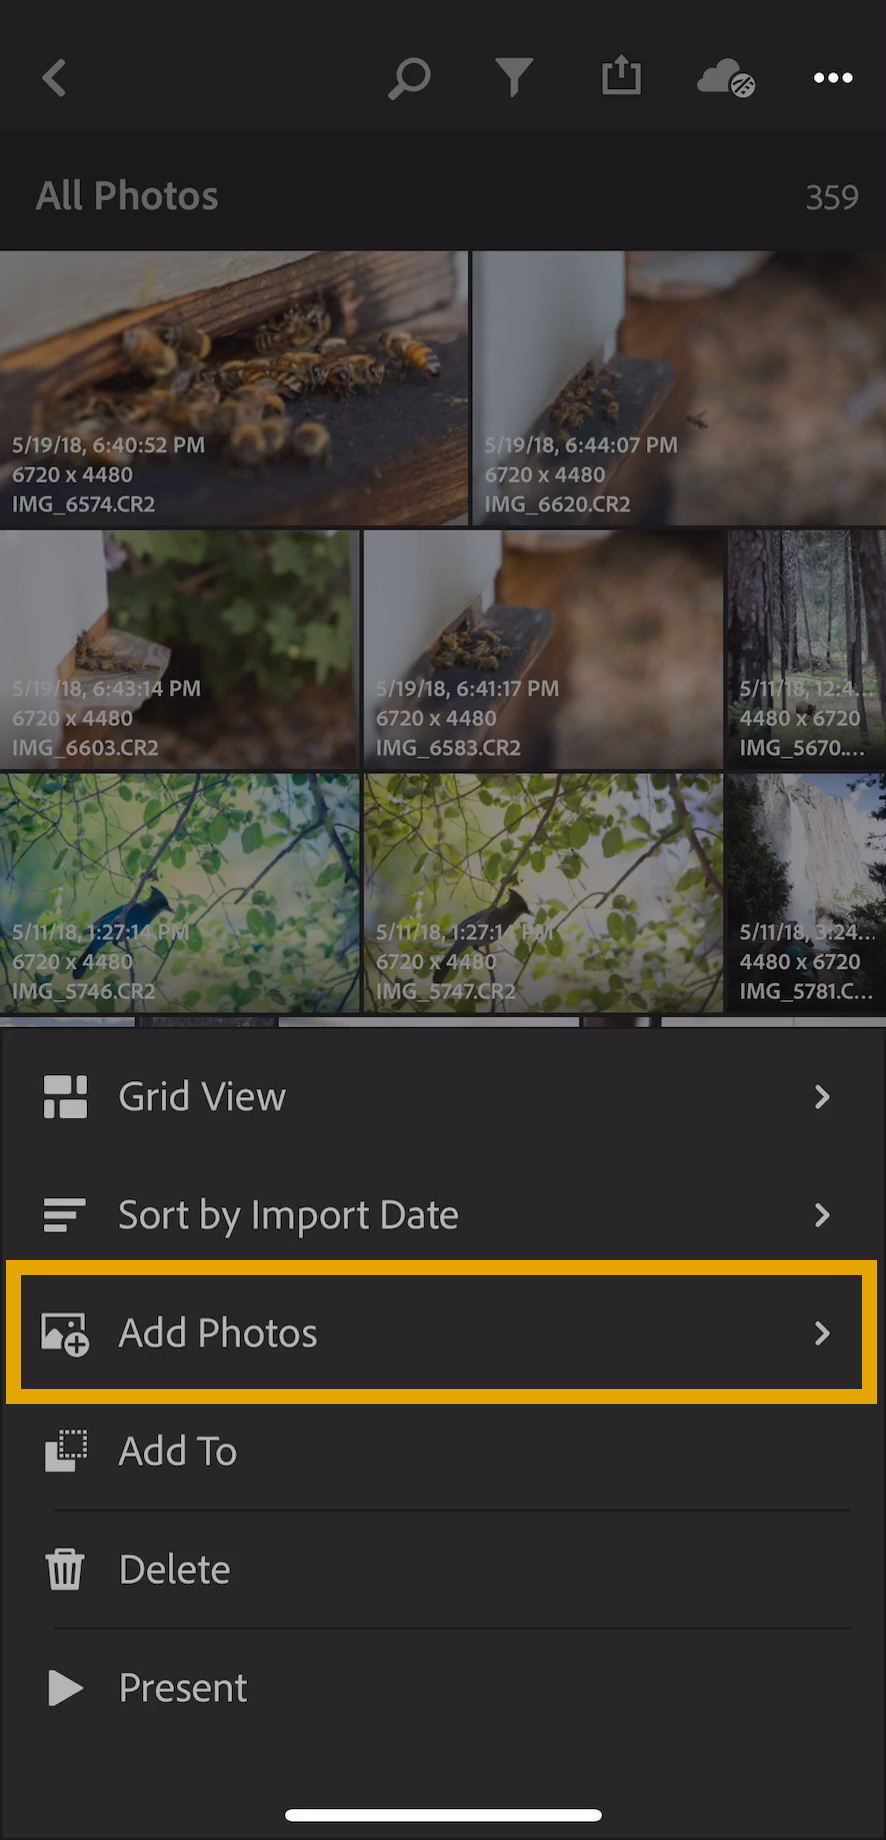
- Open up Lightroom CC on your iOS device, select an album (such equally "All Photos"), and tap on the 3 dots in the upper correct.
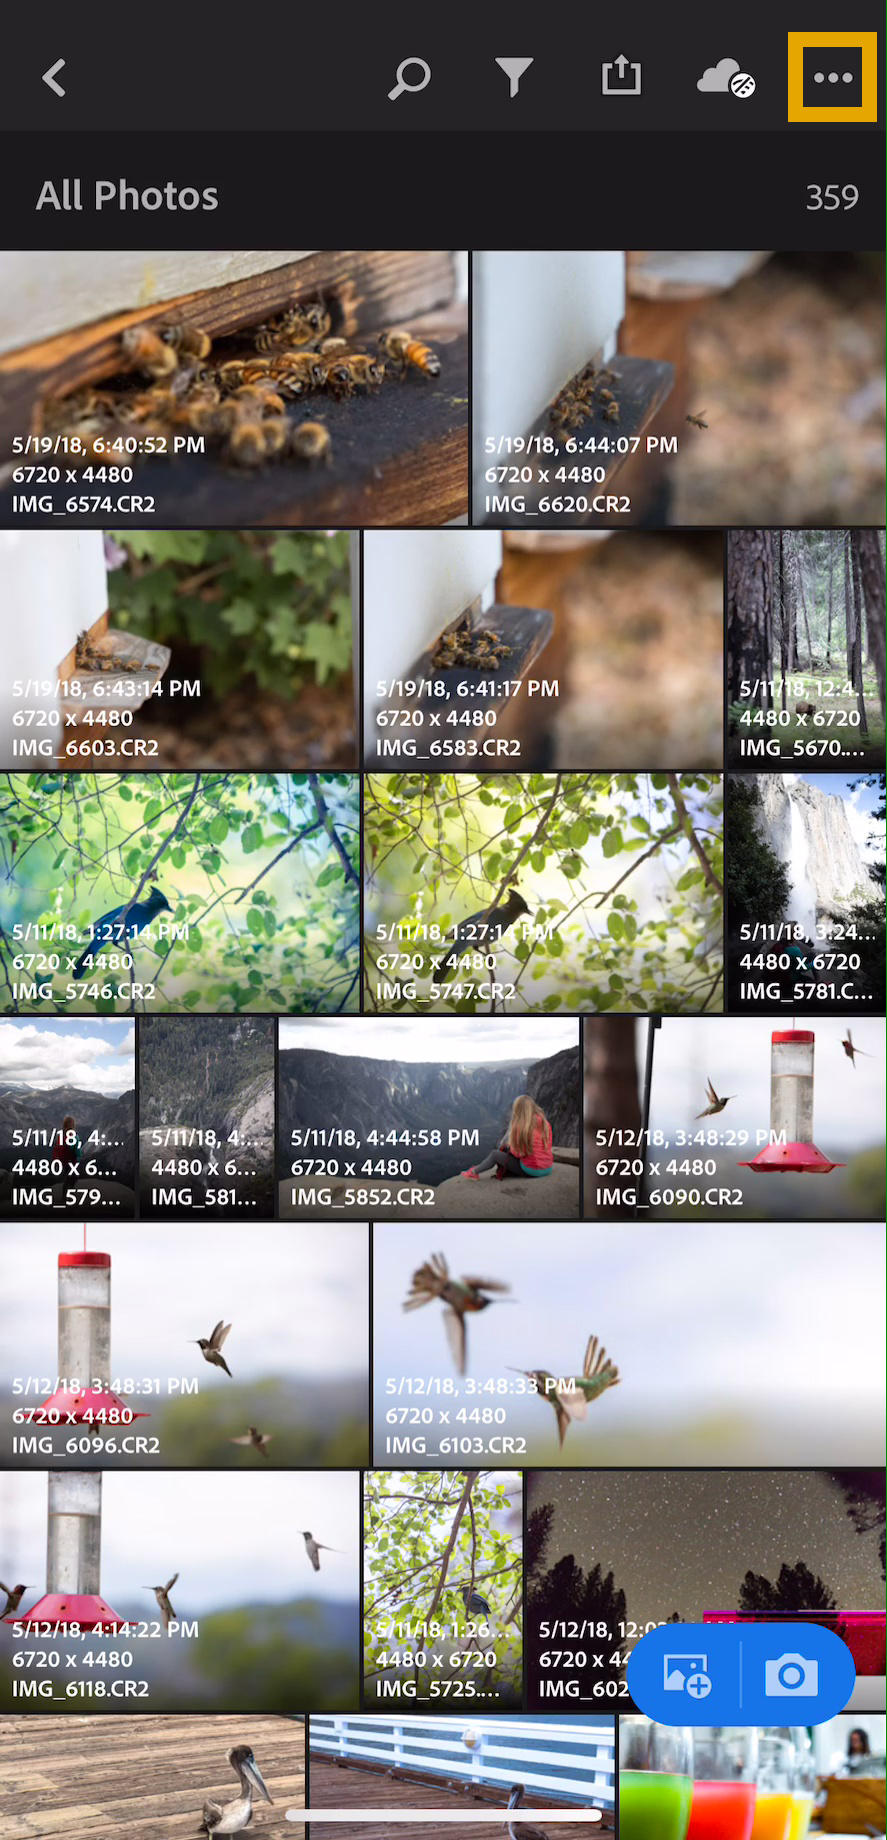
- Tap "Add Photos" and and so select "Files."
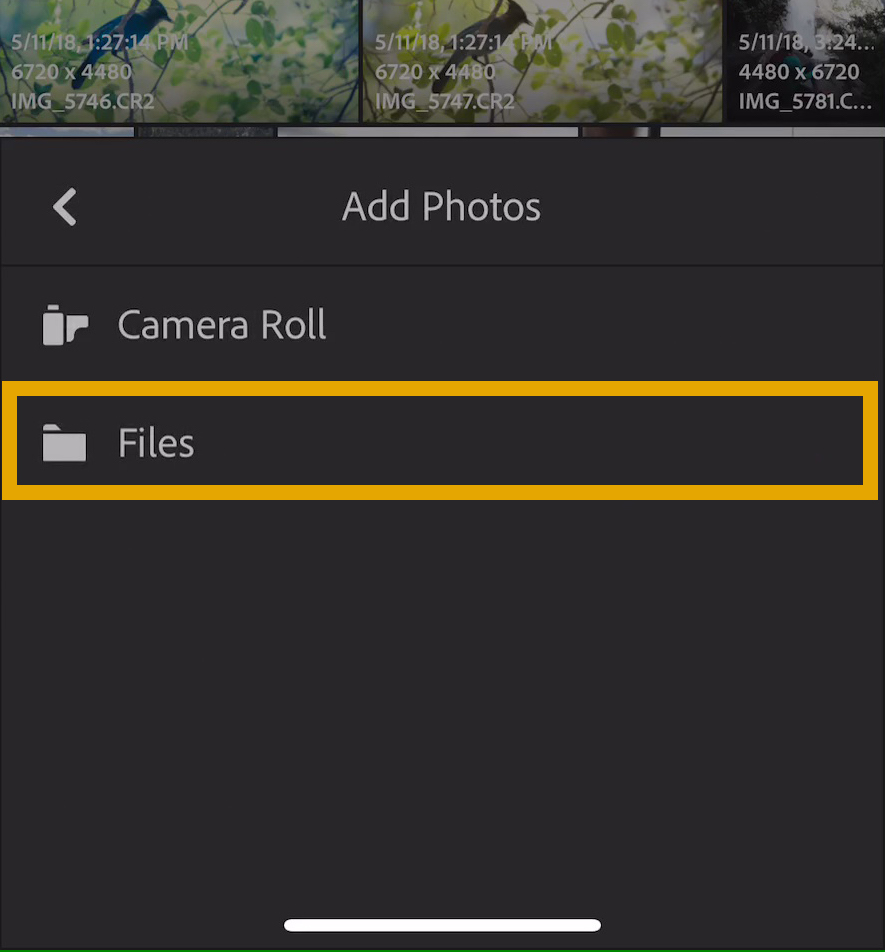
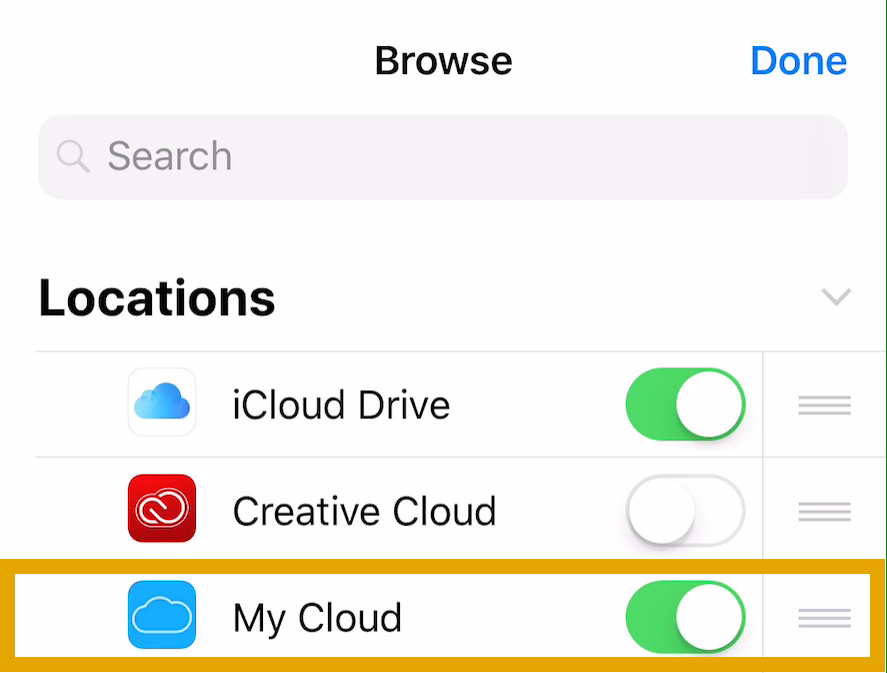
- If this is your outset time using the My Cloud app within Files, you lot may not encounter it in your list of Storage Locations. Tap "More Locations," so find and set the "My Deject" switch to the "On" position.
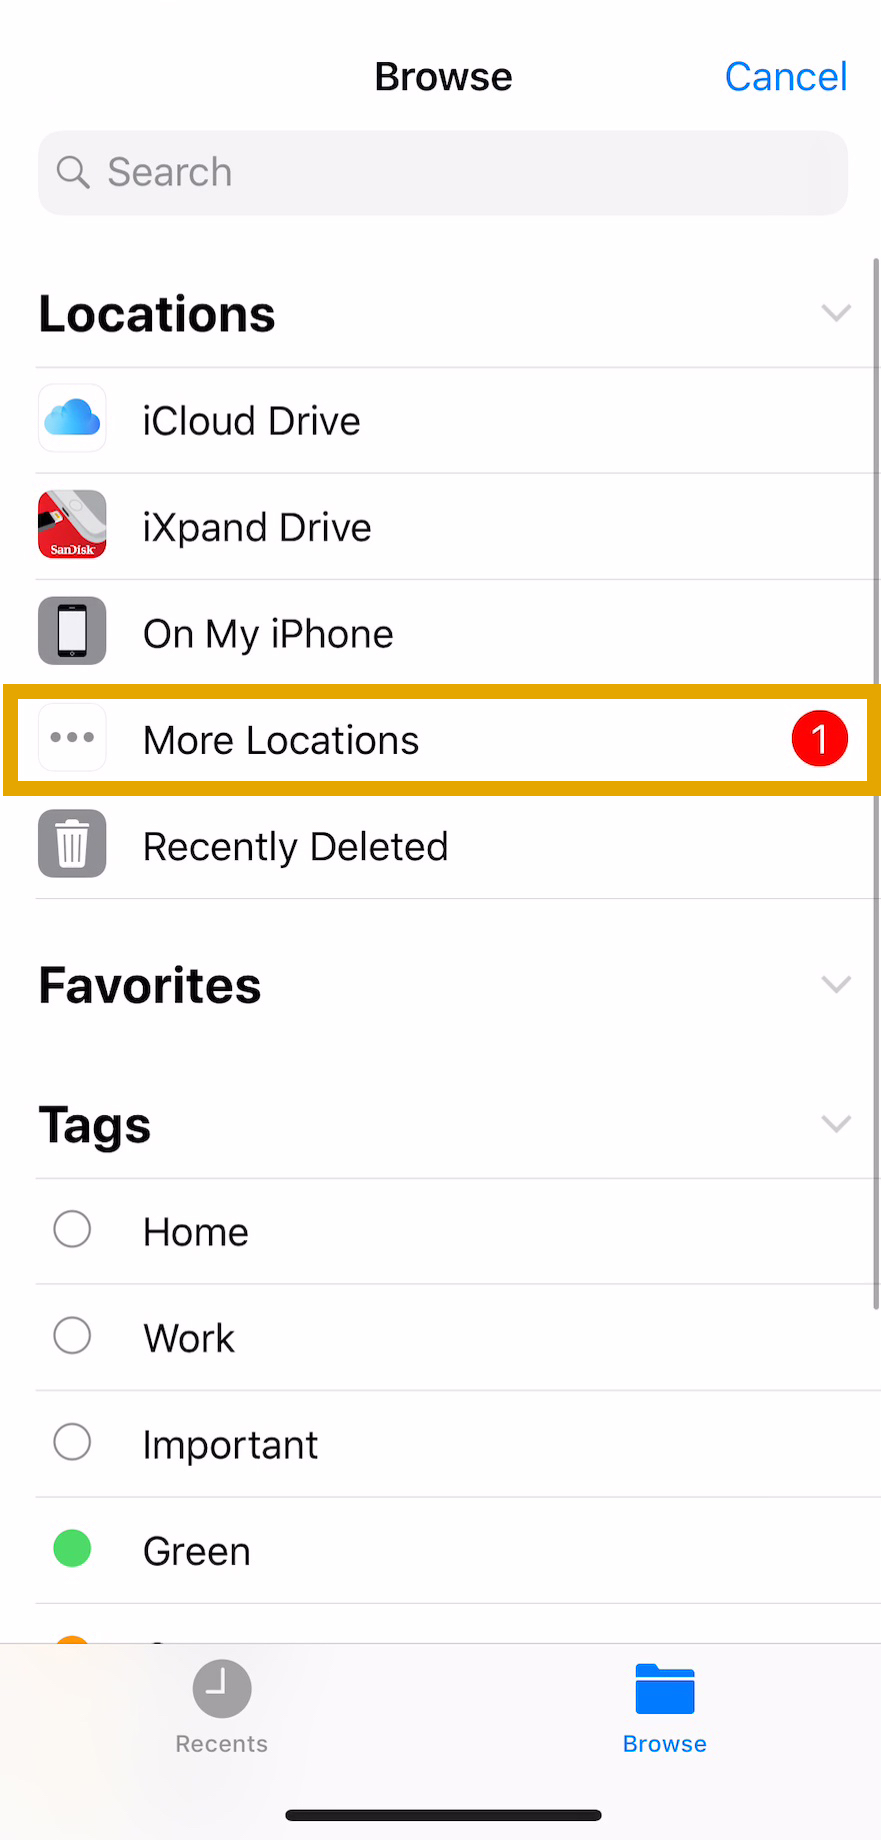
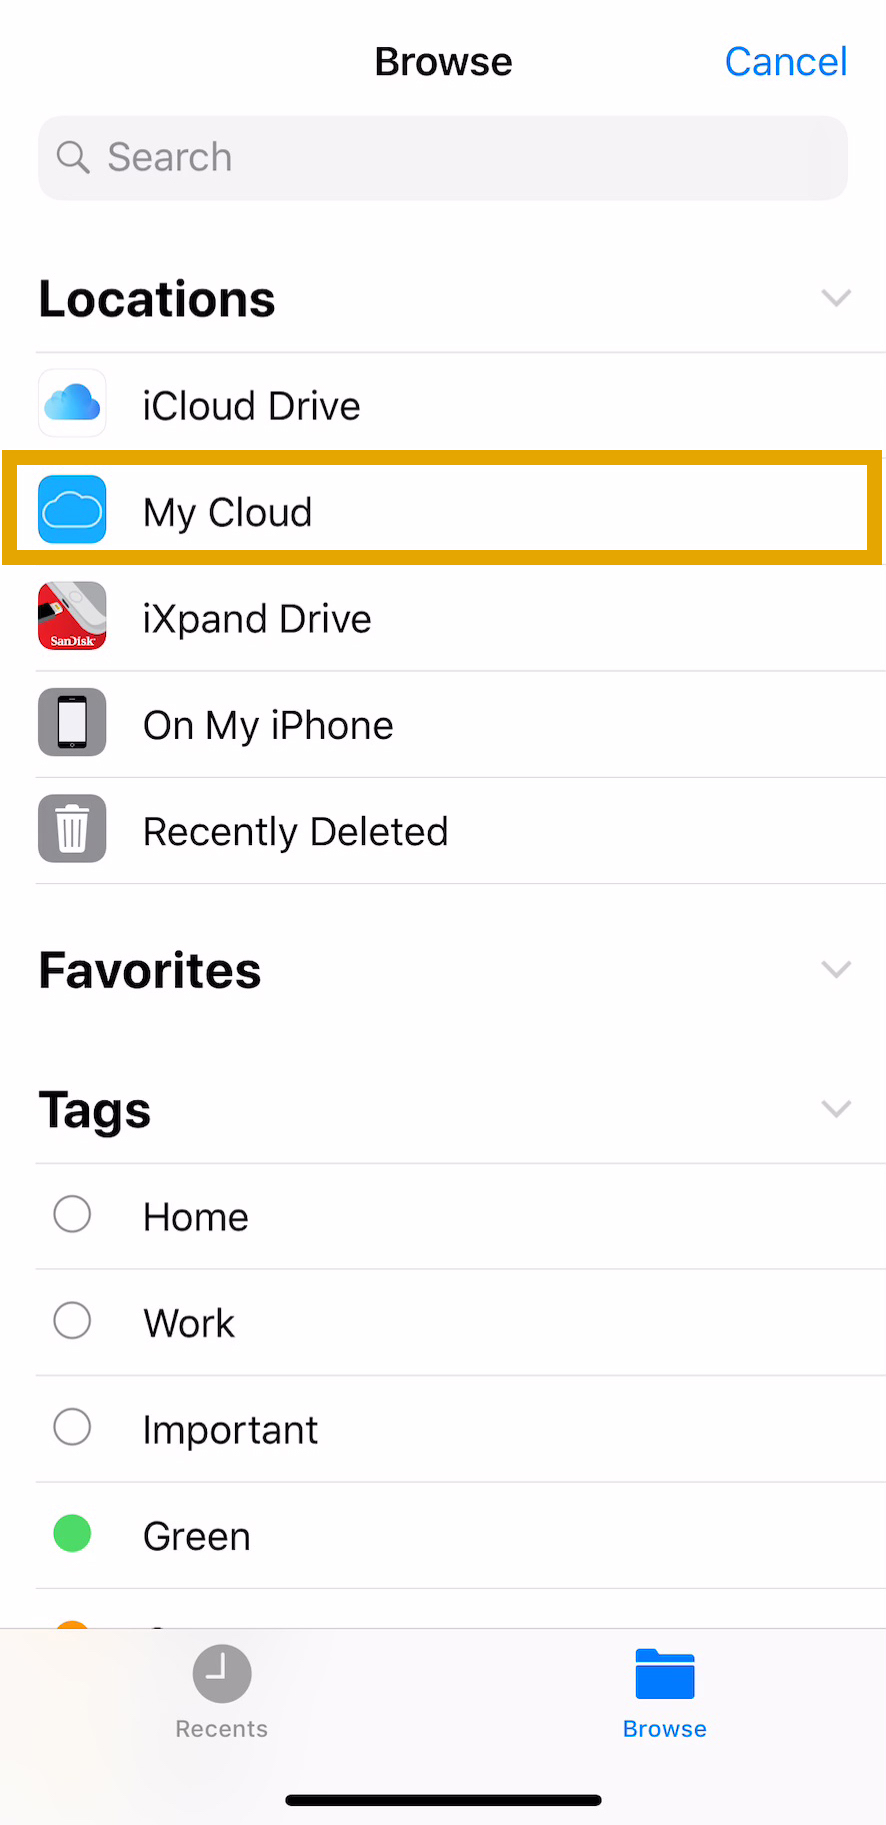
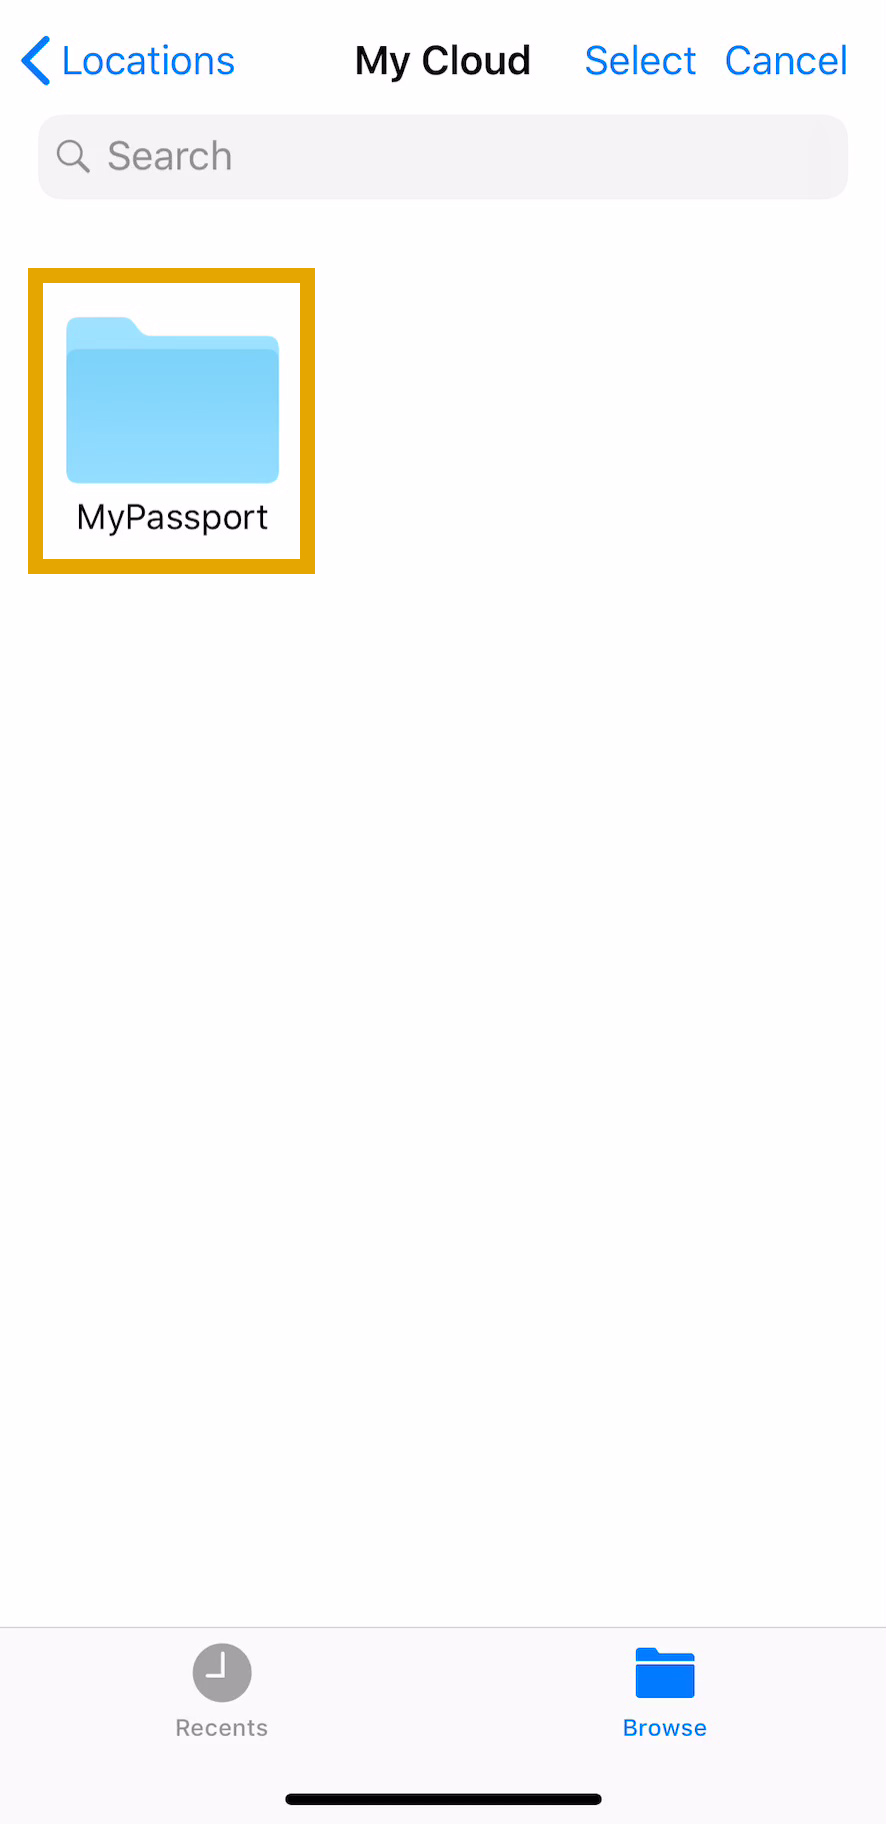
- Tap on "My Cloud," and then tap "MyPassport," and so navigate to the photos you would like to import into Adobe Lightroom CC.
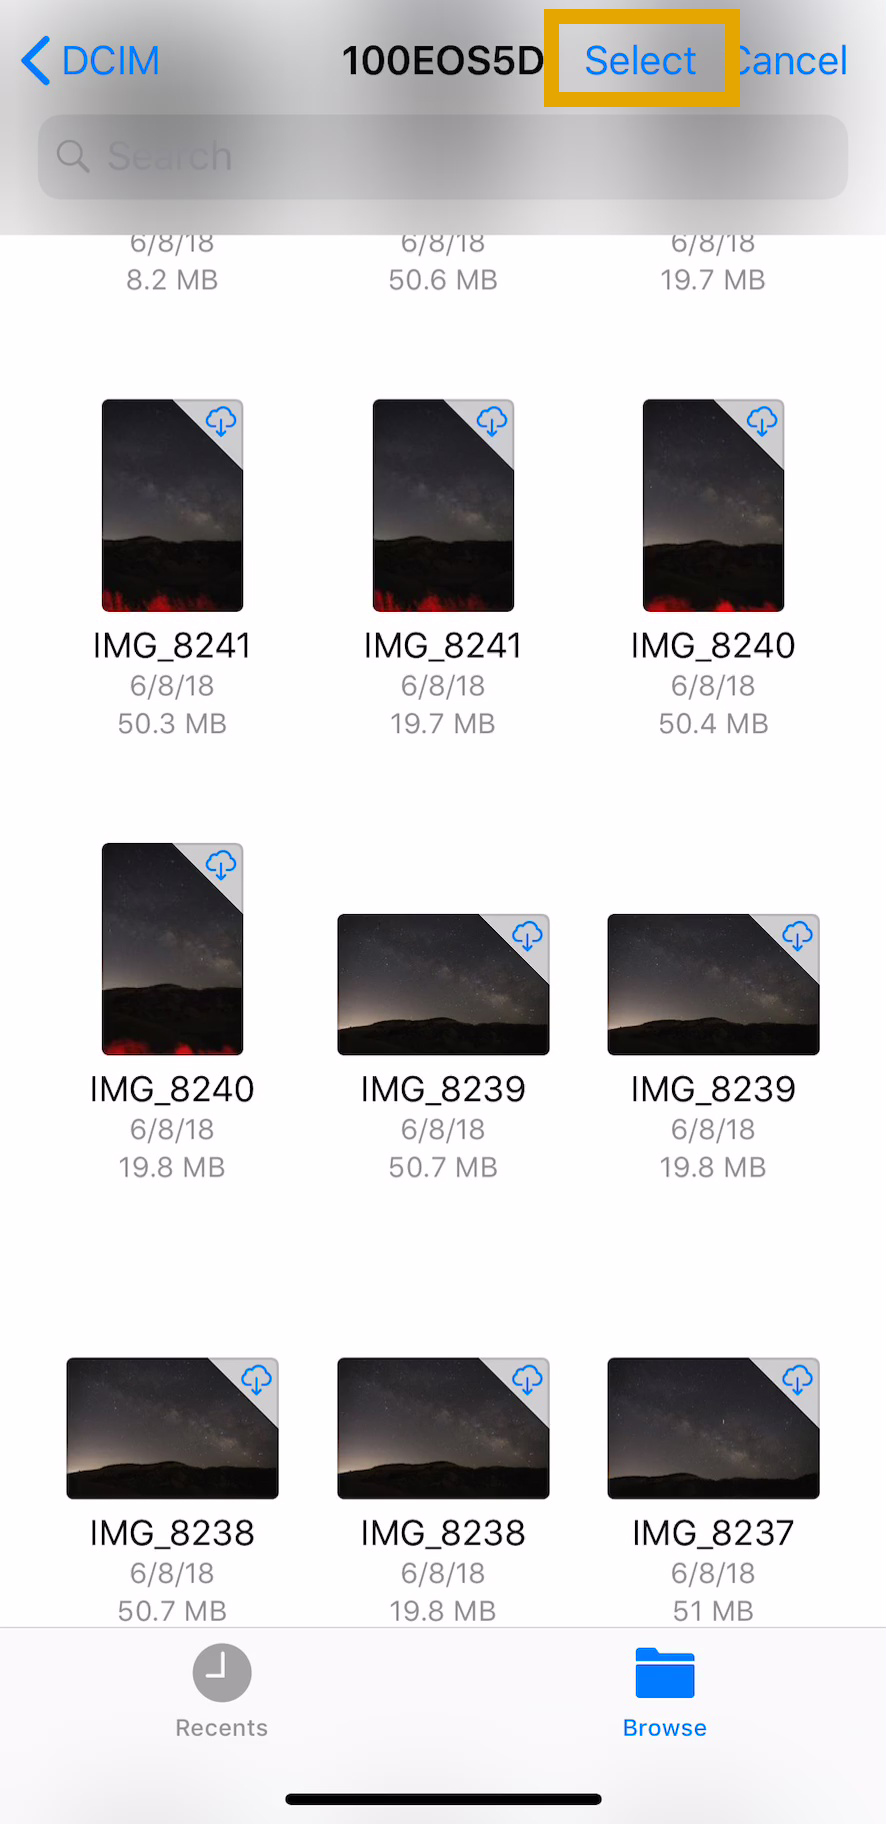
- Tap "Select" in the upper right, so select the RAW images you would similar to import to Lightroom CC. One time you lot have finished making your selections, tap "Open."
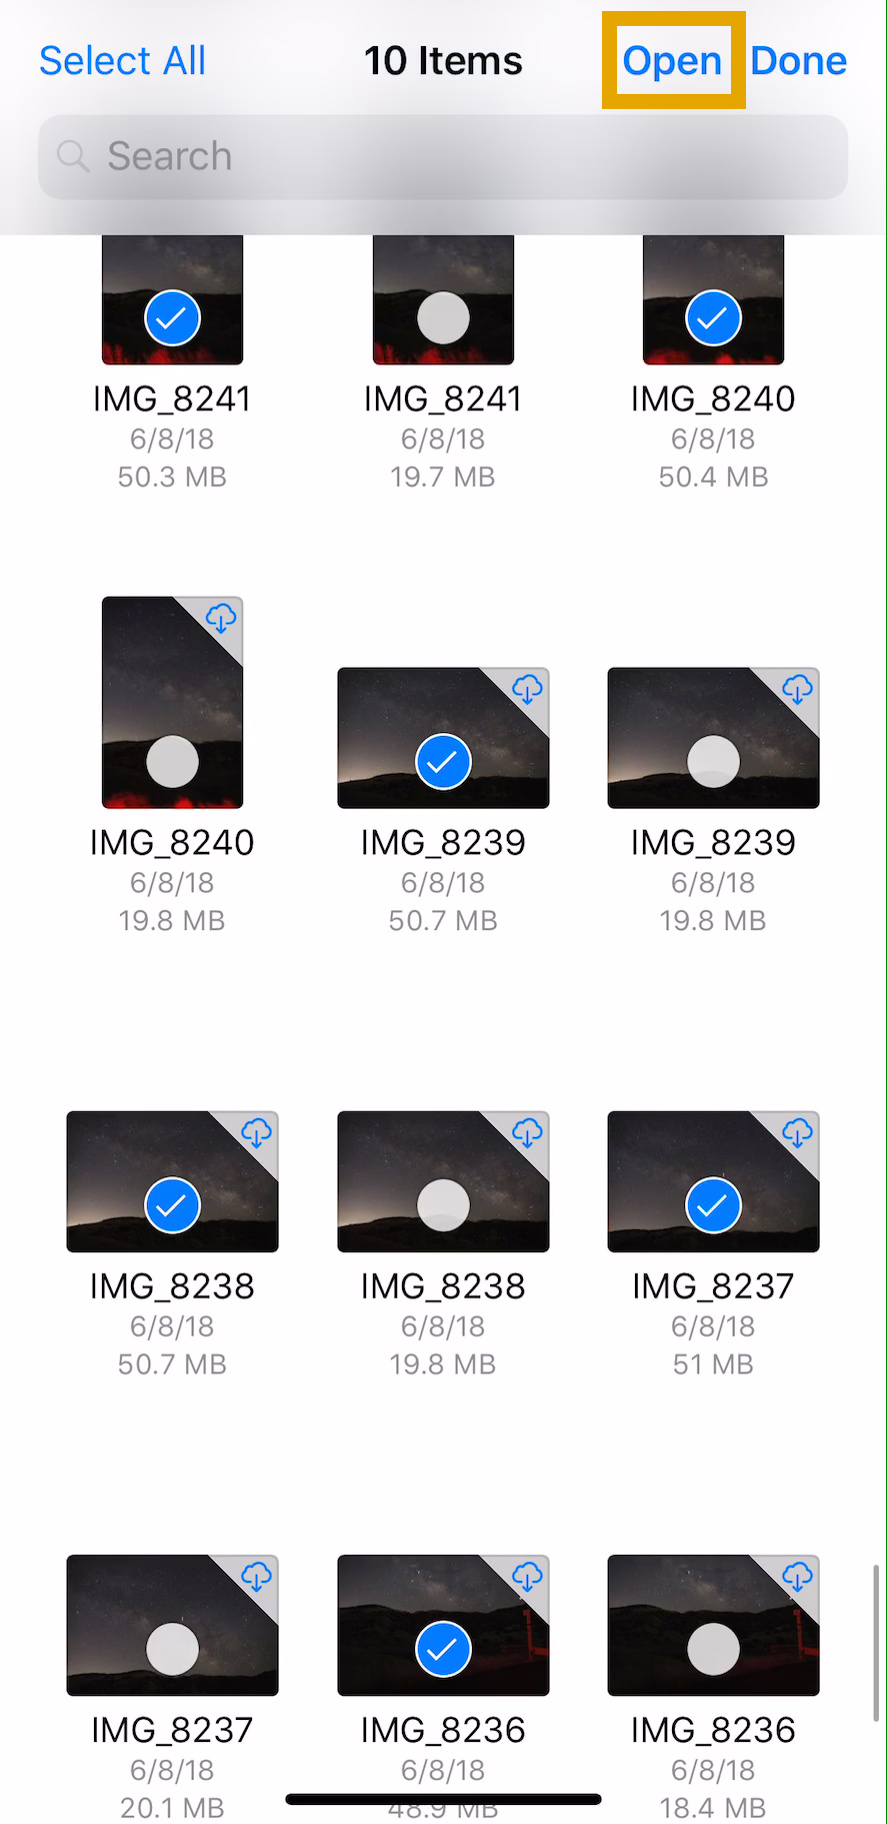
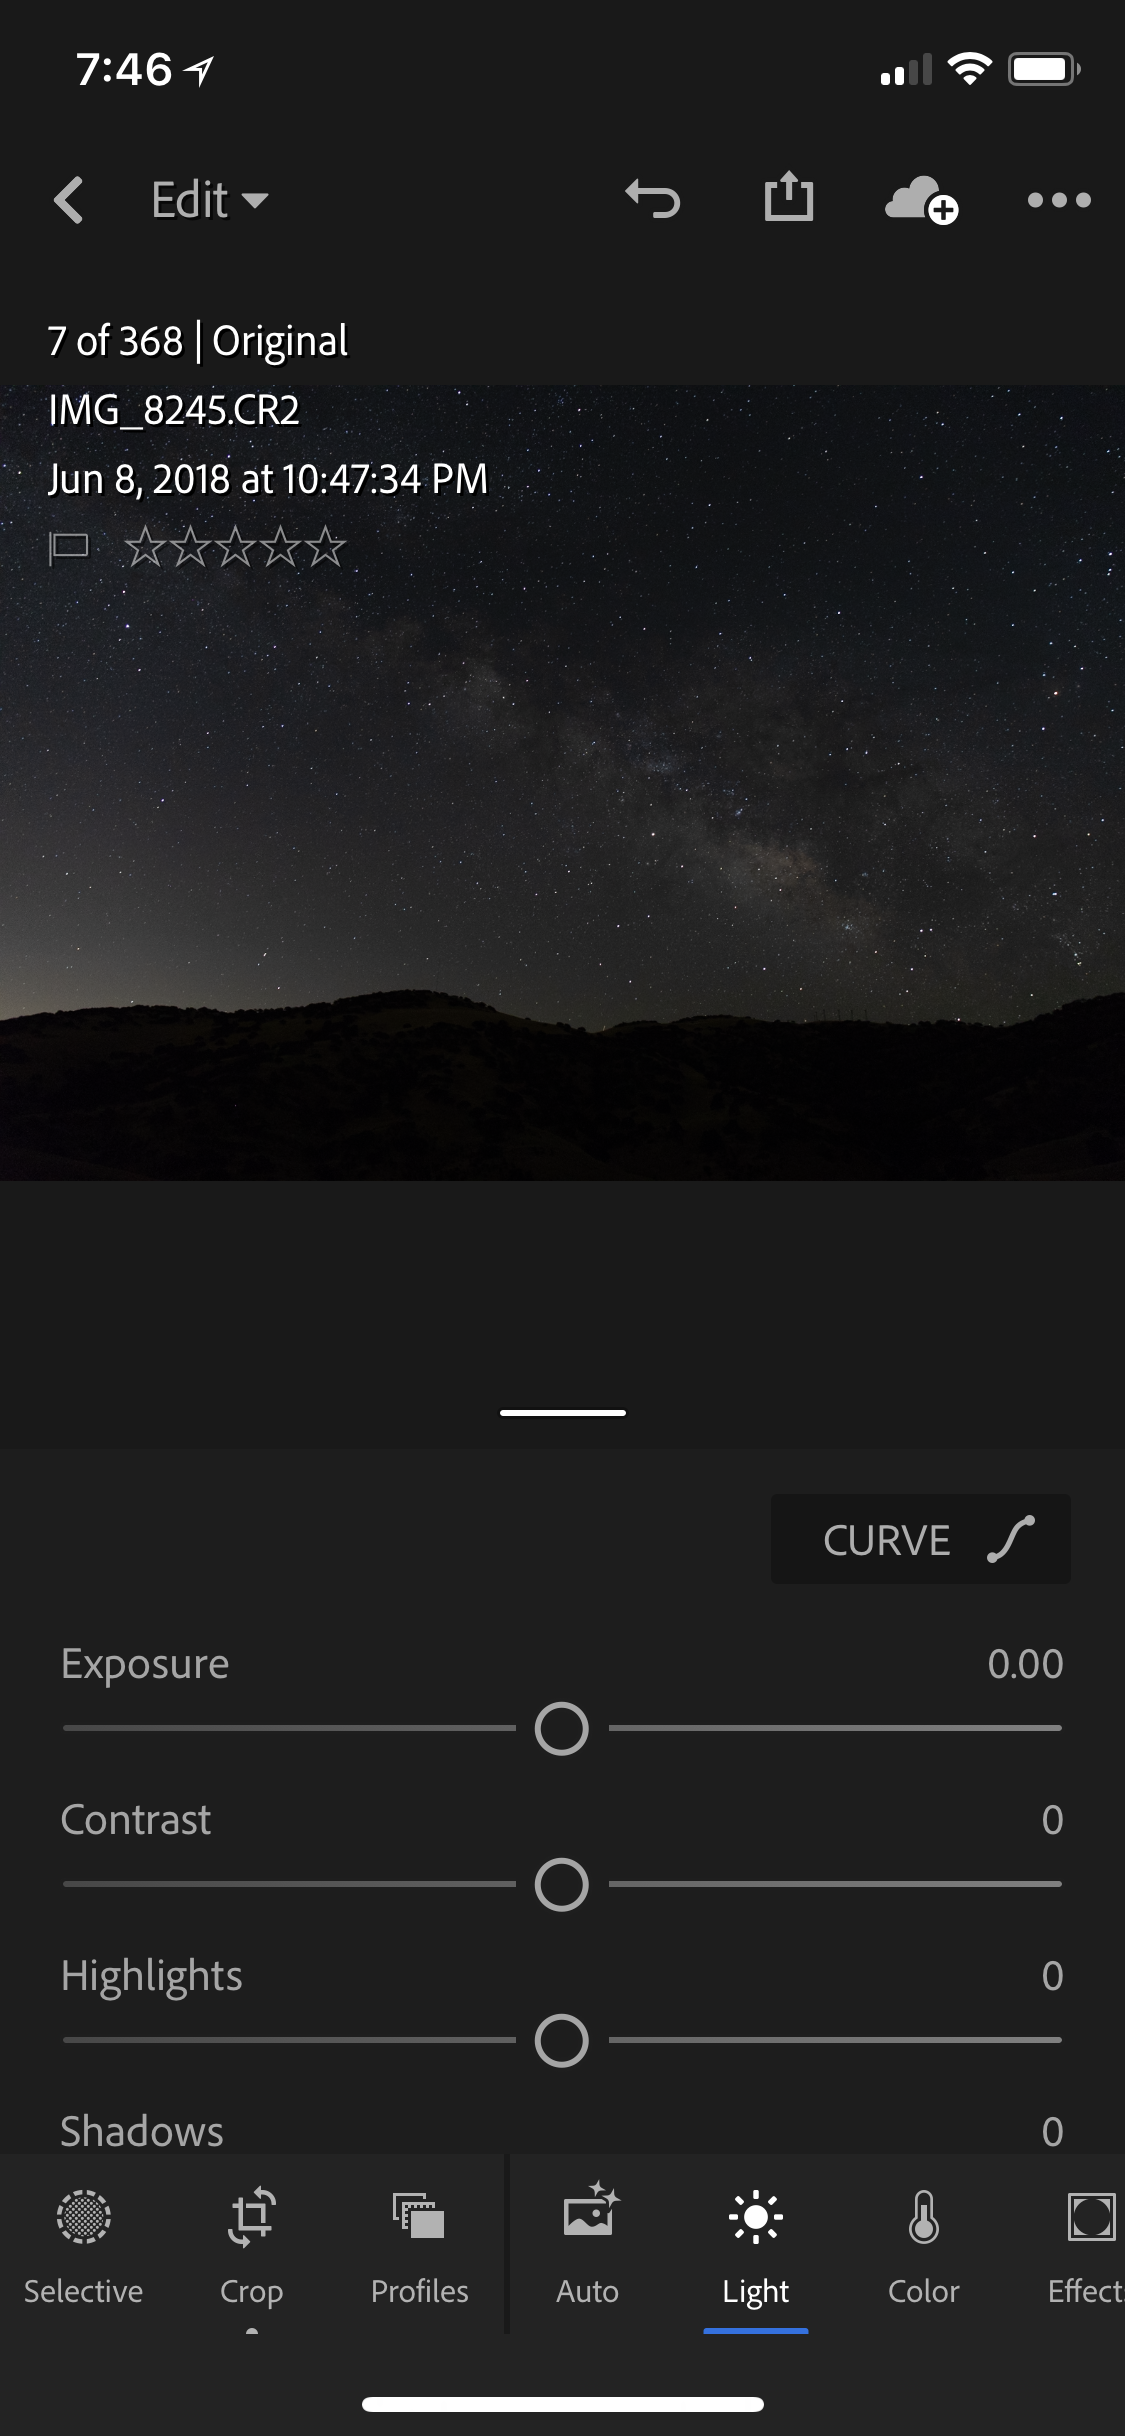
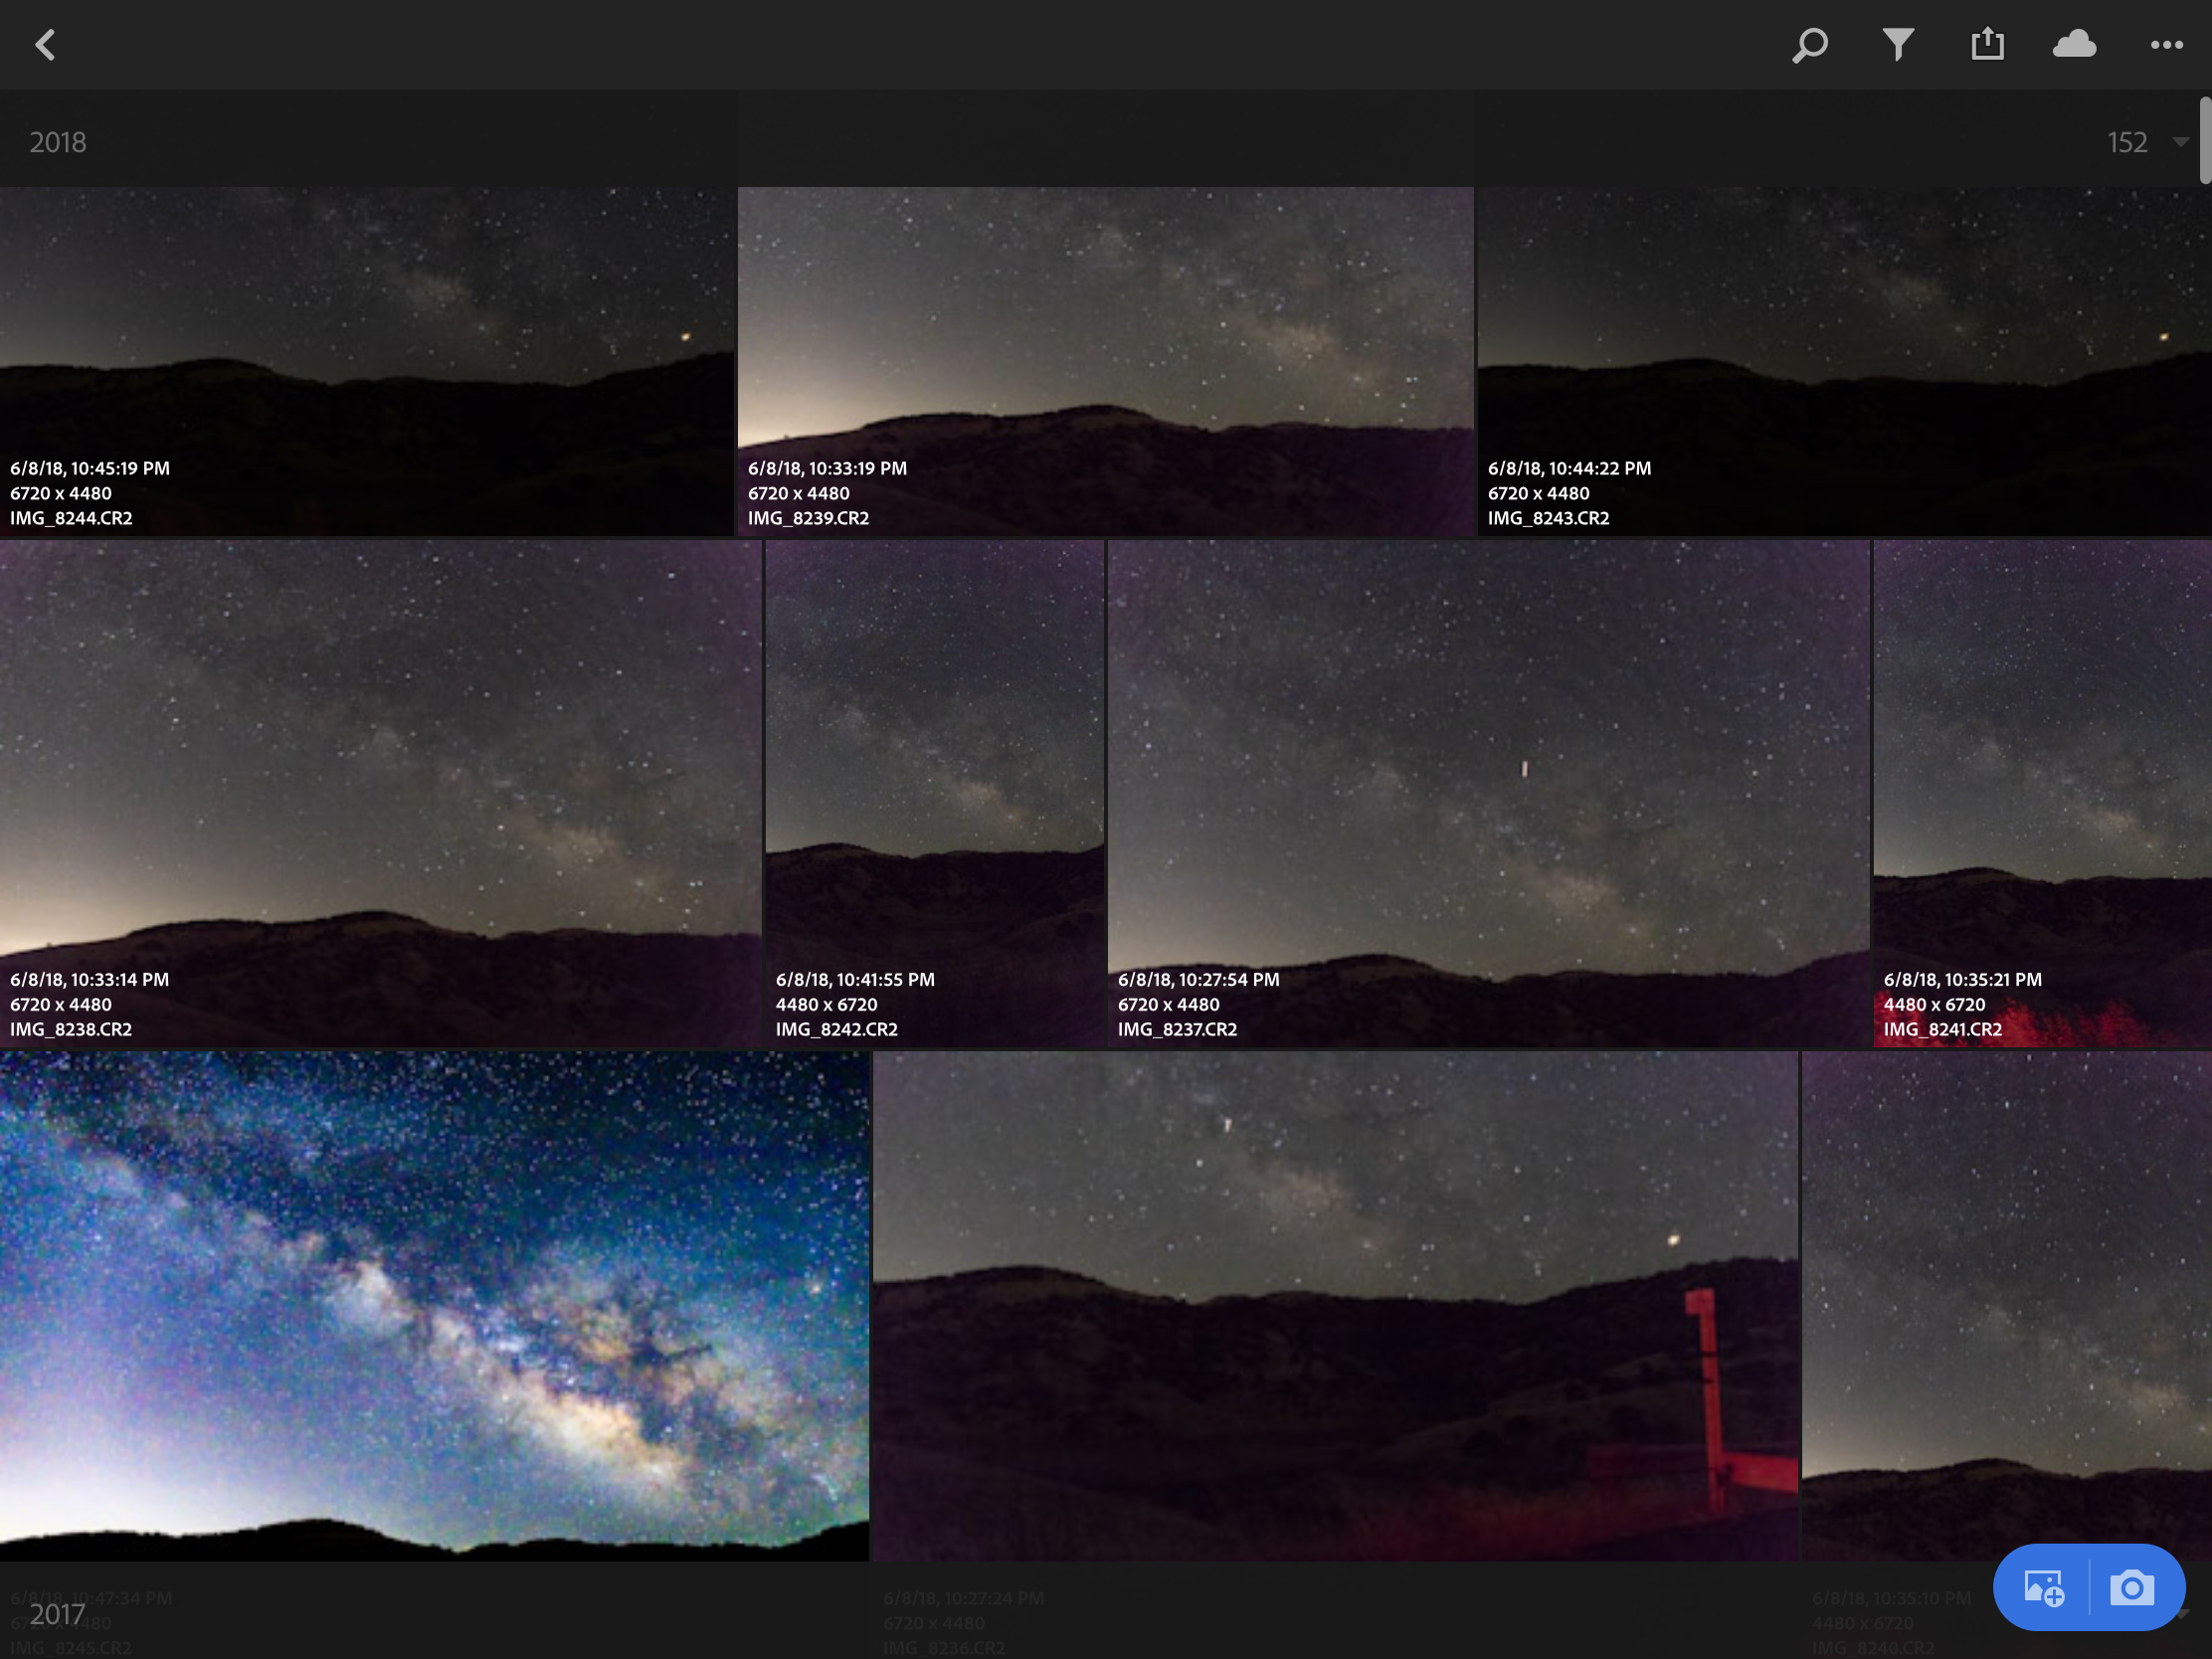
- Photos will and so import into Adobe Lightroom CC.
NOTE: When importing multiple images, Lightroom CC may import (and alert to) only i image at a time. The remaining images from your selection will import in succession with no intervention required from the user.
Lightroom CC import speed depends on multiple factors such as iOS device connection speed to the My Passport Wireless, the size of the file, and the computational speed of your iOS device.

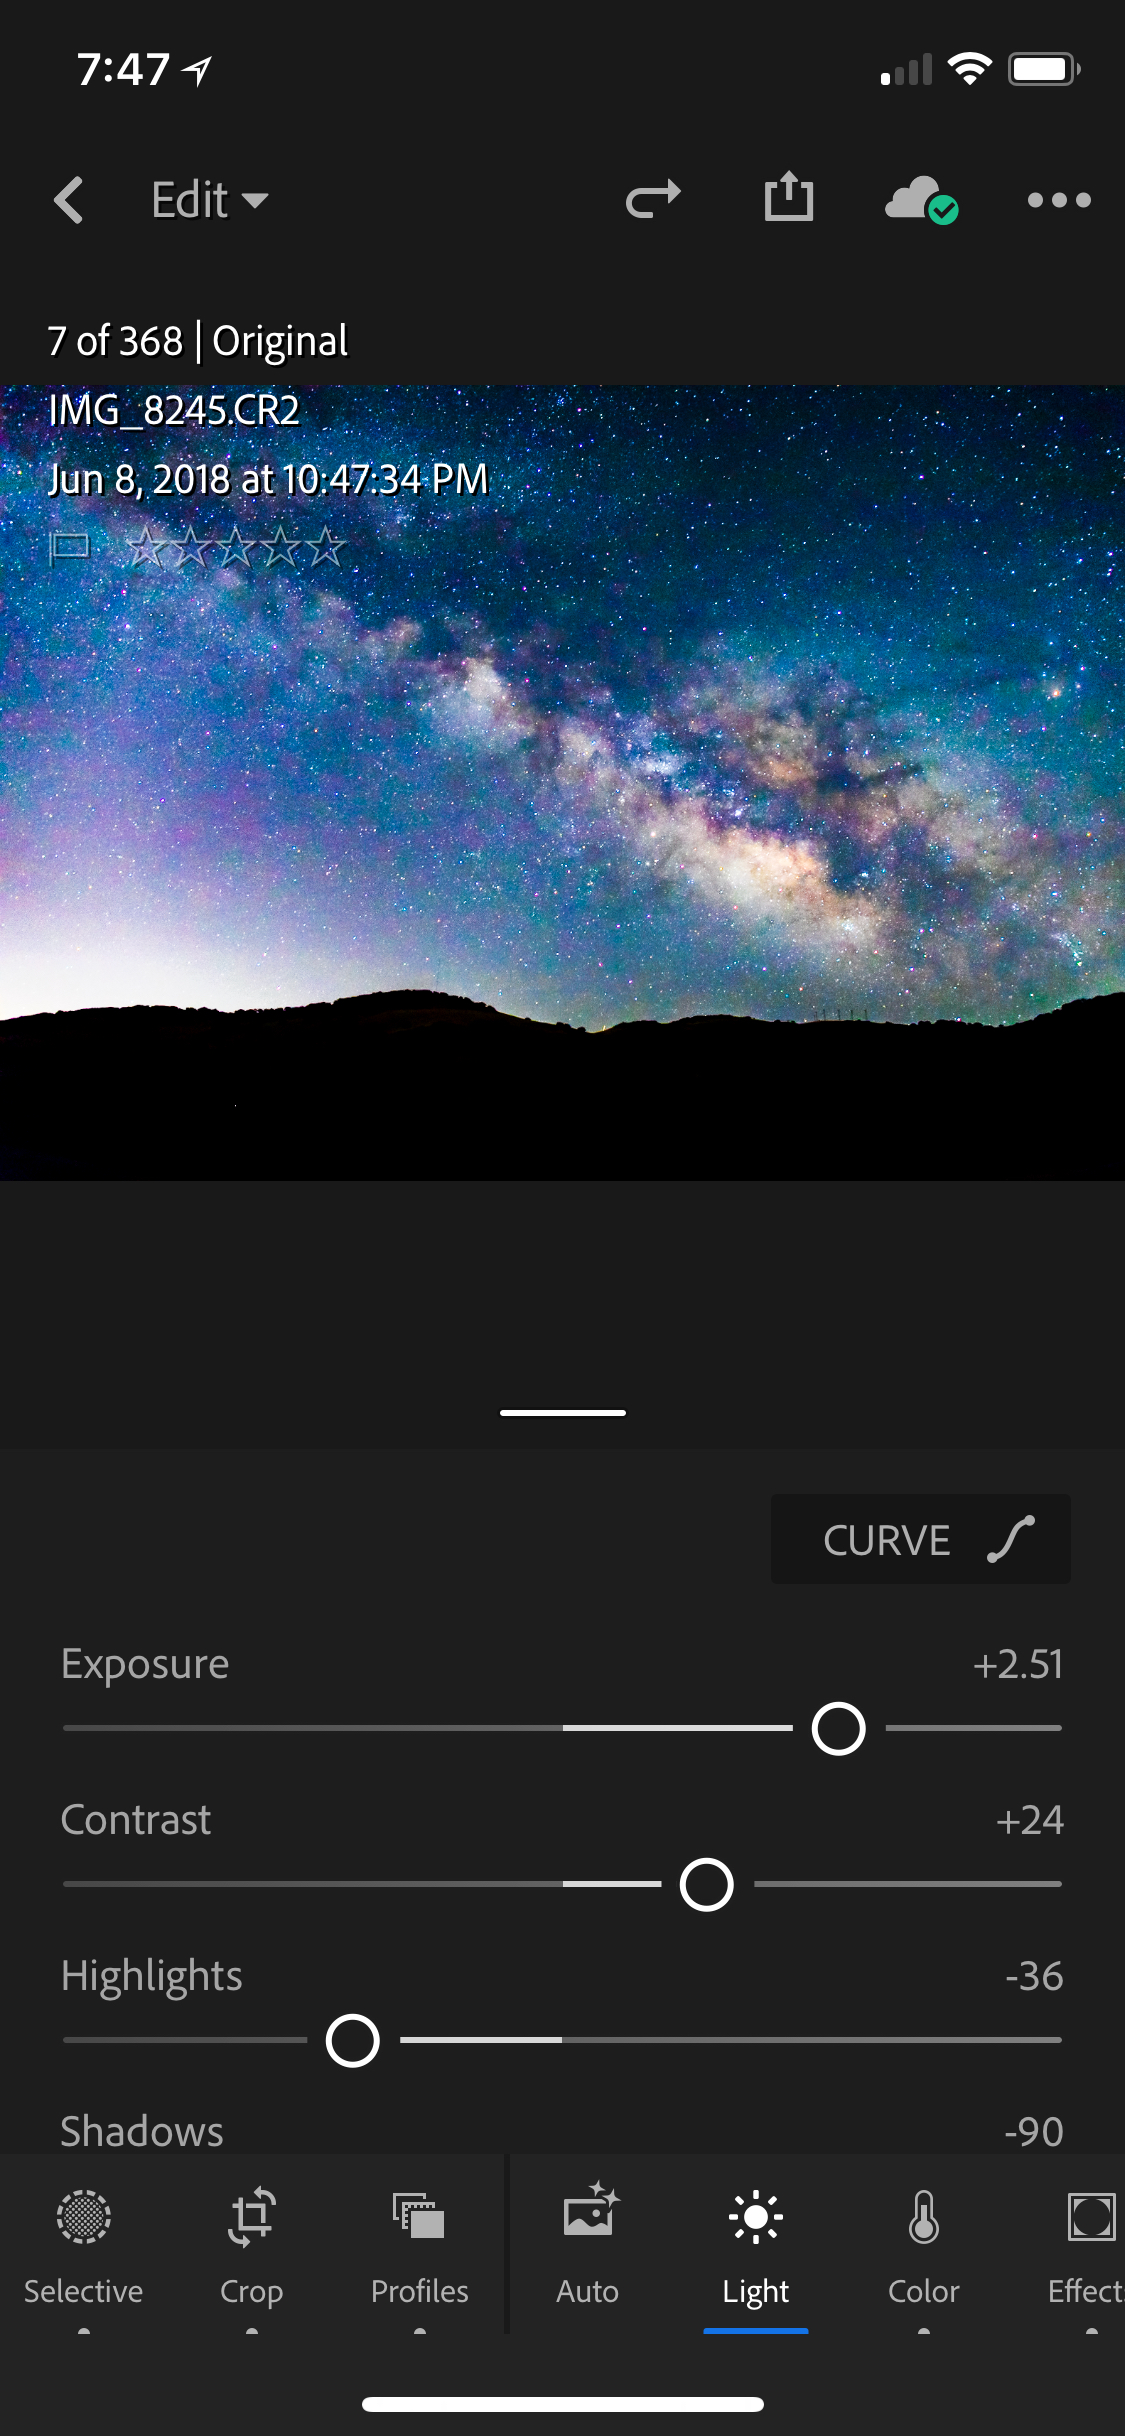
- Your images, and any edits you make, will sync between your iOS device and other platforms where you lot have installed and activated sync for Adobe Lightroom CC or Adobe Lightroom CC Classic.
To learn more about Adobe Lightroom CC, please visit https://helpx.adobe.com/lightroom-cc/get-started.html
Common Questions:
-
How to set up your My Deject Home
Watch this short video to learn how to:
- Ready My Deject Home through a mobile web browser
- Fix up My Cloud Abode if device is not automatically found with your nine digit code
-
How to upload content from your mobile phone
Watch this brusque video to learn how to:
- Ready auto fill-in for your Camera Gyre
- Manually upload content to your My Cloud Home
- Take a photo or video and salvage directly to your My Cloud Dwelling device
- Download all your content from a public cloud service (Dropbox, Box, 1 Drive, etc.) to your My Cloud Abode device
- Transfer all the content from your current My Cloud to the new My Cloud Home
- Plug in a USB storage device and copy content to your My Cloud Home
-
How to centralize all your content
Watch this brusk video to acquire how to:
- Download all your content from a public cloud service (Dropbox, Box, One Drive, etc.) to your My Deject Dwelling house device
- Transfer content from your current My Deject to your new My Deject Dwelling house device
- Utilise MyCloud.com to upload content
-
How to share content
Scout this short video to learn how to:
- Share a photograph or file with your friends and family using the mobile app, the MyCloud.com, or the Desktop app
-
How to add together users
Watch this short video to larn how to:
- Add friends and family members to your device for their own individual space
- Manage users from your mobile phone
-
How to assist secure your device
Watch this short video to acquire how to:
- Prepare a Passcode and Touch ID on your mobile app
- General pointers on helping to keep your device secure
© 2020 Western Digital Corporation or its affiliates. All rights reserved.

Western Digital My Cloud Tutorial,
Source: https://learn.mycloud.com/
Posted by: clapperhavers.blogspot.com
0 Response to "Western Digital My Cloud Tutorial"
Post a Comment